🧢 Beautiful ✨ Detailed πŸ’ Adorable

Squirtle Amigurumi Pattern

Squirtle Amigurumi Pattern
4.9β˜… Rating
2-4 Hours Time Needed
2.4K Made This
βœ‚οΈ

Beginner Friendly Level

Perfect for those just starting their crochet journey, with clear instructions and simple techniques

⏱️

Bite-Sized Project

Finishes in 2-4 hoursβ€”perfect for an afternoon of creative relaxation.

🧸

Cute Companion

An adorable friend to cherish, handcrafted with love to bring comfort and joy for years to come.

About This Squirtle Amigurumi Pattern

This pattern creates a tiny Squirtle amigurumi complete with head, body, arms, legs, shell and curled tail. It uses worsted weight yarn and a 3.5mm hook to produce a small, sturdy toy with a sweet expression. The shell is worked in two colors and sewn on for a neat finish.
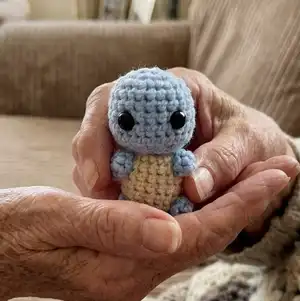
Squirtle Amigurumi Pattern crochet pattern - detailed view of completed project

Clear round-by-round instructions are included for each piece, plus placement notes for eyes and assembly tips. Ideal for quick makes, gifts, or practicing basic amigurumi construction.

Why You'll Love This Squirtle Amigurumi Pattern

I absolutely love this pattern because it turns simple stitches into a delightful, recognizable character that brings a smile. I enjoy how quickly each part works up, so you see progress fast and stay motivated. The shell detail is a fun little finishing touch that elevates the toy without adding complexity. Sewing the small pieces together is satisfying and finishes the amigurumi beautifully. Overall it is a warm, approachable pattern that I find relaxing and rewarding to make.

Squirtle Amigurumi Pattern step 1 - construction progress Squirtle Amigurumi Pattern step 2 - assembly progress Squirtle Amigurumi Pattern step 3 - details and accessories Squirtle Amigurumi Pattern step 4 - final assembly and finishing

Switch Things Up

I love how easy it is to customize this Squirtle pattern with different colors β€” try pastel blues or mint greens for a fresh look.

I sometimes make a mini version by using sport weight yarn and a 2.5mm hook to create tiny keychain friends.

I also experiment with different eye types: embroidering eyes for baby-safe toys or smaller safety eyes for a subtler look.

I add embroidered eyebrows or a tiny smile to change the character's expression and personality in seconds.

For a plush, squishier version I use a slightly larger hook and bulkier yarn which gives a chunkier, cuddlier toy.

I like to replace the shell trim with a decorative yarn or add surface crochet details for a more textured shell finish.

Sometimes I stitch tiny accessories like a crochet scarf, hat, or a tiny ball to make the character more playful and gift-ready.

I recommend experimenting with stuffing levels: more stuffing gives structure while less stuffing makes the piece softer and more flexible.

When gifting, I include a small felt name tag or a crocheted initial attached to the shell for a personalized touch.

I often make a small family of characters by changing colors and eye sizes so each one has its own personality and charm.

Common Mistakes & How to Fix Them

βœ— Placing safety eyes too high or too close will distort the face; count stitches carefully and place eyes 5 stitches apart, 6 stitches down from the top before continuing. βœ— Not stuffing as you go can make shaping difficult; stuff the head as much as possible before closing and finish stuffing gradually to maintain shape. βœ— Cutting yarn or fastening off too early can leave you short tails for sewing; leave a long tail when switching colors or attaching pieces for secure sewing. βœ— Skipping stitch counts during increases and decreases causes mismatched rounds; count stitches after every round and correct errors immediately to keep shape accurate. βœ— Pulling stitches too tight on small rounds makes parts stiff and hard to sew; maintain consistent, moderate tension so pieces remain flexible for assembly.
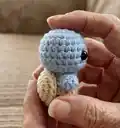
Squirtle Amigurumi Pattern

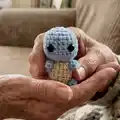
Make your own adorable Squirtle amigurumi with clear, photo-supported instructions. This small, cuddly crochet toy is perfect for gifting or collecting. You will enjoy simple rounds, basic shaping, and a fun shell detail to sew on. Follow step-by-step guidance to create a polished finished piece.

Beginner Friendly 2-4 Hours

Materials Needed for Squirtle Amigurumi Pattern

β€” Main Fabric

  • 01
    Worsted weight yarn (4) - Blue (small amount for head, limbs and tail)
  • 02
    Worsted weight yarn (4) - Beige (small amount for body)
  • 03
    Worsted weight yarn (4) - White (small amount for shell trim)
  • 04
    Worsted weight yarn (4) - Light Brown (small amount for shell center)
  • 05
    Polyfil (or another soft stuffing) - small amount for stuffing head, body, limbs and tail

β€” Tools Required

  • 01
    Crochet hook size 3.5mm
  • 02
    Scissors
  • 03
    Tapestry needle
  • 04
    1 pair 10mm safety eyes
  • 05
    Polyfil or soft stuffing

Progress Tracker

0% Complete

β€” Head :

Round 1 :

CH 2, SC 8 in first stitch. (8 stitches) Alternatively, SC 8 into a magic circle

Round 2 :

INC x 8 (16 stitches)

Round 3 :

*SC, INC* x 8 (24 stitches)

Round 4-6 :

SC x 24 (24 stitches)

Round 7 :

*SC x 7*, INC, *SC x 8*, INC, *SC x 7* (26 stitches)

Info :

Place eyes 5 stitches apart, and 6 stitches down from the top of the head, between the two increases.

Round 8 :

SC x 26 (26 stitches)

Round 9 :

*SC x 2*, *DEC x 11*, *SC x 2* (15 stitches)

Info :

Stuff the head as much as possible

Round 10 :

SC, *DEC x 6*, *SC x 2* (9 stitches)

Info :

Finish stuffing the head

β€” Body :

Info :

Cut the blue yarn, leaving a tail, but don't fasten off, and switch to the beige yarn. Stuff any extra yarn into the head.

Round 1 :

INC x 9 (18 stitches)

Round 2-6 :

SC x 18 (18 stitches)

Round 7 to close :

DEC to close, FO.

Info :

Stuff the body before you complete the DEC.

β€” Shell :

Info :

With light brown yarn

Round 1 :

CH 2, SC 7 in first stitch. (7 stitches) Alternatively, SC 7 into a magic circle

Round 2 :

INC x 7 (14 stitches)

Round 3 :

*SC x 3, INC x 4* x 2 (22 stitches)

Info :

With white

Round 4 :

SC x 22 (22 stitches)

Info :

FO with SlSt. Sew shell onto body. (As pictured)

β€” Arms :

Round 1 :

CH 2, SC 6 into first stitch. (6 stitches) Alternatively, make a magic circle and SC 6 into it.

Round 2 :

SC x 6 (6 stitches)

Info :

FO with SlSt

Info :

Sew on arms using the tapestry needle (use picture for guidance.)

β€” Legs :

Round 1 :

CH 2, SC 7 into first stitch. (7 stitches) Alternatively, make a magic circle and SC 7 into it.

Round 2 :

SC x 7 (7 stitches)

Info :

FO with SlSt

Info :

Sew on arms using the tapestry needle (use picture for guidance.)

β€” Tail :

Round 1 :

CH 2, SC 10 in first stitch. (10 stitches) Alternatively, SC 10 into a magic circle

Round 2 :

*SC x 2*, INC, *SC x 4*, INC, *SC x 2* (12 stitches)

Round 3-7 :

SC x 12 (12 stitches)

Round 8 :

*SC x 2*, DEC, *SC x 4*, DEC, *SC x 2* (10 stitches)

Round 9 :

SC x 10 (10 stitches)

Round 10 :

*SC x 4*, DEC, *SC x 4* (9 stitches)

Round 11 :

SC x 9, FO with a SlSt.

Info :

Using the same shade of blue yarn, fold over the top (row 1) and sew to fasten, creating the curl. Sew the tail to the base of the shell.

Info :

Weave in any remaining loose ends, and trim off.

Assembly Instructions

  • Place safety eyes 5 stitches apart and 6 stitches down from the top of the head, positioned between the two increases on Round 7, then secure according to safety eye instructions.
  • Sew the shell onto the body using a tapestry needle following the pictured placement, aligning the shell center to the back of the body.
  • Sew arms to the sides of the body using the tapestry needle, using the photos as a guide for height and spacing.
  • Sew legs to the bottom of the body and arrange them so the amigurumi sits upright; use the tails left for sewing to secure firmly.
  • Fold the tail top over to create the curl and sew it closed, then attach the curled tail to the base of the shell.

Important Notes

  • πŸ’‘Place safety eyes before closing the head to avoid sewing through the wrong place and ensure even spacing for a balanced face.
  • πŸ’‘Stuff pieces firmly but gradually, especially the head, to achieve the correct shape without overstuffing that can distort stitches.
  • πŸ’‘Leave long yarn tails when switching colors or before fastening off to make sewing pieces together easier and more secure.
  • πŸ’‘Sew parts in place with a tapestry needle and check placement visually with photos before making permanent stitches.

This sweet Squirtle amigurumi pattern brings a tiny, huggable companion to life with simple stitches and a charming shell detail. Whether you make one as a quick gift or as a collectible, the finished toy is full of personality and handmade warmth. Happy crocheting and enjoy every stitch! 🧢😊

You ask,

we answer.

FAQs

What size will the finished piece be?

The finished amigurumi measures approximately 8-10 cm tall when using worsted weight yarn and a 3.5mm hook, depending on tension.

Can I use different yarn weights for this pattern?

Yes, you can use different yarn weights, but this will affect the final size and required hook. Adjust eye size and stuffing accordingly for proportion.

Do I need prior crochet experience for this pattern?

This pattern is rated beginner friendly, so basic knowledge of single crochet, increases, and decreases is recommended for best results.

How long does this project typically take to complete?

Most crocheters complete this project in 2-4 hours, though time may vary based on experience level and how much assembly is needed.