๐Ÿงถ Beautiful โœจ Detailed ๐Ÿ’ Adorable

Spike Stitch Tote Bag Pattern

Spike Stitch Tote Bag Pattern
4.1โ˜… Rating
5-7 Hours Time Needed
1.1K Made This
โœ‚๏ธ

Intermediate Level

Ideal for those with basic crochet experience, featuring slightly more advanced stitches and techniques to expand your skills.

โฑ๏ธ

Weekend Treat

Takes 5-7 hours, making it an enjoyable project to finish over a couple of days.

โœจ

Stylish Touch

An elegant detail to elevate any look, combining traditional techniques with contemporary design sensibilities.

About This Spike Stitch Tote Bag Pattern

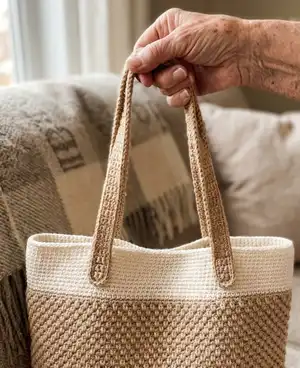
This pattern creates a textured Spike Stitch Tote Bag with a rounded base and a neat single crochet top band. You can choose between pre-made leather straps or crochet your own handles for a cohesive look. The instructions include a short spike stitch tutorial and clear round-by-round directions to help you follow along.

Spike Stitch Tote Bag Pattern crochet pattern - detailed view of completed project

Ideal for everyday use, this tote finishes at approximately 15 x 12 inches. The pattern uses worsted weight yarn and American crochet terminology for easy following.

Why You'll Love This Spike Stitch Tote Bag Pattern

I absolutely love this pattern because the spike stitch creates a beautiful, modern texture that elevates a simple tote into something special. I enjoy how sturdy the finished bag feels when crocheted tightly and optionally crocheting around a second strand for extra structure. The two strap options mean you can finish it quickly with pre-made hardware or make matching crocheted handles for a seamless look. Every time I make one I tweak the color blocking and it always becomes a favorite accessory for daily use.

Spike Stitch Tote Bag Pattern step 1 - construction progress Spike Stitch Tote Bag Pattern step 2 - assembly progress Spike Stitch Tote Bag Pattern step 3 - details and accessories Spike Stitch Tote Bag Pattern step 4 - final assembly and finishing

Switch Things Up

I love changing the color blocking to create a totally different look; try a bold bottom with a neutral top for contrast.

You can make the bag larger or smaller by changing the starting chain; increasing by multiples that fit the base shape will scale the bag up or down.

Want a firmer bag? Crochet around a second strand of yarn from round 2 and pull the carried yarn to remove any puckering as you work.

Try lining the finished bag with fabric to add structure and a professional finish; a lightweight cotton lining works beautifully.

Swap the 3.5mm hook for a slightly smaller hook for a denser fabric, or go up a size and use bulkier yarn for a chunkier, squishier tote.

I often add an inner pocket sewn to the lining for keys or a phone; you can crochet a small pocket and slip stitch or sew it into the lining before attaching it.

Experiment with decorative stitches along the top band like reverse single crochet or crab stitch to add a neat edge detail.

Make the handles adjustable by adding button tabs or rings to leather straps, or lengthen the chain handles for a crossbody style if desired.

Personalize with embroidery or appliques on the body panel after finishing to create a custom gift or branded look.

If you prefer hardware, use rivets for pre-made straps as suggested, or sew on reinforced strap tabs for extra durability with heavy use.

Common Mistakes & How to Fix Them

โœ— Skipping stitch markers when placing handles leads to uneven strap placement; place markers in the exact stitches listed and adjust before continuing. โœ— Not checking your gauge will change the finished bag size significantly; measure 19 sts x 18 rows = 4 inches and adjust hook or tension as needed. โœ— Crocheting too loosely for the base makes the bag lack structure; crochet more tightly or work around a second strand of yarn for a firmer fabric. โœ— Forgetting to keep chains untwisted when making handles will create a twisted strap; always check the CH before slip stitching into it and straighten if needed.

Spike Stitch Tote Bag Pattern

Make a stylish, textured tote using the spike stitch and simple construction. This pattern guides you through a rounded base, textured body, and two strap options so you can choose leather handles or crochet your own. Clear step-by-step rounds and a spike stitch tutorial help you create a durable everyday bag you will reach for again and again.

Intermediate 5-7 Hours

Materials Needed for Spike Stitch Tote Bag Pattern

โ€” Main Fabric

  • 01
    Worsted weight yarn (#4), approximately 100m of worsted weight in cream
  • 02
    Worsted weight yarn (#4), approximately 300m of worsted weight in beige
  • 03
    Additional small amount of white/ecru yarn for top band and trim (used Lily Sugar 'n Cream Solids in Jute, Ecru and White)

โ€” Tools Required

  • 01
    Crochet hook size 3.5mm
  • 02
    Tapestry needle (yarn needle)
  • 03
    Scissors
  • 04
    Faux leather bag strap 80cm x 18mm (optional)
  • 05
    8mm length bag rivets (optional)
  • 06
    Stitch markers

Progress Tracker

0% Complete

โ€” Spike Stitch Tutorial :

Info :

Place your hook in the next stitch one round below (the same position where that stitch was worked in the last round).

Info :

Yarn over and draw up a loop to the height of the round.

Info :

Yarn over and draw through both loops.

โ€” Notes :

Info :

Finished dimensions: Approx 15 inches (width) x 12 inches (height).

Info :

Gauge: 19 stitches and 18 rows = 4 inches or 10 cm in single crochet and spike stitch.

Info :

This pattern uses American crochet terminology.

Info :

The number in brackets confirms the number of stitches in each round.

Info :

I recommend crocheting around a second strand of yarn to help create a firm structure for the bag, if doing this remember to check the work at the end of each round for any bunching or puckering and pull the carried yarn to stretch it out.

Info :

The pattern offers two options for the straps โ€“ one crocheted and the other using pre-made bag straps.

Info :

For this pattern I used Lily Sugar 'n Cream Solids in Jute, Ecru and White.

โ€” Base :

Info :

In cream CH 55

Round 1 :

Start in the 2nd CH from the hook, SC Inc, SC 52, SC 4 in the last stitch. Continue on the other side of the CH, SC 52, SC Inc in the last stitch. (112)

Info :

(Note: to create a firmer structure, begin crocheting around another strand of yarn in round 2)

Round 2 :

[SC Inc] x 2, SC 52, [SC Inc] x 4, SC 52, [SC Inc] x 2 (120)

Round 3 :

[SC 1, SC Inc] x 2, SC 52, [SC 1, SC Inc] x 4, SC 52, [SC 1, SC Inc] x 2 (128)

Round 4 :

[SC 2, SC Inc] x 2, SC 52, [SC 2, SC Inc] x 4, SC 52, [SC 2, SC Inc] x 2 (136)

Round 5 :

[SC 3, SC Inc] x 2, SC 52, [SC 3, SC Inc] x 4, SC 55, SC Inc, SC 4 (143)

โ€” Body :

Round 6 :

BLO SC 143

Round 7 :

*BLO SC, SPSC (143)

Round 8 :

*SPSC, BLO SC (143)

Round 9 - 47 :

Repeat rounds 7 and 8.

Info :

Change to white or cream:

Round 48 :

BLO SC 143 (143)

Rounds 49 - 53 :

SC 143 (143)

Info :

Continue to either pre-made bag strap or crocheted bag strap instructions.

โ€” Pre-made bag strap :

Rounds 54 - 57 :

SC 143

Round 58 :

SS 143

Info :

FO and weave in ends.

Info :

Attach pre-made bag strap approximately 4.5 inches from either side of the bag using the rivets.

โ€” Crochet bag strap :

Info :

Continue crocheting until you reach the edge of the bag, place a stitch marker, this is the new end of round 53.

Info :

The straps will be approximately 4.5 inches from the side of the bag. Before the next round I recommend placing stitch markers to indicate where your straps will be placed. This will ensure they are lined up before you start.

Info :

Place 1 stitch marker in the following stitches of the next round: 21st stitch, 49th stitch, 94th stitch, 121st stitch.

Info :

You can now adjust your stitch markers if straps are not positioned equally. Proceed to the next round when you are happy with the placement of your straps.

Round 54 :

SC 20 (or until the stitch before the first stitch marker), CH 100, make sure the CH is not twisted and skip the next 29 stitches (or until the stitch after the next stitch marker), SC 43 (or until the stitch before the next stitch marker), CH 100, make sure the CH is not twisted and skip the next 29 stitches (or until the stitch after the next stitch marker), SC 22 (285 incl CH's)

Round 55 :

SC 20, place 1 SC in the next 100 CH sts, SC 43, place 1 SC in the next 100 CH sts, SC 22 (285)

Rounds 56โ€“57 :

SC 285 (285)

Round 58 :

SS 285 (285).

Info :

FO and weave in ends.

โ€” Finishing the crochet straps :

Info :

Re-attach the yarn to the first unworked stitch of round 53.

Info :

SS 29, continue slip stitching up the chain side of the handle.

Info :

SS to the first SS and FO.

Info :

Repeat on the other side.

Assembly Instructions

  • Attach pre-made bag strap approximately 4.5 inches from either side of the bag using the rivets, aligning straps with the marked stitch positions.
  • For crocheted straps, place stitch markers in stitches 21, 49, 94 and 121 of the next round to mark strap placement and adjust until symmetrical before continuing.
  • When making crochet handles, work Round 54 with CH 100 loops for handles, then SC around chains in Round 55, finish with Rounds 56โ€“58 and weave in ends.
  • To finish crocheted handles, re-attach yarn to the first unworked stitch of round 53, SS 29, slip stitch up the chain side of the handle, SS to the first SS and FO, then repeat on the other side.
  • Weave in all ends securely and block or shape the bag as needed to even out texture and ensure straps are positioned correctly.

Important Notes

  • ๐Ÿ’กFinished dimensions are approximately 15 inches (width) x 12 inches (height); check measurements before adding straps.
  • ๐Ÿ’กGauge is important: 19 stitches and 18 rows = 4 inches (10 cm) in single crochet and spike stitch; change hook size if necessary.
  • ๐Ÿ’กYou can crochet around a second strand of yarn beginning in round 2 to create extra structure; check for bunching and adjust tension.
  • ๐Ÿ’กPlace stitch markers for strap positions before starting handle rounds to ensure accurate and symmetrical placement.
  • ๐Ÿ’กThis pattern uses American crochet terminology; counts in brackets indicate total stitches per round.

This Spike Stitch Tote Bag pattern makes a timeless, textured tote that works as an everyday bag or a handmade gift. The pattern includes a spike stitch tutorial, full round-by-round instructions, and two strap options for easy finishing. Have fun choosing colors and styling your perfect tote! ๐Ÿงถ โœจ

You ask,

we answer.

FAQs

What size will the finished piece be?

The finished tote measures approximately 15 inches wide by 12 inches high when worked to gauge with the recommended yarn and hook size.

Can I use different yarn weights for this pattern?

Yes, you can change yarn weight, but the finished size and handle strength will change; adjust your hook and consider adding a second strand or lining for stability.

Do I need prior crochet experience for this pattern?

This pattern is rated intermediate and requires knowledge of single crochet, increases, back loop only, and the spike stitch technique shown in the included tutorial.

How long does this project typically take to complete?

Most crocheters finish this tote in about 5-7 hours, depending on experience and whether you crochet the handles or use pre-made straps.