🧢 Beautiful ✨ Detailed πŸ’ Adorable

Molly Boho Bag Pattern

Molly Boho Bag Pattern
4.4β˜… Rating
8-10 Hours Time Needed
2.2K Made This
βœ‚οΈ

Intermediate Level

Ideal for those with basic crochet experience, featuring slightly more advanced stitches and techniques to expand your skills.

⏱️

All-Day Adventure

Requires 8-10 hours, ideal for a full day of immersive crocheting.

✨

Stylish Touch

An elegant detail to elevate any look, combining traditional techniques with contemporary design sensibilities.

About This Molly Boho Bag Pattern

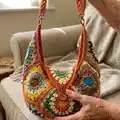
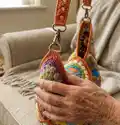
This pattern creates a slouchy boho shoulder bag made from 11 textured granny-style squares joined to form a 3D curved bag. The squares use cluster, puff and shell-like stitches to create a sunburst centre and a pretty crochet border. The pattern includes instructions for making the squares, joining them, edging, a flap/buttonhole and an optional strap with hardware.

Molly Boho Bag Pattern crochet pattern - detailed view of completed project

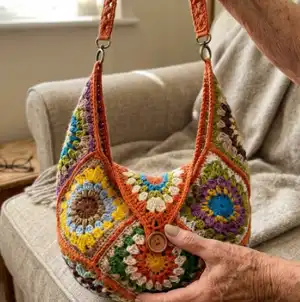
You can use 1-5 colours of DK yarn or scraps to create unique colourways and textures. The pattern contains step-by-step instructions and photos to guide assembly and finishing.

Why You'll Love This Molly Boho Bag Pattern

I absolutely love this pattern because it celebrates colourful yarn play and texture in a wearable accessory. I adore how the cluster and puff-style stitches create a petal-like sunburst that feels both vintage and modern. The construction is clever β€” simple squares transform into a curved, three-dimensional bag that feels rewarding to stitch and assemble. I also love that you can mix scraps or make a carefully coordinated palette to match your wardrobe.

Molly Boho Bag Pattern step 1 - construction progress Molly Boho Bag Pattern step 2 - assembly progress Molly Boho Bag Pattern step 3 - details and accessories Molly Boho Bag Pattern step 4 - final assembly and finishing

Switch Things Up

I love making this bag in different colourways; try deep jewel tones for an autumnal boho look or soft pastels for a springtime vibe.

To make a smaller or larger bag simply adjust the number of squares you join or change your yarn weight and hook size; a bulkier yarn will give you a chunky, quick version.

I often substitute the strap hardware for a fixed crocheted strap if I want a continuous look β€” just skip the clips and stitch the strap directly to the bag sides.

For a lined, structured bag add a fabric lining with interfacing: cut the lining to the bag dimensions before you join the top flap, then hand-sew it in after assembly for a professional finish.

If you like a firmer base, add a thin piece of plastic canvas or craft board inside the bottom before attaching the lining so the bag keeps its shape when loaded.

Try embroidering the flap or adding a contrasting yarn pompom to personalise each bag and give it a signature detail you wont find anywhere else.

I sometimes combine different weights of DK yarn for the centre rounds to create subtle texture changes; just be mindful of hook size adjustments to keep square size consistent.

Want a crossbody version? Make the strap longer or attach a second strap on the opposite side and use longer swivel clips so the bag can be worn crossbody comfortably.

I also experiment with finishing edges: try a picot or scallop edging instead of the single crochet round to give a softer decorative finish.

Dont be afraid to swap the button for a magnetic snap for faster closure, or add metal studs for a more modern, edgy look.

Common Mistakes & How to Fix Them

βœ— Not closing the magic ring tightly results in a loose centre; pull the magic circle closed securely and slip stitch to lock the stitches in place. βœ— Skipping the chain counts at the start of rounds can shift your stitch placement; always make the chain as instructed and count stitches after each round to verify your total. βœ— Joining squares with the wrong side out will show the wrong texture on the bag exterior; place squares back-to-back and single crochet in the back loop only as directed for a neat join. βœ— Using inconsistent tension while making squares causes uneven edges and mismatched sizes; maintain steady tension and block squares lightly if needed before joining.

Molly Boho Bag Pattern

Create a charming Molly Boho Bag using colourful DK yarn and simple granny-square techniques. This pattern walks you through making 11 textured squares, joining them into a curved boho-style bag, and adding a comfortable strap with hardware. Youll enjoy mixing colours and experimenting with yarn scraps to make a unique, handmade accessory. Ideal for crafters who love project versatility and bold, textured crochet.

Intermediate 8-10 Hours

Materials Needed for Molly Boho Bag Pattern

β€” Main Fabric

  • 01
    DK weight yarn (light worsted / #3) - use 1-5 colours for squares; photographed sample used 4 colours (cream repeated twice).
  • 02
    Colour A: Cream (used for centre and repeated) - approx 25-50g
  • 03
    Colour B: Rust / Terracotta - approx 25-50g
  • 04
    Colour C: Mustard / Yellow - approx 25-50g
  • 05
    Colour D: Teal / Blue - approx 50-100g for joining and edging and strap
  • 06
    Additional scraps of DK yarn for small colour changes if desired

β€” Tools Required

  • 01
    6mm J crochet hook (for squares and bag body)
  • 02
    5mm H crochet hook (for strap foundation and some details)
  • 03
    Tapestry / yarn needle for sewing and weaving ends
  • 04
    Scissors
  • 05
    Bag hooks / swivel clips (hardware) for strap ends
  • 06
    Stitch markers
  • 07
    Pins for assembly (optional)

Progress Tracker

0% Complete

β€” Square :

Round 1 :

Using the 6mm J hook. Magic Ring, Chain 3 (counts as first stitch) Double crochet 15 stitches more (16 stitches total)

Round 1 :

Pull magic circle closed, slip stitch into first stitch

Round 2 :

Change Colour. Chain 2 (counts as first stitch). Cluster stitch into each stitch (16 total). Slip stitch closed

Info :

Cluster stitch: Start a Double crochet but only pull through the first loop leaving the second loop on the hook, yarn over and double crochet into same stitch and only pull through the first loops ending up with 3 loops on the hook (for the first cluster, the following clusters will have 4 loops on the hook), pull through all 3 loops and chain 1. 3 stitches per cluster, 16 clusters total.

Round 3 :

Change colour, Chain 2. As before cluster stitches but this time its 4 stitches per cluster and chain 2 between each. Slip stitch closed

Round 4 :

Change Colour, Chain 2 (counts as first Double). 1. Double crochet 3 times into the same stitch. 2. Half Double crochet 3 times into the next stitch. 3. Double crochet 3 times into the next stitch. 4. Treble crochet 3 times into the next stitch. 5. Chain 1 Treble crochet 3 times into the same stitch as the first set of trebles creating a corner. Repeat 1-5 all around

Round 5 :

Change Colour, Chain 2 (counts as first Double stitch). Double crochet 3 times into each stitch. Once you get to the corner Double crochet 3 times, chain 1, Double crochet 3 times again into the same corner stitch, continue round

Info :

You need to make 11 of these squares

β€” Assembly :

Step 1 :

Start with 8 of the 11 squares and lay them out in the formation shown (four across with diamond centre and two extra rows to form the curved base)

Step 2 :

Its time to start to stitch the squares together. Using Single crochet in the back stitch only of the squares. Placing the squares back to back helps this

Step 3 :

I have used a contrasting colour but you can use the same colour if you dont want the join to be as visible

Step 4 :

Fold in half. You now need to stitch the bag along these lines. The bag will start to take on its 3D shape and not sit flat anymore

Step 5 :

Now you add 2 more squares at the top corners, these will be folded in half

Step 6 :

The last Square will need a little manipulation again adding to the 3D shape of the final bag. Stitch it to the back of the bag so it can be folded over the front

Step 7 :

Now all the squares are joined. Single crochet around the whole edge of the bag. Once you reach the point of the flap chain 8 and slip stitch back into the same stitch. Continue Single crochet around until you reach each corner (marked with yellow stars on the picture above). Chain 5 and slip stitch into the same stitch

Step 8 :

Single crochet around again and add 8 stitches into the chain loop for the button hole and 5 stitches into the chain loops at the sides of the bag

Step 9 :

Choose your button and pick the best spot to place it on your bag, stitch it on

Strap (Foundation) :

Using a size 5mm H hook Start by making a row of Single crochet foundation chain. Make this row as long as you like in multiples of 2, I have done 100 stitches. Going down a hook size for the foundation row helps to keep it neat and tidy

Strap :

Going back to the 6mm J hook, chain 1, Turn work, Single crochet along the whole row. Chain 4, turn work

Strap Row (Bead stitch) :

Skip 1 stitch and Double crochet. This row is a bead stitch row so you are going to essentially be doing a sideways puff stitch onto the Double crochet you have just made

Bead stitch Info :

Loop over the hook 4 times before pulling the working yarn though and chain 1, Skip 1, Double crochet, Bead stitch, Skip 1.... Continue. On the last stitch leave it as a Double

Strap Next :

Chain 1, Turn work. Single crochet into each stitch along. One on top of each bead and one between as shown. Single crochet twice into the last stitch space, chain 1 and turn work

Strap Finish :

Single crochet along every stitch, chain 1 and turn work, repeat for a third time. Cut and weave in your ends

Hardware :

Take a needle and length of yarn and simply sew your bag clips to the ends of your strap. Clip it to your bag and wear with pride

Assembly Instructions

  • Lay out 8 of the 11 squares in the diamond/flower layout shown and stitch them together by placing squares back-to-back and single crocheting through the back loop only to create a neat, contrasting join.
  • Fold the joined panel in half along the indicated seam lines and stitch the sides together to form the 3D curved base of the bag, checking the photo reference for where seams should run.
  • Add the two top corner squares folded in half and manipulate and stitch the final square to the back so it becomes the flap that can fold over the front; check fit as you sew.
  • Single crochet around the entire bag edge, create the flap loop by chaining 8 and slip stitching back into place, then add the buttonhole loop (chain 8) and side chain loops (5 stitches each) for the strap hardware.
  • Sew the selected button to the front at the spot that matches the buttonhole loop, then create the strap using the foundation single crochet, bead-stitch rows and finish by sewing swivel clips to the strap ends.

Important Notes

  • πŸ’‘Place squares back-to-back and single crochet in the back loop only to join for a tidy, stable seam.
  • πŸ’‘Go down one hook size for your foundation chain to keep the foundation neat and prevent stretching along the strap.
  • πŸ’‘Maintain consistent tension across all squares so they sit evenly during assembly and the bag keeps a smooth shape.
  • πŸ’‘Pin and check placement before stitching additions like the flap and button so shaping and fit remain accurate.

This Molly Boho Bag pattern invites you to mix colours and textures to make a truly one-of-a-kind accessory. Have fun experimenting with scraps or carefully chosen shades to create a beautiful boho statement piece. Happy crocheting and wear your handmade creation with pride! 🧢✨

You ask,

we answer.

FAQs

What size will the finished bag be?

The finished bag size will vary depending on your tension and strap length, but using the recommended DK yarn and hooks the pictured bag is a roomy shoulder bag approximately medium-sized and suitable for everyday use.

How many squares do I need to make?

You need to make 11 squares in total: 8 for the main body layout, plus 2 top corner squares and 1 final manipulated square that becomes the flap.

Can I use different yarn weights for this pattern?

Yes, but changing yarn weight will affect the finished size and drape; if you use a thicker yarn you may need larger hooks and fewer stitches for the same coverage.

Do I need experience with cluster or puff stitches?

This pattern is rated intermediate because it uses cluster-style stitches and a bead/puff variation for the strap; if you know basic trebles, double crochets and can follow the cluster description you should be able to complete it.

How long does this project typically take?

Most crocheters complete this project in 8-10 hours, though time will vary depending on experience, colour changes and assembly time.