🧢 Beautiful ✨ Detailed πŸ’ Adorable

Spiderman Amigurumi Pattern

Spiderman Amigurumi Pattern
4.2β˜… Rating
5-7 Hours Time Needed
3.0K Made This
βœ‚οΈ

Intermediate Level

Ideal for those with basic crochet experience, featuring slightly more advanced stitches and techniques to expand your skills.

⏱️

Weekend Treat

Takes 5-7 hours, making it an enjoyable project to finish over a couple of days.

🧸

Cute Companion

An adorable friend to cherish, handcrafted with love to bring comfort and joy for years to come.

About This Spiderman Amigurumi Pattern

This pattern creates an adorable Spiderman amigurumi approximately 10 inches tall using chunky plush yarn. It is written for the Peter Parker colorway with notes to adapt the doll to Miles Morales. You will work in continuous rounds with simple increases, decreases, and multiple color changes to create the head, body, arms, and legs.

Spiderman Amigurumi Pattern crochet pattern - detailed view of completed project

Includes a full materials list, step-by-step rounds, and assembly directions. Eye and spider details are explained with simple methods using felt or puffy paint.

Why You'll Love This Spiderman Amigurumi Pattern

I absolutely love this pattern because it turns simple stitches into a character full of personality. I enjoy the playful color changes that let you switch between Peter Parker and Miles Morales easily. Sewing the head and body together and adding the felt eyes is such a satisfying finishing step that brings the plush to life. The project is compact enough to finish over a weekend but detailed enough to feel like a real accomplishment.

Spiderman Amigurumi Pattern step 1 - construction progress Spiderman Amigurumi Pattern step 2 - assembly progress Spiderman Amigurumi Pattern step 3 - details and accessories Spiderman Amigurumi Pattern step 4 - final assembly and finishing

Switch Things Up

I love customizing this pattern by changing colors to make different versions; switching the red and blue to pastels gives a soft, whimsical plush.

I sometimes use a smaller hook and lighter yarn to create a mini keychain version that is perfect for gifting or decorations.

I often add embroidered facial expressions or small accessories like a tiny crochet mask to personalize each doll.

For a more durable toy, I recommend sewing the eyes on with felt rather than gluing them, especially for children.

I also experiment with different spider emblem techniques β€” puffy paint for texture or small felt pieces for a cleaner look.

If you want posable arms, consider adding thin wire inside the arm stuffing for gentle posing and display options.

I enjoy making a Miles Morales variant by using primarily black yarn and adding red accents to change the character immediately.

You can make a family set by altering sizes and colors, creating matching or complementary versions for display or play.

I sometimes mix yarn textures β€” a smooth worsted for details and plush chunky for the body β€” to add visual interest and contrast.

Don't be afraid to experiment with eye shapes and sizes; moving the eyes slightly changes the personality of the plush dramatically.

Common Mistakes & How to Fix Them

βœ— Skipping stitch markers during rounds can make it hard to track the start of each round; place a marker at the first stitch of every round to stay oriented. βœ— Not stuffing as you go can create lumps or gaps later; begin stuffing early and add fiber gradually while shaping to maintain even firmness. βœ— Changing color without securing ends can cause unraveling during play; weave in and secure color changes or carry yarn neatly when possible. βœ— Forgetting to count stitches after increases or decreases leads to incorrect shaping; count stitches at the end of each round especially after shaping rounds to correct mistakes early.

Spiderman Amigurumi Pattern

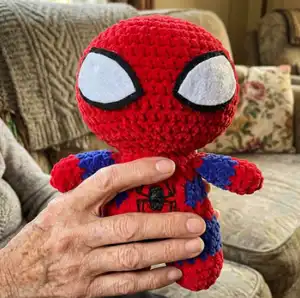
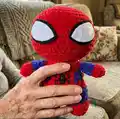
Make your own cuddly Spiderman amigurumi using this clear, step-by-step crochet pattern. You will create a 10-inch plush with color changes and simple shaping, perfect for gift giving or display. The pattern includes both Peter Parker and Miles Morales notes so you can choose your favorite. Follow the full materials list, rounds, and assembly instructions to finish a polished, adorable toy.

Intermediate 5-7 Hours

Materials Needed for Spiderman Amigurumi Pattern

β€” Main Fabric

  • 01
    Premier Parfait Chunky yarn (chunky/plush) - Peter Parker: Red (poppy) & Blue (classic blue)
  • 02
    Premier Parfait Chunky yarn (chunky/plush) - Miles Morales: Black & Red (poppy)
  • 03
    Felt for eyes - Peter Parker: black & white; Miles Morales: red & white
  • 04
    Puffy paint for spider detail (optional) - Peter Parker: black; Miles Morales: red
  • 05
    Polyester stuffing - amount to fill a 10-inch plush

β€” Tools Required

  • 01
    Crochet hook size 4.5 mm
  • 02
    Stuffing (polyester fiberfill)
  • 03
    Yarn needle
  • 04
    Scissors
  • 05
    Stitch marker
  • 06
    Felt for eyes (black, white, red as needed)
  • 07
    Puffy paint for spider detail (or felt to cut out spider)
  • 08
    Pins for assembly (optional)

Progress Tracker

0% Complete

β€” Materials :

Infos :

Premier parfait chunky (shade indicated in parentheses below). Peter parker: Red (poppy) & Blue (classic blue). Miles morales: Black & Red (poppy). 4.5 mm crochet hook. Stuffing. Yarn needle. Scissors. Stitch marker. Felt for eyes - Peter parker: black & white. Miles morales: red & white. Puffy paint for spider (or felt if you prefer to cut it out) - Peter parker: black. Miles morales: red. The finished spiderman plush is about 10 inches tall. This pattern will be written for the peter parker version, with notes at the end of each section to adapt it to the miles morales version.

β€” Head :

Round 1 :

8 sc in MR (8)

Round 2 :

inc x 8 (16)

Round 3 :

*sc,inc* x8 (24)

Round 4 :

*3sc, inc* x6 (30)

Round 5 :

*2sc, inc, 2sc* x6 (36)

Round 6 :

*5sc, inc* x6 (42)

Round 7 :

*3sc, inc, 3sc* x6 (48)

Round 8-14 :

sc around (48), 7 total rounds.

Round 15 :

*3sc, dec, 3sc* x6 (42)

Round 16 :

*5sc, dec* x6 (36)

Round 17 :

*2sc, dec, 2sc* x6 (30)

Info :

Begin stuffing, and continue to stuff well as you work.

Round 18 :

*3sc, dec* x6 (24)

Round 19 :

*sc, dec* x8 (16)

Round 20 :

dec x6 (6)

Info :

Fasten off and sew closed.

Info :

Use black to make the head if making miles morales.

β€” Arms :

Info :

(make 2) Starting with red.

Round 1 :

8 sc in a MR (8)

Round 2-4 :

sc around (8), 3 total rounds.

Info :

Change to blue.

Round 5-8 :

sc around (8), 4 total rounds.

Info :

Change to red.

Round 9 :

sc around (8)

Info :

Fasten off and leave a long tail for sewing. Stuff very lightly.

Info :

For miles morales: Rnd 1-2. with red, Rnd 3-9. with black.

β€” Legs :

Info :

(make 2) Starting with red.

Round 1 :

8 sc in a MR (8)

Round 2 :

inc x8 (16)

Round 3-5 :

sc around (16), 3 total rounds.

Info :

Change to blue.

Round 6-7 :

sc around (16), 2 total rounds.

Info :

Fasten off here on the first leg only. On the second leg, continue to round 8.

Info :

For miles morales: Rnd 1. with red, Rnd 2-7. with black.

β€” Body :

Round 8 :

Ch 1. Make 16 sc around the first leg, 1 sc in the ch, 16 sc around second leg, and 1 sc into the other side of the ch (34)

Round 9 :

*sc 7, dec, 6 sc, dec* x2 (30)

Info :

Change to red.

Round 10 :

sc around (30)

Info :

Stuff the legs well.

Round 11 :

*dec, 13 sc* x2 (28)

Info :

Rounds 12-14 involve multiple color changes. Change colors between red and blue as indicated by the red and blue text.

Round 12 :

5 sc, 6 sc, 7 sc, 6 sc, 4 sc (28)

Round 13 :

3 sc, dec, 6 sc, *sc,dec* x2, sc, 6sc, 2sc, dec (24)

Round 14 :

5 sc, 5 sc, 6 sc, 5 sc, 3 sc (24)

Info :

The rest of the body is made with red.

Round 15-17 :

sc around (24), 3 total rounds.

Info :

Fasten off and leave a long tail for sewing.

Info :

Stuff the body well, especially the top of the body/neck.

Info :

For miles morales: All of the body is made with black.

β€” Assembly :

Info :

Using the long tail from the body, sew it to the head.

Info :

Sew the arms between rnd 16-17, on either side of the body.

Info :

Sew legs to the bottom of the body as evenly spaced pieces and close any gaps when sewing to ensure stability.

Info :

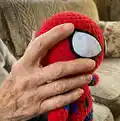
Use felt eyes or glue them around rnd 6-10 as described in the Eyes section; attach spider detail using puffy paint or felt on the front of the body.

β€” Eyes :

Info :

I do not have a cricut, so i cut out my eyes by hand. Here is how i do it. 1. Using a picture of my spiderman plush, or any other you like, enlarge the image on a tablet/laptop so that it is the same size as your plush. 2. Trace the inner white part of the eye and cut it out in felt. 3. Glue this to the outer eye felt color (black or red felt depending on the version). 4. Leaving a small border, cut around the white part. Glue the eyes around rnd 6-10.

β€” Spider :

Info :

I use puffy paint and a yarn needle to be as precise as possible when making the spider. Alternatively, you could use a cricut for this.

Assembly Instructions

  • Using the long tail from the body, sew the body to the head securely with a yarn needle and whipstitch, making sure the head is centered.
  • Position and sew the arms between rounds 16-17 on either side of the body, matching color transitions and sewing through the stuffed arm base to anchor them firmly.
  • Attach the legs to the bottom of the body, spacing them evenly and sewing them securely to support the plush in a standing or sitting pose.
  • Glue or sew the felt eyes in place around rounds 6-10, centering them symmetrically and trimming any excess felt to create a small border.
  • Create the spider emblem with puffy paint or a cut felt piece; use a yarn needle for fine painted details or glue felt spider center before painting legs.

Important Notes

  • πŸ’‘Use stitch markers to mark the beginning of each round so you can easily keep track of increases and decreases.
  • πŸ’‘Stuff the head and body gradually; begin stuffing the head at round 17 and stuff firmly but evenly to keep a round shape.
  • πŸ’‘For the Miles Morales version, work the head and all of the body in black as noted to maintain the correct color scheme.
  • πŸ’‘Glue or attach eyes between rounds 6-10 to ensure the correct placement relative to facial shaping and stuffing.

This Spiderman amigurumi pattern is a fun and rewarding make that brings a beloved character to life in plush form. Whether you crochet the Peter Parker red-and-blue or the Miles Morales black-and-red version, the finished doll measures about 10 inches tall and makes a wonderful handmade gift. Grab your chunky yarn and a 4.5 mm hook and start stitching today! πŸ§ΆπŸ•·οΈ

You ask,

we answer.

FAQs

What size will the finished piece be?

The finished amigurumi plush is about 10 inches tall when made with the recommended chunky yarn and 4.5 mm hook.

Can I use different yarn weights for this pattern?

Yes, you can use different yarn weights but this will change the final size; choose an appropriate hook size for your selected yarn to keep gauge and shaping consistent.

Do I need prior crochet experience for this pattern?

This pattern is rated intermediate, so basic knowledge of single crochet, increases, decreases, working in the round, and simple color changes is recommended.

How long does this project typically take to complete?

Most crocheters finish this project in 5-7 hours, depending on experience and how quickly you work through color changes and assembly.