๐Ÿงถ Beautiful โœจ Detailed ๐Ÿ’ Adorable

Sorting Hat Pattern

Sorting Hat Pattern
4.1โ˜… Rating
5-7 Hours Time Needed
3.5K Made This
โœ‚๏ธ

Intermediate Level

Ideal for those with basic crochet experience, featuring slightly more advanced stitches and techniques to expand your skills.

โฑ๏ธ

Weekend Treat

Takes 5-7 hours, making it an enjoyable project to finish over a couple of days.

๐Ÿ‘•

Casual Chic

Relaxed style with a modern twist, perfect for everyday wear while maintaining that handcrafted uniqueness.

About This Sorting Hat Pattern

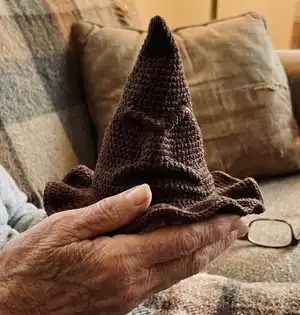
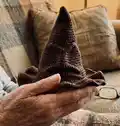
This pattern creates a crocheted Sorting Hat inspired by the classic Harry Potter design. You will work in unjoined spirals to shape the pointed crown, sculpt the mouth and eyes, and create a ruffled brim. Optional felt and fiberfill variations let you adjust stiffness and structure for a perfect fit.

Sorting Hat Pattern crochet pattern - detailed view of completed project

Detailed, round-by-round instructions guide you through increases, textural stitches, and front-loop shaping. Finishing notes explain how to make a stiff brim with felt or add fiberfill for a sturdier top.

Why You'll Love This Sorting Hat Pattern

I absolutely love this pattern because it captures the Sorting Hat's character with simple crochet techniques and smart shaping. I enjoy how the unjoined spiral method creates a seamless, sculpted crown that feels handmade and authentic. The finishing options let me personalize each hat โ€” whether I want a floppy, whimsical look or a firm, theatrical brim. Seeing the face take shape when stitching the mouth and eyes always makes me smile, and I hope you feel that same joy while making it.

Sorting Hat Pattern step 1 - construction progress Sorting Hat Pattern step 2 - assembly progress Sorting Hat Pattern step 3 - details and accessories Sorting Hat Pattern step 4 - final assembly and finishing

Switch Things Up

I love customizing this pattern by changing yarn weight and hook size to make different hat sizes and textures.

I sometimes use bulky yarn with a larger hook for a soft, squishy version perfect for display on a shelf.

For a more realistic, crisper hat I use worsted weight doubled or chenille with a firm felt brim glued and stitched inside.

I also experiment with distressing the brim edges by brushing the yarn or using a lighter color yarn for subtle highlights.

I often add embroidered wrinkles and extra stitching around the mouth to enhance the Sorting Hat's personality.

Try substituting hdc or dc in place of some sc rounds to change the slope and drape of the crown for varied silhouettes.

I sometimes add a hidden wire at the tip to make the hat poseable and hold a jaunty fold in place for photos.

If you want a child-size or oversized adult hat, simply continue increasing by 3 sts per round until you reach the desired diameter before proceeding with the pattern.

I recommend testing felt thickness and placement before stitching the circle in place so the hat still fits comfortably when finished.

For themed variations, swap brown for deep green or purple yarn and add appliques or badges to create a personalized magical heirloom.

Common Mistakes & How to Fix Them

โœ— Skipping a locking stitch marker makes it easy to lose your place in the spiral; use a marker at the end of each round and move it to the loop on your hook. โœ— Not counting stitches after increase rounds will quickly derail shaping; count stitches after each increase round to confirm your stitch count matches the pattern. โœ— Crocheting with inconsistent tension causes uneven rows and a misshapen crown; maintain steady tension and practice on a small swatch if needed before starting. โœ— Placing the felt circle too low inside the hat will prevent it from fitting properly; position the felt just underneath the eyes and test fit before stitching it in place. โœ— Overstuffing the top with fiberfill makes the hat too bulky and stiff; add small amounts of stuffing gradually and check the fit frequently while shaping.

Sorting Hat Pattern

Make the iconic Sorting Hat with this detailed crochet pattern designed for a snug, sculpted look. You will follow round-by-round instructions to shape the crown, create the brim, and add the Sorting Hat's characterful face. The pattern uses unjoined spirals and offers finishing tips for a crisp brim or a floppy, lived-in look. Perfect for fans who love a handmade Harry Potter touch.

Intermediate 5-7 Hours

Materials Needed for Sorting Hat Pattern

โ€” Main Fabric

  • 01
    Brown yarn (chenille or double stranded worsted) - main material (amount not specified in pattern)
  • 02
    Brown felt (optional) - for a stiffer brim and internal support
  • 03
    Polyester fiberfill (optional) - for stuffing the top if needed

โ€” Tools Required

  • 01
    Crochet hook size N
  • 02
    Yarn needle
  • 03
    Needle and thread (optional, for felt)
  • 04
    Stitch marker (locking recommended)
  • 05
    Scissors
  • 06
    Pins for positioning felt (optional)

Progress Tracker

0% Complete

โ€” Materials :

Infos :

Brown yarn (chenille or double stranded worsted). Size N crochet hook. Yarn needle. Brown felt (optional). Polyester fiberfill (optional). Needle and thread (optional).

โ€” Abbreviations :

Infos :

st - stitch. sc - single crochet. hdc - half double crochet. trc - triple crochet. sc2tog - single crochet 2 stitches together. FLO - crochet into the front loops only of each stitch.

โ€” Techniques :

Info :

Adjustable ring - Make a ring, insert hook into front of ring and pull up loop through to front of ring, chain one stitch, sc into ring as directed in pattern, pull tail gently to close ring.

โ€” Notes :

Infos :

Numbers in () indicate number of stitches at the end of that round. Pattern is worked in unjoined spirals. Use a locking stitch marker to keep track of rounds. At the end of each round, move marker to loop on your hook.

โ€” Pattern :

Round 1 :

Starting at top of hat with N hook, make an adjustable ring, ch 1, sc 3 into ring. Pull closed (3 sts)

Round 2 :

Work 2 sc into each st (6 sts)

Round 3-5 :

Sc in each st.

Round 6 :

2 Sc in next st, sc in each st around (7 sts)

Round 7 :

Sc in next 3 sts, 2 sc in next st, sc in next 3 sts (8 sts)

Round 8 :

*(2 Sc in next st, sc in next 3 sts), rep from * around (10 sts)

Round 9 :

*(Sc in next 2 sts, 2 sc in next st, sc in next 2 sts), rep from * around (12 sts)

Round 10 :

*(Sc in next st, 2 sc in next st), rep from * around (18 sts)

Round 11-12 :

Sc in each st.

Round 13 :

*(2 Sc in next st, sc in next 8 sts), rep from * around (20 sts)

Round 14 :

Sc in each st.

Round 15 :

*(Sc in next 4 sts, 2 sc in next st, sc in next 5 sts), rep from * around (22 sts)

Round 16 :

Sc in each st.

Round 17 :

*(2 Sc in next st, sc in next 10 sts), rep from * around (24 sts)

Round 18 :

Sc in next 8 sts, 2 trc in next 4 sts, hdc in next 4 sts, 2 trc in next 4 sts, sc in next 4 sts (32 sts)

Round 19 :

Sc in next 8 sts, sc2tog 4 times, sc in next 4 sts, sc2tog 4 times, sc in next 4 sts (24 sts)

Round 20 :

*(Sc in next 3 sts, 2 sc in next st, sc in next 4 sts), rep from * around (27 sts)

Round 21 :

*(Sc in next 8 sts, 2 sc in next st), rep from * around (30 sts)

Round 22 :

Sc in each st.

Round 23 :

Sc in next 14 sts, 2 hdc in next 10 sts, sc in next 6 sts (40 sts)

Round 24 :

Sc in next 14 sts, hdc in next 20 sts, sc in next 6 sts (40 sts)

Round 25 :

Sc in next 14 sts, sc2tog 10 times, sc in next 6 sts (30 sts)

Round 26 :

*(Sc in next 9 sts, 2 sc in next st), rep from * around (33 sts)

Round 27 :

*(Sc in next 5 sts, 2 sc in next st, sc in next 5 sts), rep from * around (36 sts)

Round 28 :

*(2 Sc in next st, sc in next 11 sts), rep from * around (39 sts)

Round 29 :

*(Sc in next 12 sts, 2 sc in next st), rep from * around (42 sts)

Round 30 :

Sc in each st.

Info :

* To make a larger hat, continue increasing by 3 sts per round until the hat reaches the size you want. Continue on as instructed below, adjusting stitch counts for each row.

Round 31 :

Working in FLO of each st, *(2 sc in next st, sc in next 6 sts), rep from * around (48)

Round 32 :

Working in both loops of each st, *(Sc in next 3 sts, 2 sc in next st, sc in next 4 sts), rep from * around (54 sts)

Round 33 :

*(Sc in next 8 sts, 2 sc in next st), rep from * around (60 sts)

Round 34 :

*(2 sc in next st, sc in next 9 sts), rep from * around (66 sts)

Round 35 :

*(Sc in next 3 sts, 2 sc in next st, sc in next 7 sts), rep from * around (72 sts)

Round 36 :

*(Sc in next 10 sts, 2 sc in next st, sc in next st), rep from * around (78 sts)

Round 37 :

*(2 sc in next st, sc in next 12 sts), rep from * around (84 sts)

Info :

Fasten off and weave in ends.

โ€” Finishing :

Info :

Thread a yarn needle with a long strand of the brown yarn you are using. Knot the end. Push the mouth made in Rnds 23-25 to the inside. Weave the yarn from the bottom of the hat, up through the mouth, securing it to the inside. Stitch both sides of the mouth the same way so that it stays to the inside of the hat, then come up between the eyes created in Rnds 18-19, and back down towards the mouth, pulling tightly so that it makes the center of the eyes tilt downward slightly for the Sorting Hat's grumpy expression. Pull the yarn tightly and knot to the inside of the hat, and weave in end. For a stiffer brim, overlap rounded strips of brown felt over the inside of the brim and pin into place. Trim edges to line up with the crocheted edge of the brim. Use brown thread to stitch the felt into place on the edge and inner edge of the brim. If your hat is too floppy on top, insert polyester fiberfill. Cut a circle of felt to fit inside just underneath the eyes of the hat. Stitch into place with brown thread. Make sure not to put the felt circle too low or the hat won't fit onto a head.

Assembly Instructions

  • Push the mouth created in Rounds 23-25 to the inside of the hat and secure by weaving the yarn from the bottom of the hat up through the mouth, knotting and hiding the end inside.
  • Stitch both sides of the mouth and then pass the yarn between the eyes created in Rounds 18-19 and back down toward the mouth, pulling tightly to create the Sorting Hat's tilted, grumpy expression.
  • For a firmer brim, cut rounded strips of brown felt and overlap them on the inside of the brim, pin into place, then trim to line up with the crocheted edge and stitch the felt in place with brown thread.
  • If the hat top is too floppy, insert polyester fiberfill and/or cut a felt circle to fit just underneath the eyes, stitch it into place with brown thread, and ensure it is not positioned too low so the hat still fits a head.

Important Notes

  • ๐Ÿ’กUse a locking stitch marker to keep track of rounds; move the marker to the loop on your hook at the end of each round for accuracy.
  • ๐Ÿ’กNumbers in parentheses indicate the number of stitches at the end of that round; count stitches frequently after increases or decreases.
  • ๐Ÿ’กWork in unjoined spirals as instructed for smooth shaping and avoid joining rounds with slip stitches to maintain correct shaping.

This Sorting Hat pattern brings a little Hogwarts magic to your crochet basket. Handcraft a whimsical, characterful hat with clear round-by-round shaping and finishing tips. Perfect as a costume piece or a playful gift that will spark delight. ๐ŸŽฉ๐Ÿงถ

You ask,

we answer.

FAQs

What size will the finished hat be?

The pattern does not list a specific finished size; size will vary depending on your yarn tension and how many increase rounds you choose. Follow the note about continuing increases by 3 sts per round to grow the hat to the desired size.

Can I use a different yarn weight or hook size?

Yes, you can change yarn weight and hook size, but the final size and drape will change. Using bulkier yarn and a larger hook will make a chunkier hat, while lighter yarn will make a smaller, more delicate hat.

Do I need to use felt for the brim?

Felt is optional; use it to stiffen the brim for a crisper look. The pattern explains how to overlap felt strips and stitch them to the inner edge of the brim for a more structured finish.

Is this pattern suitable for beginners?

This pattern is rated intermediate because it includes shaping, front-loop work, and finishing techniques. A beginner with experience in increases and working in spirals could attempt it, but some practice may be helpful.