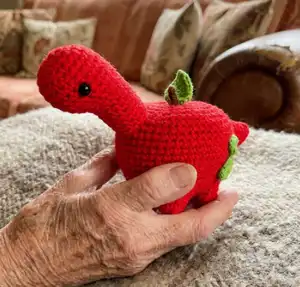
🧢 Beautiful ✨ Detailed πŸ’ Adorable

Appletosaurus Amigurumi Pattern

Appletosaurus Amigurumi Pattern
4.5β˜… Rating
5-7 Hours Time Needed
1.1K Made This
βœ‚οΈ

Intermediate Level

Ideal for those with basic crochet experience, featuring slightly more advanced stitches and techniques to expand your skills.

⏱️

Weekend Treat

Takes 5-7 hours, making it an enjoyable project to finish over a couple of days.

🧸

Cute Companion

An adorable friend to cherish, handcrafted with love to bring comfort and joy for years to come.

About This Appletosaurus Amigurumi Pattern

This pattern creates an Appletosaurus β€” a tiny amigurumi dinosaur shaped like an apple with a leaf stem and decorative spots. It includes separate pieces for legs, body, head, tail, leaf, stem and spots with clear round-by-round instructions. Techniques covered include invisible closing and invisible decreases to give a neat finished look.

Appletosaurus Amigurumi Pattern crochet pattern - detailed view of completed project

Perfect as a cute handmade gift or a fun desk companion, it uses DK weight yarn and small hook to create a firm fabric. The pattern includes assembly guidance and photo references to help you position parts accurately.

Why You'll Love This Appletosaurus Amigurumi Pattern

I absolutely love this pattern because it combines playful design with simple amigurumi techniques that produce an instantly charming toy. I enjoy how the apple shape and tiny dinosaur tail give it a unique personality that always makes people smile. The pattern taught me neat finishing tricks like invisible closing which make a big difference in the final look. I also love that it is quick to make yet still allows you to practise shaping and sewing skills.

Appletosaurus Amigurumi Pattern step 1 - construction progress Appletosaurus Amigurumi Pattern step 2 - assembly progress Appletosaurus Amigurumi Pattern step 3 - details and accessories Appletosaurus Amigurumi Pattern step 4 - final assembly and finishing

Switch Things Up

I love how easy it is to customise this Appletosaurus by changing colours β€” try pastel pinks for a softer look or golden yellow for a sunny twist.

If you want a larger version, switch to a bulkier yarn and a larger hook for a chunkier, cuddlier toy.

To make a tiny keychain version, use fingering weight yarn and a 1.75mm hook and add a keyring to the top of the stem.

Embroidered facial details can change expression β€” experiment with different eye positions or stitched smiles for personality variations.

Try different spot shapes and sizes or position them asymmetrically to create unique characters in a family set.

Add wire inside the tail or neck for subtle posability if you want the Appletosaurus to hold poses.

Swap the leaf for a tiny flower or bow to create a themed version for holidays or special gifts.

Use variegated yarn for the body to give a textured, mottled look without changing colours often.

I often make matching mini accessories like tiny hats or scarves to give each Appletosaurus extra charm and individuality.

If you like a firmer finish, use less stuffing and tighter tension; for softer, squishier toys, stuff a bit more and use a slightly larger hook.

Common Mistakes & How to Fix Them

βœ— Forgetting to place safety eyes at the recommended rounds will misplace the face; insert safety eyes between rounds 7 - 8 and space them ten stitches apart so they appear either side of the head. βœ— Not attaching legs correctly when joining to the body can create an unbalanced toy; follow Rnd 5 carefully, inserting your hook through the leg and the body stitches to secure each leg in the correct sequence. βœ— Stuffing too late or too lightly will cause lumps and a collapsed shape; start stuffing firmly at the recommended rounds and continue stuffing gradually as you decrease to maintain shape. βœ— Skipping the invisible close steps can leave a visible hole at the top; complete the invisible close up to step 2, pull the yarn tight through the centre and weave in the tail to hide the closure.

Appletosaurus Amigurumi Pattern

Make a sweet Appletosaurus β€” a tiny apple-inspired dinosaur amigurumi that is perfect for gifting or displaying. This pattern guides you through creating a cuddly little toy with charming details like a leaf stem and bright green spots. Clear step-by-step rounds, assembly notes, and finishing techniques help you achieve a neat, professional result. Enjoy a fun and creative crochet project that adds personality to your handmade collection.

Intermediate 5-7 Hours

Materials Needed for Appletosaurus Amigurumi Pattern

β€” Main Fabric

  • 01
    Stylecraft Special DK - Matador (red) - main colour
  • 02
    Stylecraft Special DK - Grass Green - for leaf and spots
  • 03
    Stylecraft Special DK - Gingerbread - for stem

β€” Tools Required

  • 01
    2.5 mm Crochet Hook
  • 02
    Two 6mm safety eyes
  • 03
    Stitch markers
  • 04
    Yarn needle
  • 05
    Fibrefill / Polyfill stuffing
  • 06
    Scissors

Progress Tracker

0% Complete

β€” Materials :

Info :

Stylecraft Special DK in the following colours: Matador. Grass Green. Gingerbread. 2.5 mm Crochet Hook. Two 6mm safety eyes. Stitch markers. Yarn needle. Fibrefill. If made using the suggested yarn and hook size, the finished product is 10cm tall.

β€” Abbreviations :

Infos :

MR = magic ring. ch = chain. st = stitch. sts = stitches. sc = single crochet. hdc = half double crochet. dc = double crochet. inc = increase. dec = decrease. FLO = front loop only. BLO = back loop only. slst = slip stitch. rep = repeat.

β€” Techniques :

Info :

How to close amigurumi invisibly - 1. Insert needle in the FLO of each stitch around 2. Pull tight to close 3. Insert needle through centre exiting a few rounds down 4. Weave in the end and admire your work!

Info :

How to decrease invisibly - 1. Insert hook into FLO of first stitch 2. Insert hook into FLO of next stitch 3. Yarn over and pull through two loops 4. Yarn over and pull through two loops again. Invisible decrease complete!

β€” Legs (make four) :

Round 1 :

6sc in MR (6)

Round 2 :

inc each st around (12)

Round 3 :

in BLO sc each st around (12)

Round 4 :

sc each st around (12)

Info :

Cut yarn and weave in ends (photo 1)

β€” Body :

Round 1 :

6sc in MR (6)

Round 2 :

inc each st around (12)

Round 3 :

*1sc, inc* rep 6 times (18)

Round 4 :

*2sc, inc* rep 6 times (24)

Round 5 :

2sc, with the body still on your hook (photo 2) Insert hook through any st in leg 1 and through the next st of rnd 4 (photo 3) complete sc, complete a further 2sc in this way, 3sc, 3sc through leg 2 and rnd 4, 3sc, 3sc through leg 3 and rnd 4, 3sc, 3sc through leg 4 and rnd 4, sc (24)

Info :

All four legs should now be attached to the body (photo 4)

Round 6 :

2sc, 9sc around leg 1, 3sc, 9sc around leg 2, 3sc, 9sc around leg 3, 3sc, 9 sc around leg 4, sc (48)

Round 7-11 :

sc each st around (48) (5 rnds)

Round 12 :

*7sc, inc* rep 6 times (54)

Round 13-20 :

sc each st around (54) (8 rnds)

Round 21 :

*7sc, dec* rep 6 times (48)

Round 22 :

*6sc, dec* rep 6 times (42)

Round 23 :

*5sc, dec* rep 6 times (36)

Info :

Start to stuff firmly and continue to stuff as we decrease.

Round 24 :

*4sc, dec* rep 6 times (30)

Round 25 :

*3sc, dec* rep 6 times (24)

Round 26 :

*2sc, dec* rep 6 times (18)

Info :

Stop stuffing here.

Round 27 :

sc each st around (18)

Round 28 :

*1sc, dec* rep 6 times (12)

Round 29 :

sc each st around (12)

Round 30 :

dec 6 times (6)

Info :

Cut yarn leaving a long tail.

Info :

Complete invisible close up to step 2 (photo 6). Insert the needle into the centre, push it through the body coming out directly at the bottom (photo 7 and 8). Pull the yarn tight making a dip in the top of the body (photo 9). Make a few sts on the bottom to secure. This should also raise the tummy slightly. Weave in ends.

β€” Head :

Round 1 :

6sc in MR (6)

Round 2 :

inc each st around (12)

Round 3 :

*1sc, inc* rep 6 times (18)

Round 4 :

*2sc, inc* rep 6 times (24)

Round 5-9 :

sc each st around (24) (5 rnds)

Round 10 :

6sc, *sc, dec* rep 4 times, 6sc (20)

Round 11 :

4sc, *sc, dec* rep 4 times, 4sc (16)

Info :

Insert safety eyes between rnds 7 - 8 ten sts apart so they appear either side of the head.

Round 12-18 :

sc each st around (16) (7 Rnds)

Info :

Finish the final rnd with a slst to join. Cut yarn leaving a long tail.

β€” Tail :

Round 1 :

6sc in MR (6)

Round 2 :

*sc, inc* rep 3 times (9)

Round 3-4 :

sc each st around (9) (2 rnds)

Round 5 :

*2sc, inc* rep 3 times (12)

Round 6-7 :

sc each st around (12) (2 rnds)

Round 8 :

*3sc, inc* rep 3 times (15)

Round 9-10 :

sc each st around (15) (2 rnds)

Round 11 :

6sc, 3inc, 6sc (18)

Round 12-13 :

sc each st around (18) (2 rnds)

Info :

Finish the final rnd with a slst to join. Cut yarn leaving a long tail. Head and tail shown in (photo 10)

β€” Leaf :

Round 1 :

Using Grass Green: ch8, sc in 2nd st from hook, hdc, dc, dcinc, dc, hdc, work the following sts in the final st (sc, ch2, slst in 2nd ch from hook, sc) Now working down the other side of the ch, hdc, dc, dcinc, dc, hdc, sc, slst to join (16)

Info :

Cut yarn leaving a long tail.

β€” Stem :

Row 1 :

Using Gingerbread: Ch10, slst in 2nd ch from hook, 8slst (9)

Info :

Cut yarn leaving a long tail. Leaf and stem shown in (photo 11)

β€” Spots :

Small Spots (make two) :

Using Grass green: Rnd 1 6sc in MR close with a slst (6). Cut yarn leaving a long tail.

Medium Spots (make two) :

Rnd 1 8sc in MR close with slst (8). Cut yarn leaving a long tail.

Large Spots (make two) :

Rnd 1 6sc in MR (6). Rnd 2 inc each st around close with slst (12). Cut yarn leaving a long tail.

Info :

All spots shown in (photo 12)

β€” Assembly :

Info :

We will use the long tails to attach everything.

Info :

Using a few small sts attach the leaf half way up the stem (photo 13) then sew in the centre of the dip (photo 14 and 15).

Info :

Stuff head firmly and sew over rnds 18 - 22. You may need to adjust this positioning if you find your Appletosaurus won't balance correctly. (photo 16)

Info :

Stuff tail firmly and sew over rnds 14 - 19 ensuring the 3 increases from rnd 11 are towards the top (photo 17).

Info :

Sew the spots on each side towards the rear (photo 18).

Assembly Instructions

  • Using a few small stitches, attach the leaf halfway up the stem and then sew into the centre of the dip to secure the leaf firmly.
  • Stuff the head firmly and sew the head to the body over rounds 18 - 22, adjusting position so the Appletosaurus balances correctly.
  • Stuff the tail firmly and sew it to the body over rounds 14 - 19, ensuring the three increases from round 11 face towards the top.
  • Sew the spots onto each side of the body towards the rear, using the long tails to stitch them securely and weave in ends.

Important Notes

  • πŸ’‘Insert safety eyes between rounds 7 - 8, ten stitches apart so they appear either side of the head.
  • πŸ’‘Start stuffing firmly early and continue stuffing as you decrease to maintain a smooth, even shape.
  • πŸ’‘Use the long yarn tails from each piece to sew parts together for neat assembly and fewer visible ends.
  • πŸ’‘Finish final rounds with a slip stitch to join and leave long tails for assembly or invisible closing.

This Appletosaurus is a playful mix of apple charm and dinosaur cuteness, perfect for gifting or decorating a shelf. Make a whole family in different colours and watch them bring smiles to every room. Happy crocheting and enjoy every stitch! 🧢🍎

You ask,

we answer.

FAQs

What size will the finished piece be?

The finished amigurumi measures approximately 10 cm tall when using Stylecraft Special DK and a 2.5 mm hook as recommended.

Can I use different yarn weights for this pattern?

Yes, you can use different yarn weights, but this will affect the final size; switch to an appropriate hook size for your chosen yarn to get neat stitches.

Do I need prior crochet experience for this pattern?

This pattern is rated intermediate, so basic amigurumi experience and familiarity with increases, decreases and sewing pieces together is recommended.

How long does this project typically take to complete?

Most crocheters complete this project in 5-7 hours, though time may vary based on experience level and how detailed you are with finishing and assembly.