๐Ÿงถ Beautiful โœจ Detailed ๐Ÿ’ Adorable

Patchwork Sweater Pattern

Patchwork Sweater Pattern
3.9โ˜… Rating
12-15 Hours Time Needed
2.6K Made This
โœ‚๏ธ

Intermediate Level

Ideal for those with basic crochet experience, featuring slightly more advanced stitches and techniques to expand your skills.

โฑ๏ธ

Multi-Day Project

A rewarding 12+ hour journeyโ€”perfect for dedicated crafters who love detailed work.

๐Ÿ‘•

Casual Chic

Relaxed style with a modern twist, perfect for everyday wear while maintaining that handcrafted uniqueness.

About This Patchwork Sweater Pattern

This pattern creates an oversized, slightly cropped patchwork sweater made from sunburst granny squares. You will crochet individual squares, join them into four panels, then add contrast ribbing for the bottom, collar, and sleeves. The modular construction makes it easy to customize sizing and color placement for a unique finished piece.

Patchwork Sweater Pattern crochet pattern - detailed view of completed project

Squares are worked with puff and cluster stitches to give a textured sunburst effect, then panels are assembled with single crochet seams. Instructions include size adjustment notes, full assembly guidance, and step-by-step ribbing instructions.

Why You'll Love This Patchwork Sweater Pattern

I absolutely love this pattern because it turns simple granny squares into a modern, wearable sweater that feels special and handmade. I enjoy the rhythm of making the sunburst squaresโ€”each one works up quickly and becomes a colorful building block. The modular panels make assembly satisfying and easy to adjust for size. I also appreciate how the contrast ribbing elevates the finished look and gives a professional edge to the sweater. Sharing this pattern lets me help others create a wearable piece that uses up yarn and showcases creativity.

Patchwork Sweater Pattern step 1 - construction progress Patchwork Sweater Pattern step 2 - assembly progress Patchwork Sweater Pattern step 3 - details and accessories Patchwork Sweater Pattern step 4 - final assembly and finishing

Switch Things Up

I love how easy this sweater is to customizeโ€”try switching the square colors to create stripes, gradients, or a checkerboard layout for a completely different look.

You can change the size by altering the number of squares per panel; adding columns will make the body wider while adding rows will lengthen the sweater.

Swap the DK yarn for a bulkier yarn and larger hook to make a chunky, cozy version; remember that you will need fewer squares and larger ribbing for balance.

For a daintier, keychain-sized version, use fingering weight yarn and a smaller hook to create miniature squares and a tiny wearable or doll sweater.

I often change the ribbing color to a neutral to ground a very colorful sweater, but you can also match the ribbing to one dominant square color for a coordinated finish.

Try adding embroidered details or surface slip stitches across some squares to personalize the sweater with initials or simple motifs.

If you want a more fitted silhouette, reduce the number of squares in each panel and make a narrower ribbing depth to hug the hemline.

For an even cozier feel, line the sweater with a lightweight fleece or sew a fabric backing to protect delicate yarns from wear while keeping the textured look of the squares.

I sometimes add buttons to the shoulder seams for a decorative closure or to make dressing easier for childrenโ€”just add buttonholes when doing the shoulder rows.

Finally, mix fibers for texture: combine soft mohair blends for a halo effect with acrylic squares for structure and durability.

Common Mistakes & How to Fix Them

โœ— Skipping stitch markers during panel assembly can cause uneven seams; place markers at corners and junctions to maintain alignment while seaming. โœ— Not blocking or squaring motifs leads to mismatched joins and a warped sweater; block squares to the correct measurement before assembly for neat edges and accurate sizing. โœ— Using inconsistent hook sizes for the same square changes the gauge and square size; use the recommended hooks or swatch to ensure uniform squares across your project. โœ— Pulling yarn too tight when crocheting ribbing makes the collar and hem stiff and small; work ribbing with relaxed tension and try the ribbing on as you go to check fit. โœ— Skipping counts when joining squares causes misaligned seams and uneven panels; count stitches on each side before joining and adjust with extra sc at corners if needed.

Patchwork Sweater Pattern

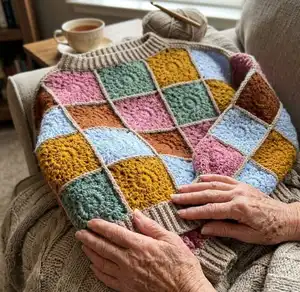
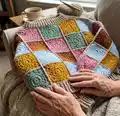
Make a cozy, oversized patchwork sweater using sunburst granny squares and simple ribbed edges. This pattern guides you through making individual squares, assembling four panels, and adding neat ribbing for a polished finish. Perfect for using up DK/light worsted yarn scraps and creating a colorful handmade wardrobe staple. You will love the modular construction that makes sizing and customization straightforward.

Intermediate 12-15 Hours

Materials Needed for Patchwork Sweater Pattern

โ€” Main Fabric

  • 01
    DK / Light Worsted Weight Acrylic Yarn (Weight 3 Medium) - suggested: Hobbii Kind Feather Yarn, 100% premium acrylic, 257 yd / 235 m per 100 g skein
  • 02
    Approximately 1850 yd total for the Body (estimate, depends on sizing)
  • 03
    Approximately 25 yd per square (estimate)
  • 04
    Approximately 400 yd for contrasting yarn and ribbing (collar, bottom, cuffs)

โ€” Tools Required

  • 01
    Crochet hook 4.0 mm (for default squares)
  • 02
    Crochet hook 5.0 mm (for larger squares / larger sizes)
  • 03
    Crochet hook 3.5 mm (for ribbing on 4-inch square option)
  • 04
    Crochet hook 4.5 mm (for ribbing on 5-inch square option)
  • 05
    Yarn needle for sewing and weaving in ends
  • 06
    Scissors
  • 07
    Measuring tape
  • 08
    Stitch markers (recommended for assembly and counting rounds)

Progress Tracker

0% Complete

โ€” Sunburst Granny Square :

Info :

Begin: Using larger hook, form a Magic Loop. (Alternative: ch 4, sl st into first ch to make a loop)

Round 1 :

Ch 3 (counts as a dc), work 15 more dc in the ring; join with a sl st to the top of the beginning ch-3. (16 dc)

Round 2 :

Ch 1, puff st in the same st and in each dc around; join with a sl st to the first puff st. (16 puff sts)

Round 3 :

Ch 2, (cluster st, ch 2) in the first ch-1 sp and in each ch-1 sp around; join with a sl st to the first cluster st of the round. (16 cluster sts)

Round 4 :

Entire round is worked into ch-2 sps between clusters. Ch 3, 2 dc in the same sp, *(3 tr, ch 2, 3 tr), 3 dc, 3 hdc, 3 dc; rep from * around omitting last 3 dc at the end, join to top of beg ch-3. 15 sts on each side between each ch-2 sp. Fasten off.

โ€” Size Notes & Square Quantities :

Infos :

4 mm hook = 4 x 4" square. 5 mm hook = 4.5 x 4.5" square. Make 40 squares for the body and 32 squares for sleeves (or quantity required for size adjustments).

Info :

Size adjustments: To make the sweater wider, add 5 squares to each side to the back and front panels. To make the sweater longer, add 7 more squares at the bottom of the front and back panels. To make the sleeves wider, add 4 more squares to each side.

โ€” Shoulder :

Info :

Switch to contrast color yarn.

Front & Back panel :

In the 2nd square inside the body, sl st in between the 2nd and 3 cluster, ch 1, sc in the same sp.

Row 1 :

Working towards corner, Sc 24 sts. Ch 1 turn. Repeat for 3 more rows.

Info :

Repeat for the opposite shoulder.

โ€” Assembly :

Info :

Switch to contrast color yarn. Front & Back panel: Lay out 20 (wider: 35) squares in a grid. 5 (wider: 7) squares across by 4 (longer: 5) squares long.

Seaming :

Work horizontal seams first in one direction. Insert hook into 2 corners, sl st corners together, ch 1, 2 sc in corner. Cont 1 sc in each st to next corner. 2 sc at each of the corners to end.

Info :

This pattern is worked into 4 panels. Granny squares are connected through sc, then ribbing is added. All panel assembly is done with sc.

โ€” Whole Body Assembly :

Info :

Whole Body Assembly (done with sc).

Row 3 :

Sc blo in each st to body, sc in next 2 sts of body, turn. (15 sts)

Info :

Repeat Rows 2-3 until all body sts are used around bottom of sweater.

โ€” Ribbing for Bottom :

Info :

Switch to smaller hook & contrast color yarn.

Row 1 :

Sl st into bottom corner of front panel, ch 1. Sc into each st around the whole body opening sl st into first sc. Ch 16.

Ribbing Row 1 :

Sc in the second ch from hook and each ch to body, sc in the next 2 sts of body, turn.

Ribbing Row 2 :

Sk 2 sts in the body, sc blo each st across ribbing, ch 1, turn.

โ€” Ribbing for Collar :

Info :

Switch to smaller hook & contrast color yarn.

Row 1 :

Sl st into the color sp, ch 1. Sc into each st around the whole body opening sl st into first sc. Ch 8.

Row 1 (rib) :

Sc in the second ch from hook and each ch to body, sc in the next 2 sts of body, turn.

Row 2 :

Sk 2 sts in the body, sc blo each st across ribbing, ch 1, turn.

Row 3 :

Sc blo in each st to body, sc in next 2 sts of body, turn. (7 sts)

Info :

Repeat Rows 2-3 until all body sts are used around the neck opening.

โ€” Ribbing for Sleeves :

Info :

Foundation for Ribbing: Switch to smaller hook.

Sleeve Cinching Round 1 :

Insert hook into bottom of sleeve. Ch 1, sc in each st and each ch-sp, sl st to first sc.

Round 2 :

Ch 1, sc2tog around, sl st in first st.

Making the Cuff :

Ch 11

Row 1 :

Sc in the second ch from hook and each ch to body, sc in the next 2 sts of body, turn. (10 sts)

Row 2 :

Sk 2 sts in the body, sc blo each st across ribbing, ch 1, turn.

Row 3 :

Sc blo in each st to body, sc st in next 2 sts of body, turn.

Info :

Repeat Rib Rows 2-3 as for other sections until all sleeve sts are used. Fasten off leaving a tail to sew edges of ribbing together (through blo of last row).

โ€” Finishing :

Info :

Fasten off, sew in ends.

Assembly Instructions

  • Lay out front and back panels as a grid of 5 squares across by 4 squares long (20 squares); for wider size use 7 across by 5 long as noted in sizing. Arrange sleeve panels to the sides before seaming.
  • Seaming: Work horizontal seams first in one direction; insert hook into two corner stitches, sl st corners together, ch 1, work 2 sc in the corner, then 1 sc in each stitch to the next corner and 2 sc in corner to finish.
  • Join panels to form whole body: use sc across panel seams, then work horizontal and vertical seams to create the body and sleeve openings; ensure panels are aligned square to square.
  • Ribbing attachment: With smaller hook and contrast yarn, sl st into corner, ch and work required number of stitches around the whole body opening, then work ribbing rows (sc in second ch, sc to body, sc blo across ribbing) until ribbing reaches desired depth.
  • Sleeve ribbing: Cinch the sleeve bottom with a round of sc2tog then work the cuff ribbing (foundation chain, sc into chain, then rib rows sc blo) and sew the short ends of the ribbing together to form the cuff.

Important Notes

  • ๐Ÿ’กBlock squares before assembly if using natural fibers to ensure accurate sizing and neat joins.
  • ๐Ÿ’กUse stitch markers to keep track of rounds and join points, especially when assembling panels and working ribbing.
  • ๐Ÿ’กWork with consistent tension and check gauge by making a test square so your finished sweater matches the indicated measurements.

This patchwork sweater pattern turns sunburst granny squares into a modern, wearable statement piece. Customize colors and placement to make it uniquely yours and enjoy the satisfaction of piecing it together like a cozy puzzle. Whether you make a bold, colorful version or a soft neutral sweater, it will become a favorite in your wardrobe. ๐Ÿงถโœจ

You ask,

we answer.

FAQs

What size will the finished piece be?

This pattern is written as one size with a flatlay body measurement of approximately 20" across and a length of 22", with sleeves measuring about 8" and bottom ribbing 4"; see sizing notes to adjust.

Can I change the yarn weight or hook size?

Yes โ€” changing yarn weight or hook size will change the square size and the final sweater measurements; use a gauge swatch and adjust the number of squares or panel layout accordingly.

Do I need to block squares before assembly?

Blocking is recommended for natural fibers to square up motifs and make seaming more accurate, but you can skip it for acrylic if you prefer a more relaxed finish.

How long does this project typically take to complete?

This is a multi-day project; expect about 12-15 hours depending on your speed, number of squares, and how much time you spend on blocking and assembly.