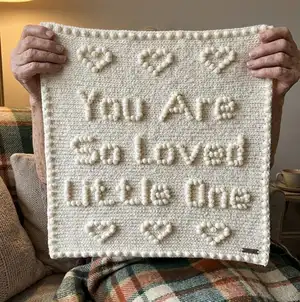
Make a cozy, textured 'So Loved' crochet blanket featuring puff-stitch lettering and a simple single crochet background. This pattern walks you through every row and includes a chart so you can follow along visually or by stitch counts. Perfect for a heartfelt baby gift or a comforting lap blanket, the design is customizable to your preferred yarn and size. Enjoy creating a soft, handmade keepsake that says "You Are So Loved."
Progress Tracker
0% Complete
— Information :
Infos :
Needles : I used a 4mm hook for the blanket in the photo, my tension is on the looser side. If your tension is tight I would suggest going up in size with your hook. With a light worsted yarn a 4mm to 5mm will be fine, with a worsted yarn ( aran ) a 5mm to 5.5mm will also work perfectly, making it a much thicker bigger blanket. Yarn : I used Stylecraft 100% premium acrylic dk 100g balls ( light worsted yarn ) in shade cream ~ 1005, I used 275g in total. Finished blanket size : Approximately 28 inches X 28inches. Depending on your tension, hook size and yarn used the size may vary. Gauge : 17 stitches x 18 rows = 4 inch square. Adjust hook size if wanting the same size blanket in the photo. Terminology ( US & UK ) : Ch(s) ~ Chain(s). Sc ~ Single crochet ( UK double crochet ). Ps ~ Puff stitch. St(s) ~ Stitch(es). ( ) ~ Work instructions within brackets as many times as directed. Yo ~ Yarn over ( uk Yoh ~ Yarn over hook ). Pattern notes : Pattern is in US terminology. Gauge is not important for this pattern. Beginning chain is not included in the total stitch count. Every row ends with 103 stitches with a Ch 1 and turn. Always start the first Sc of each row into the first stitch that the ch1 came from. For best results it is best to use a plain solid colour. If you're reading the pattern from the chart, it is worked from the bottom of the chart upwards, and left to right. Add a stitch at the end of the chain row and start the 1st row from the 2nd chain from the hook, ch 1 at the end of each row. Puff stitches are created on the wrong side of the blanket and will pop out into the front of the blanket. If your puff stitch is not popping forward try a tighter than normal sc into the next stitch ( this sc will be part of the pattern, not an extra stitch added ). For pattern support please contact me via the website you purchased this pattern from. I had a left handed tester test this pattern for me, they found that following the lines backwards worked better for them, as this is my first left hand tester I can not confirm that this works. How to create a Puff stitch : Yarn over and pull up a loop, 6 times ( 13 loops on the hook) yarn over and pull through 12 loops leaving 2 loops on the hook ( if you're finding it hard to pull through the 12 loops you may need to pull up a little higher when you yarn over, making them looser ) then yarn over and pull through the remaining 2 loops, sc into the next stitch to lock down the puff stitch, ( this sc will be part of the pattern, not an extra stitch added ) the puff stitch will naturally pop out on the right side of the blanket creating the puff stitch. Chain - 104 sts, Each row after this will end with 103 sts including the ps stitch. All even rows throughout this pattern are Sc into all sts.
— Blanket :
Row 1 :
Sc into 2nd loop from the hook, ( into the back bump of the Ch to create a nice edge to add your border to), continue to sc into the back bump for the rest of the chain. Ch1 and turn.
Row 3 :
Sc 1 st, ( ps, sc 3 sts ) x 25, ps, sc 1 st, ch 1, turn.
Row 5 :
Sc into all sts, Ch 1, turn.
Row 7 :
Sc 1 st, ps, sc 99 sts, ps, sc 1 st, ch 1, turn.
Row 9 :
Sc into all sts, ch 1, turn.
Row 11 :
Sc 1 st, ps, sc 23 sts, ps, sc 25 sts, ps, sc 25 sts, ps, sc 23 sts, ps, sc 1 st, ch 1, turn.
Row 13 :
Sc 23 sts, ps, sc 3 sts, ps, sc 21 sts, ps, sc 3 sts, ps, sc 21 sts, ps, sc 3 sts, ps, sc 23 sts, ch 1, turn.
Row 15 :
Sc 1 st, ps, sc 19 sts, ps, sc 7 sts, ps, sc 17 sts, ps, sc 7 sts, ps, sc 17 sts, ps, sc 7 sts, ps, sc 19 sts, ps, sc 1 st, ch 1, turn.
Row 17 :
Sc 19 sts, ps, sc 11 sts, ps, sc 13 sts, ps, sc 11 sts, ps, sc 13 sts, ps, sc 11 sts, ps, sc 19 sts, ch 1, turn.
Row 19 :
Sc 1 st, ps, sc 17 sts, ps, sc 5 sts, ps, sc 5 sts, ps, sc 13 sts, ps, sc 5 sts, ps, sc 5 sts, ps, sc 17 sts, ps, sc 1 st, ch 1, turn.
Row 21 :
Sc 21 sts, ps, sc 1 st, ps, sc 3 sts, ps, sc 1 st, ps, sc 17 sts, ps, sc 1 st, ps, sc 3 sts, ps, sc 1 st, ps, sc 17 sts, ps, sc 1 st, ps, sc 3 sts, ps, sc 1 st, ps, sc 21 sts, ch 1, turn.
Row 23 :
Sc 1 st, ps, sc 99 sts, ps, sc 1 st, ch 1, turn.
Row 25 :
Sc into all sts, ch 1, turn.
Row 27 :
Sc 1 st, ps, sc 99 sts, ps, sc 1 st, ch 1, turn.
Row 29 :
Sc into all sts, ch 1, turn.
Row 31 :
Sc 1 st, ps, sc 99 sts, ps, sc 1 st, ch 1, turn.
Row 33 :
Sc 10 sts, ( ps, sc 1 st ) x 2, ps, sc 3 sts, ps, sc 7 sts, ( ps, sc 1 st ) x 2, ps, sc 7 sts, ( ps, sc 1 st ) x 2, ps, sc 3 sts, ps, sc 4 sts, ( ps, sc 1 st ) x 2, ps, sc 11 sts, ( ps, sc 1 st ) x 2, ps, sc 4 sts, ps, sc 5 sts, ps, sc 4 sts, ( ps, sc1 st ) x 2, ps, sc 11 sts, ch 1, turn.
Row 35 :
Sc 1 st, ps, sc 7 sts, ps, sc 8 sts, ps, sc 5 sts, ps, sc 11 sts, ps, sc 9 sts, ps, sc 3 sts, ps, sc 15 sts, ps, sc 5 sts, ps, sc 3 sts, ps, sc 5 sts, ps, sc 3 sts, ps, sc 14 sts, ps, sc 1 st, ch 1, turn.
Row 37 :
Sc 9 sts, ps, sc 8 sts, ps, sc 5 sts, ps, sc 11 sts, ps, sc 9 sts, ps, sc 3 sts, ( ps, sc 1 st ) x 3, ps, sc 9 sts, ps, sc 5 sts, ps, sc 3 sts, ps, sc 5 sts, ps, sc 3 sts, ( ps, sc 1 st ) x 3, ps, sc 10 sts, ch 1, turn.
Row 39 :
Sc 1 st, ps, sc 7 sts, ps, sc 8 sts, ps, sc 5 sts, ps, sc 11 sts, ps, sc 9 sts, ps, sc 3 sts, ps, sc 5 sts, ps, sc 9 sts, ps, sc 5 sts, ps, sc 3 sts, ps, sc 5 sts, ps, sc 8 sts, ps, sc 1 st, ch 1, turn.
Row 41 :
Sc 9 sts, ps, sc 8 sts, ps, sc 3 sts, ( ps, sc 1 st ) x 2, ps, sc 7 sts, ( ps, sc 1 st ) x 2, ps, sc 7 sts, ps, sc 4 sts, ( ps, sc 1 st ) x 2, ps, sc 10 sts, ps, sc 5 sts, ps, sc 4 sts, ( ps, sc 1 st ) x 2, ps, sc 5 sts, ( ps, sc 1 st ) x 2, ps, sc 11 sts, ch 1, turn.
Row 43 :
Sc 1 st, ps, sc 7 sts, ps, sc 14 sts, ps, sc 11 sts, ps, sc 9 sts, ps, sc 19 sts, ps, sc 5 sts, ps, sc 28 sts, ps, sc 1 st, ch 1, turn.
Row 45 :
Sc 9 sts, ps, sc 8 sts, ps, sc 5 sts, ps, sc 11 sts, ps, sc 9 sts, ps, sc 20 sts, ( ps, sc 1 st ) x 2, ps, sc 31 sts, ch 1, turn.
Row 47 :
Sc 1 st, ps, sc 99 sts, ps, sc 1 st, ch 1, turn.
Row 49 :
Sc into all sts, ch 1, turn.
Row 51 :
Sc 1 st, ps, sc 99 sts, ps, sc 1 st, ch 1, turn.
Row 53 :
Sc into all sts, ch 1, turn.
Row 55 :
Sc 1 st, ps, sc 99 sts, ps, sc 1 st, ch 1, turn.
Row 57 :
Sc 15 sts, ( ps, sc 1 st ) x 3, ps, sc 6 sts, ( ps, sc 1 st ) x 2, ps, sc 11 sts, ( ps, sc 1 st ) x 2, ps, sc 4 sts, ( ps, sc 1 st ) x 2, ps, sc 8 sts, ps, sc 8 sts, ( ps, sc 1 st ) x 2, ps, sc 5 sts, ( ps, sc 1 st ) x 2, ps, sc 13 sts, ch 1, turn.
Row 59 :
Sc 1 st, ps, sc 21 sts, ps, sc 3 sts, ps, sc 5 sts, ps, sc 9 sts, ps, sc 8 sts, ps, sc 5 sts, ps, sc 6 sts, ps, sc 1 st, ps, sc 6 sts, ps, sc 9 sts, ps, sc 4 sts, ps, sc 11 sts, ps, sc 1 st, ch 1, turn.
Row 61 :
Sc 23 sts, ps, sc 3 sts, ps, sc 5 sts, ps, sc 9 sts, ps, sc 8 sts, ps, sc 5 sts, ps, sc 3 sts, ps, sc 5 sts, ( ps, sc 1 st ) x 3, ps, sc 3 sts, ps, sc 4 sts, ps, sc 13 sts, ch 1, turn.
Row 63 :
Sc 1 st, ps, sc 13 sts, ( ps, sc 1 st ) x 3, ps, sc 5 sts, ps, sc 5 sts, ps, sc 9 sts, ps, sc 8 sts, ps, sc 5 sts, ps, sc 4 sts, ps, sc 5 sts, ps, sc 4 sts, ps, sc 5 sts, ps, sc 3 sts, ps, sc 4 sts, ps, sc 11 sts, ps, sc 1 st, ch 1, turn.
Row 65 :
Sc 13 sts, ps, sc 14 sts, ( ps, sc 1 st ) x 2, ps, sc 10 sts, ps, sc 9 sts, ( ps, sc 1 st ) x 2, ps, sc 4 sts, ps, sc 7 sts, ps, sc 4 sts, ( ps, sc 1 st ) x 2, ps, sc 5 sts, ( ps, sc 1 st ) x 2, ps, sc 13 sts, ch 1, turn.
Row 67 :
Sc 1 st, ps, sc 11 sts, ps, sc 29 sts, ps, sc 45 sts, ps, sc 11 sts, ps, sc 1 st, ch 1, turn.
Row 69 :
Sc 15 sts, ( ps, sc 1 st ) x 3, ps, sc 21 sts, ps, sc 45 sts, ps, sc 13 sts, ch 1, turn.
Row 71 :
Sc 1 st, ps, sc 99 sts, ps, sc 1 st, ch 1, turn.
Row 73 :
Sc into all sts, ch 1, turn.
Row 75 :
Sc 1 st, ps, sc 99 sts, ps, sc 1 st, ch 1, turn.
Row 77 :
Sc into all sts, ch 1, turn.
Row 79 :
Sc 1 st, ps, sc 99 sts, ps, sc 1 st, ch 1, turn.
Row 81 :
Sc 21 sts, ps, sc 7 sts, ( ps, sc 1 st ) x 2, ps, sc 5 sts, ( ps, sc 1 st ) x 2, ps, sc 10 sts, ps, sc 11 sts, ps, sc 3 sts, ps, sc 8 sts, ( ps, sc 1 st ) x 2, ps, sc 19 sts, ch1, turn.
Row 83 :
Sc 1 st, ps, sc 19 sts, ps, sc 6 sts, ps, sc 5 sts, ps, sc 3 sts, ps, sc 5 sts, ps, sc 10 sts, ps, sc 9 sts, ps, sc 4 sts, ps, sc 7 sts, ps, sc 22 sts, ps, sc 1 st, ch 1, turn.
Row 85 :
Sc 21 sts, ps, sc 6 sts, ps, sc 5 sts, ps, sc 3 sts, ps, sc 5 sts, ps, sc 11 sts, ( ps, sc 1 st ) x 4, ps, sc 5 sts, ps, sc 7 sts, ( ps, sc 1 st ) x 3, ps, sc 18 sts, ch 1, turn.
Row 87 :
Sc 1 st, ps, sc 19 sts, ps, sc 6 sts, ps, sc 5 sts, ps, sc 3 sts, ps, sc 5 sts, ps, sc 12 sts, ps, sc 5 sts, ps, sc 6 sts, ps, sc 7 sts, ps, sc 5 sts, ps, sc 16 sts, ps, sc 1 st, ch 1, turn.
Row 89 :
Sc 20 sts, ps, sc 1 st, ps, sc 6 sts, ( ps, sc 1 st ) x 2, ps, sc 4 sts, ps, sc 5 sts, ps, sc 13 sts, ps, sc 3 sts, ps, sc 7 sts, ( ps, sc 1 st ) x 2, ps, sc 4 sts, ( ps, sc 1 st ) x 2, ps, sc 19 sts, ch 1, turn.
Row 91 :
Sc 1 st, ps, sc 17 sts, ps, sc 3 sts, ps, sc 35 sts, ps, sc 1 st, ps, sc 39 sts, ps, sc 1 st, ch 1, turn.
Row 93 :
Sc 18 sts, ps, sc 5 sts, ps, sc 35 sts, ps, sc 42 sts, ch 1, turn.
Row 95 :
Sc 1 st, ps, sc 99 sts, ps, sc 1 st, ch 1, turn.
Row 97 :
Sc into all sts, ch 1, turn.
Row 99 :
Sc 1 st, ps, sc 99 sts, ps, sc 1 st, ch 1, turn.
Row 101 :
Sc into all sts, ch 1, turn.
Row 103 :
Sc 1 st, ps, sc 99 sts, ps, sc 1 st, ch 1, turn.
Row 105 :
Sc 25 sts, ps, sc 25 sts, ps, sc 25 sts, ps, sc 25 sts, ch 1, turn.
Row 107 :
Sc 1 st, ps, sc 21 sts, ps, sc 3 sts, ps, sc 21 sts, ps, sc 3 sts, ps, sc 21 sts, ps, sc 3 sts, ps, sc 21 sts, ps, sc 1 st, ch 1, turn.
Row 109 :
Sc 21 sts, ps, sc 7 sts, ps, sc 17 sts, ps, sc 7 sts, ps, sc 17 sts, ps, sc 7 sts, ps, sc 21 sts, ch 1, turn.
Row 111 :
Sc 1 st, ps, sc 17 sts, ps, sc 11 sts, ps, sc 13 sts, ps, sc 11 sts, ps, sc 13 sts, ps, sc 11 sts, ps, sc 17 sts, ps, sc 1 st, ch 1, turn.
Row 113 :
Sc 19 sts, ps, sc 5 sts, ps, sc 5 sts, ps, sc 13 sts, ps, sc 5 sts, ps, sc 5 sts, ps, sc 13 sts, ps, sc 5 sts, ps, sc 5 sts, ps, sc 19 sts, ch 1, turn.
Row 115 :
Sc 1 st, ps, sc 19 sts, ps, sc 1 st, ps, sc 3 sts, ps, sc 1 st, ps, sc 17 sts, ps, sc 1 st, ps, sc 3 sts, ps, sc 1 st, ps, sc 19 sts, ps, sc 1 st, ch 1, turn.
Row 117 :
Sc into all sts, ch 1, turn.
Row 119 :
Sc 1 st, ps, sc 99 sts, ps, sc 1 st, ch 1, turn.
Row 121 :
Sc into all sts, ch 1, turn.
Row 123 :
Sc 1 st, ( ps, sc 3 sts ) x 25, ps, sc 1 st, ch 1, turn.
Row 125 :
Sc into all sts, cast off.
Info :
Border: To finish off the blanket I like to do a row of sc down the left and right front sides, to tidy the raw edges. On this blanket I chose not to add a full border, the option is yours. To finish I like to do a gentle block ( which is optional ) With acrylic yarn it's best to be very gentle when blocking as the yarn can over stretch with no return, I start with the top and work around the blanket very gently.
Info :
Copyright: Thank you so much for purchasing my pdf pattern. It means a lot, I would love to hear your feedback. Follow me on Instagram & Facebook to tag and share your beautiful makes. Via designs_by_hookeduponcrochet or hookeduponcrochet Please do not copy, redistribute or sell my pattern in any way. You are more than welcome to sell your finished blanket. I just ask that you please credit me as the designer. Thank you for understanding.
This 'So Loved' blanket pattern was created to celebrate the sweet reminder every little one needs — you are so loved. It combines a simple single crochet background with textured puff stitches for charming raised lettering and hearts. Make it in neutral cream as shown or customize with your favorite shade to make a meaningful keepsake. 🧶💖✨