🧢 Beautiful ✨ Detailed πŸ’ Adorable

Sorting Bees Amigurumi Pattern

Sorting Bees Amigurumi Pattern
4.5β˜… Rating
5-7 Hours Time Needed
1.2K Made This
βœ‚οΈ

Intermediate Level

Ideal for those with basic crochet experience, featuring slightly more advanced stitches and techniques to expand your skills.

⏱️

Weekend Treat

Takes 5-7 hours, making it an enjoyable project to finish over a couple of days.

🧸

Cute Companion

An adorable friend to cherish, handcrafted with love to bring comfort and joy for years to come.

About This Sorting Bees Amigurumi Pattern

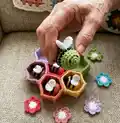
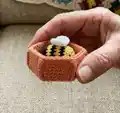
This pattern creates a complete sorting set made of seven hexagonal bowls, seven little bees with magnets and seven flowers for matching. It combines small amigurumi bees with flat flowers and small bowls that join to form a honeycomb-like play surface. The pattern includes magnet pockets, color changes and step-by-step round instructions to make assembly straightforward.

Sorting Bees Amigurumi Pattern crochet pattern - detailed view of completed project

You will make multiple identical pieces so this is a great stash-busting project in bright rainbow shades. Ideal for gifting or a hands-on learning toy for little ones.

Why You'll Love This Sorting Bees Amigurumi Pattern

I absolutely love this pattern because it combines playful design with a clever magnetic sorting feature that kids adore. I enjoy how the small repetitive pieces are soothing to crochet while still offering variety in color and finishing. Sewing the magnet pockets and fitting the bees into the bowls always feels satisfying and rewarding. The finished set is both beautiful and practical, and I love gifting these to families who appreciate handmade learning toys.

Sorting Bees Amigurumi Pattern step 1 - construction progress Sorting Bees Amigurumi Pattern step 2 - assembly progress Sorting Bees Amigurumi Pattern step 3 - details and accessories Sorting Bees Amigurumi Pattern step 4 - final assembly and finishing

Switch Things Up

I love how easy it is to customize this set with different colors and themes; try pastels for a softer look or bold neons for maximum contrast.

I often change the bee stripes patternβ€”use three-color stripes or single-color bees for a modern style.

You can make the bowls larger or smaller by adding or removing increase rounds; test gauge with scrap yarn first.

I sometimes replace the magnets with velcro or snap buttons for a non-magnetic version suitable for very young children.

If I want a sturdier bowl I use a slightly thicker yarn and a tighter tension, or insert a thin cardboard disc at the bottom before closing to give structure.

I also like to embroider faces or add tiny felt details like antennae or a little scarf to personalize each bee.

For travel-friendly sets I make mini versions using thinner yarn and a smaller hook to create tiny bees and flowers that pack easily.

I enjoy creating matching gift sets by making small drawstring bags in the same colors to store the pieces when not in use.

Try different magnet sizes and strengths and mark which polarity you used so all magnets are oriented the same way across the set to ensure reliable connections.

Finally, I recommend experimenting with yarn texturesβ€”cotton gives crisp shapes while acrylic can be softer and more durable for play.

Common Mistakes & How to Fix Them

βœ— Skipping stitch markers during rounds causes you to lose track of the start of rounds; place a marker at the beginning of each round and move it as you work to avoid counting mistakes. βœ— Overstuffing the bees makes closing the ring difficult and can distort shaping; stuff gradually as you go and use small amounts for a smooth finish. βœ— Not securing magnets properly risks choking hazards or loose parts; insert magnets into the pocket and sew the pocket securely several times, testing magnet orientation before finishing. βœ— Changing colors incorrectly while working stripes can leave loose loops and gaps; carry the yarn neatly and finish the last pull-through of the previous color into the new color to keep tidy color changes. βœ— Forgetting to work in back loops only when instructed flattens the hexagon edges; carefully work BLO where specified to get the polygon walls and defined edges.

Sorting Bees Amigurumi Pattern

Create a colorful educational sorting toy with this charming amigurumi set. You will crochet seven hexagonal bowls, seven bees with magnet pockets, and seven matching flowers to sort and play. The pattern uses simple shapes, color changes and magnets to build a tactile learning toy perfect for kids and gift-making. Clear step-by-step rounds and helpful tips guide you through each piece.

Intermediate 5-7 Hours

Materials Needed for Sorting Bees Amigurumi Pattern

β€” Main Fabric

  • 01
    280 grams total yarn (10 ply recommended)
  • 02
    35 g for each rainbow color (7 colors total)
  • 03
    20 g white for wings and flower centers
  • 04
    15 g black for bee stripes and facial details
  • 05
    I used DROPS PARIS (10 ply) but any similar yarn works

β€” Tools Required

  • 01
    Crochet hook size 2.5 mm (UK 12 / C2 US) recommended
  • 02
    Optional: Crochet hook up to 5.0 mm (UK 6 / H8 US) if you want looser fabric
  • 03
    Polyester fiberfill for stuffing
  • 04
    Small round magnets, approximately 2 cm (0.8 inches) diameter (I used 28 pcs)
  • 05
    Scissors
  • 06
    Needle for sewing and embroidering features
  • 07
    Stitch markers
  • 08
    Optional: safety eyes (around 5 mm) if desired

Progress Tracker

0% Complete

β€” Bowls :

Info :

Make 7 in your favorite rainbow colors.

Info :

Tip! Before pulling the tail to close the ring, insert the hook in the first stitch; in this way you will keep it loose enough for the hook to be inserted in the next row.

Round 1 :

MR + sc X 6 => 6

Round 2 :

inc X 6 => 12

Info :

From this row down you should make "special increases - splnc" instead of normal ones. A special increase is a [sc + ch + sc] in the same stitch. You should add the extra chain in the increase to make your bowl more like a polygon. Do not count or work in the extra chain when working the next rows – it just helps with the shape so just ignore it.

Round 3 :

(1 sc + 1 splnc) X 6 => 18

Round 4 :

(2 sc + 1 splnc) X 6 => 24

Round 5 :

(3 sc + 1 splnc) X 6 => 30

Round 6 :

(4 sc + 1 splnc) X 6 => 36

Round 7 :

(5 sc + 1 splnc) X 6 => 42

Round 8 :

BLO sc X 48 => 48

Round 9-16 :

sc X 48 => 48

Info :

Now we are going to do the 6 edges on the sides of the bowls. Repeat X 6 for each edge: SL X 8. Then, like in the 3rd picture below, go down with 9 X sc (you will be working over rows 16-8) (make sure your last sc is in the front loop of row 8). Go back up with 10 X SL – the slip stitches should be on the back of the single chains you just made (the last one should be at the top).

Info :

Optionally you can sew the bowls together like I did. There is no specific technique for this, but you will need a lot of patience.

β€” Bee :

Info :

Make 7 bees, one for every bowl color. Each bee includes a magnet socket, two wings and a striped body. Make sure magnets are inserted in the same direction in all bees for consistent attraction to flowers.

Make the magnet support :

R1: MR + sc X 6 => 6, slip stitch in the first sc, leave a tail for sewing. (the magnet should be small enough to fit in this pocket; however if yours is bigger just make an extra row to cover it -> R2: inc X 6 => 12)

Make 2 wings (white) :

R1: MR + sc X 6 => 6. R2: inc X 6 => 12, slip stitch in the first sc, leave a tail for sewing; sew the two wings together and leave the tail for sewing into the bee.

Make the bee (with main color) :

R1: MR + sc X 6 => 6

Round 2 :

inc X 6 => 12

Round 3 :

(1 sc + 1 inc) X 6 => 18

Info :

Stop and sew the magnet socket (with the magnet inside) around rows 1/2. Make sure all your magnets are inserted in the same direction. To test this, use another magnet that should connect with all the bees on the same side.

Round 4-5 :

sc X 18 => 18

Info :

Sew also the eyes in increases 1 and 3 of row 2, using black needle. If you choose safety eyes go for the smallest you can find (5 mm or smaller).

With black :

Round 6: sc X 18 => 18

Info :

When changing the color: at row 6, in the last single crochet, make half of the stitch with your main color but then finish with the other color (black in this case) to create neat stripes.

With main color :

Round 7: sc X 18 => 18

With black :

Round 8: sc X 18 => 18

With main color :

Round 9: sc X 18 => 18

With black :

Round 10: (4 sc + 1 dec) X 3 => 15

Info :

Sew the wings between rows 7 and 9. Make sure they are centered between the eyes. Start stuffing the bee, stuff as you go.

With main color :

Round 11: (3 sc + 1 dec) X 3 => 12

With black :

Round 12: (2 sc + 1 dec) X 3 => 9

Round 13 :

(1 sc + 1 dec) X 3 => 6

Round 14 :

Close the bee with a needle: insert a needle in the front loop of every stitch from the exterior to the middle of the stitch; after covering all 6 stitches pull firmly to close the ring. Insert the needle a couple of extra times under the stitches to make sure it's well secured. Hide the yarn.

β€” Flower :

Info :

Make 7 flowers, one for every bowl color. Each flower includes a magnet support at the back so it will attach to the bees in the correct orientation.

Make the magnet support :

R1: MR + sc X 6 => 6, slip stitch in the first sc, leave a tail for sewing. (the magnet should be small enough to fit in this pocket; however if yours is bigger just make an extra row to cover it -> R2: inc X 6 => 12)

Make the flower (with white) :

R1: MR + dc X 13 => 13, sl stitch in the second DC. We will not work on the first DC, so we will consider 12 DC, we will use them for 6 petals.

With main color :

Change color at the slip stitch as learned before. REPEAT 6 times for each petal: Sc X 2 in the current stitch. 3 TREBLE CROCHET in the next stitch, sc X2 in the current stitch. Slip stitch in the next stitch.

Info :

Sew the magnet cover, containing the magnet in the back of the flower – make sure the magnet is in the correct direction – to test this just place the bee in front of the flower and they should connect like in the picture.

Info :

Your Sorting toy is now finished!

Assembly Instructions

  • Sew the magnet socket into the bee around rows 1-2, inserting the magnet and securing the pocket with several passes of the needle so it cannot fall out.
  • Sew the two white wings together and attach them centered between rows 7 and 9 on the bee; check placement against the eyes before securing.
  • Sew the eyes (embroidered or safety eyes) into increases 1 and 3 of row 2 of the bee and hide ends securely.
  • Sew the magnet cover to the back of each flower, ensuring the magnet faces the correct direction so bees attach consistently.
  • Optionally sew adjacent bowls together edge to edge to form a honeycomb cluster, pinning pieces in place before stitching for even alignment.

Important Notes

  • πŸ’‘Use stitch markers to keep track of the beginning of each round, especially during increases and color changes.
  • πŸ’‘Make sure magnets are well secured and completely enclosed; test orientation of each magnet before fully closing the pocket.
  • πŸ’‘Supervise children while playing with this set due to small magnets and small parts; ensure magnets meet safety requirements for your region.
  • πŸ’‘When changing colors for bee stripes work the last pull-through of the previous color into the new color to secure the yarn and prevent gaps.

Thank you for making this joyful Sorting Bees play set β€” a colorful, magnetic, and educational toy to delight little hands. The set is perfect for playtime, learning colors and fine motor skills, and makes a cheerful handmade gift. 🧢🐝✨

You ask,

we answer.

FAQs

What size will the finished pieces be?

Each bee measures approximately 3-4 cm across and the bowls measure roughly 6-7 cm across depending on yarn tension and hook size.

Can I use different yarn weights or hooks?

Yes, you can use different yarn weights; changing yarn weight and hook size will change final size. Use a suitable hook for your chosen yarn and adjust stuffing and magnet size if necessary.

How many magnets do I need?

The designer used 28 small magnets (2 cm diameter) because they were weak; if you have stronger magnets you may only need 14. Make sure magnets are secured inside pockets.

Is this pattern suitable for beginners?

This pattern is rated intermediate because it includes color changes, sewing magnet pockets, and working special increases. Basic crochet experience is recommended.

How do I ensure the bees attach to flowers correctly?

Insert all magnets in the bees in the same orientation and the magnet in the flower in the matching orientation. Test pairing with a spare magnet to confirm correct direction before final sewing.