🧢 Beautiful ✨ Detailed πŸ’ Adorable

Ragdoll Pocket Jellyfish Amigurumi Pattern

Ragdoll Pocket Jellyfish Amigurumi Pattern
4.7β˜… Rating
2-3 Hours Time Needed
3.5K Made This
βœ‚οΈ

Beginner Friendly Level

Perfect for those just starting their crochet journey, with clear instructions and simple techniques

⏱️

Bite-Sized Project

Finishes in 2-4 hoursβ€”perfect for an afternoon of creative relaxation.

🎁

Tiny Treasure

Small, sweet, and gift-worthy creations that fit perfectly in the palm of your hand with detailed charm.

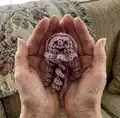
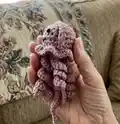
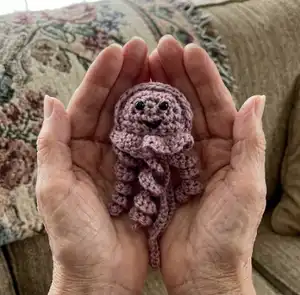
About This Ragdoll Pocket Jellyfish Amigurumi Pattern

This pattern creates a small pocket-sized jellyfish amigurumi with a soft domed head, ruffled rim and spiral tentacles. It is worked in two flat body pieces that are joined, stuffed and edged to create a little 3D jellyfish. The pattern uses DK yarn and a 3.5mm hook, with simple stitches like SC, DC, SLST and basic increases. A sweet embroidered V-shaped mouth and tiny safety eyes give your jellyfish lots of personality.

Ragdoll Pocket Jellyfish Amigurumi Pattern crochet pattern - detailed view of completed project

Perfect for using leftover yarn, keyring embellishments or as a tiny gift for friends and family. Clear step-by-step instructions and photos make this a friendly project to complete in an afternoon.

Why You'll Love This Ragdoll Pocket Jellyfish Amigurumi Pattern

I absolutely love this pattern because it turns simple stitches into an irresistibly cute tiny jellyfish that fits in your palm. I enjoy how quick it is to make β€” you can finish one in a couple of hours and make several in an afternoon. The spiral tentacles add playful movement and texture, and I always have fun choosing different colorways to match my mood. Sewing the pieces together and adding the tiny embroidered smile is the part that truly brings the character to life for me.

Ragdoll Pocket Jellyfish Amigurumi Pattern step 1 - construction progress Ragdoll Pocket Jellyfish Amigurumi Pattern step 2 - assembly progress Ragdoll Pocket Jellyfish Amigurumi Pattern step 3 - details and accessories Ragdoll Pocket Jellyfish Amigurumi Pattern step 4 - final assembly and finishing

Switch Things Up

I love experimenting with different yarns for this pattern; try a soft cotton for a washable jellyfish or a fuzzy yarn for a plush look.

I often change the color palette to create themed sets β€” pastel tones for baby gifts or bright neons for playful keychains.

To make a larger version, I switch to a thicker yarn and a larger hook; the shape stays the same but becomes more squishable.

I sometimes shorten or lengthen the chains for the tentacles to vary the silhouette and movement β€” shorter tentacles give a tidy look, longer ones are more dramatic.

I like adding a small keyring or lobster clasp before finishing so the jellyfish becomes a cute bag charm or zipper pull.

For eyes I sometimes use embroidered French knots or small safety eyes in different sizes to change the expression.

I also add tiny felt or crocheted accessories like a hat or bow to personalize the jellyfish as a gift.

If I want more stability I add a small disc of felt between the body halves before joining to keep the shape firm.

I sometimes use variegated yarn to get a lovely natural color shift without changing colors manually.

When gifting, I attach a small loop of ribbon or a gift tag and include care instructions so the receiver knows it can be gently hand washed.

Common Mistakes & How to Fix Them

βœ— Not counting stitches after increases or decreases can lead to incorrect shaping; count your stitches at the end of each row to confirm you have the correct total. βœ— Skipping the instruction to keep the yarn attached on the second body half causes unnecessary seams; do not fasten off on the second body part so you can join and continue without a visible break. βœ— Overstuffing the body will distort the shape and make sewing difficult; stuff gradually and gently until you reach a firm but slightly squeezable filling. βœ— Placing safety eyes too close together alters the expression of the jellyfish; add safety eyes as instructed on each side of the starting centre point and check placement before securing. βœ— Working with inconsistent tension makes the edges uneven when joining; maintain steady tension throughout and practice on a scrap if needed to match gauge and shape.

Ragdoll Pocket Jellyfish Amigurumi Pattern

Make a tiny, squishy Ragdoll Pocket Jellyfish you can carry in your pocket or give as a sweet handmade gift. This pattern uses simple stitches and creates a cuddly jellyfish with spiral tentacles and an embroidered smile. Perfect for using scrap yarn and quick makes, it includes step-by-step instructions and photos to guide you through assembly. Customize colors and add a keyring to turn it into a charming accessory.

Beginner Friendly 2-3 Hours

Materials Needed for Ragdoll Pocket Jellyfish Amigurumi Pattern

β€” Main Fabric

  • 01
    DK acrylic yarn (main color) - small amount suitable for a pocket-sized amigurumi
  • 02
    Cotton yarn (optional alternative to acrylic) - small amount
  • 03
    Black embroidery thread - small length for mouth detail
  • 04
    Polyester fibrefill or scraps of yarn for stuffing

β€” Tools Required

  • 01
    Crochet hook size 3.5mm
  • 02
    Black embroidery thread
  • 03
    1mm safety eyes (2 pieces)
  • 04
    Scissors
  • 05
    Metal yarn needle
  • 06
    Polyester fibrefill or scraps of yarn
  • 07
    Optional keyring

Progress Tracker

0% Complete

β€” Body (MAKE 2) :

Info :

slipknot, CH 2, SC 3 times in the 2nd CH from hook

R1 :

SC 2 times in each ST (6 sts total) CH 1, turn

R2 :

INC, SC 1, repeat until end of row (9 sts total), CH 1, turn

R3 :

INC, SC 2, repeat until end of row (13 sts total) CH 1

R4 :

starting from where the row ended and working on the bottom (the straight side) SC in 8 ST spaces to form a straight row (picture is marked to show which ST spaces)

R5 :

SC in each ST – CH 1, turn

R6 :

SC in each ST, fasten and cut yarn

Infos :

on the second body part don’t fasten yarn, add the safety eyes on each side of the starting centre point (the row above the straight row). bring both sides together and start to SC along the edges. stuff as you go. when reaching the straight part, SC only in the inside loops until closed. when that row is finished CH 1 and start working in the loops on the exterior.

Round 1 :

DC 3 times in each loop around (39 sts in total), SLST in the CH from the beginning of this row

Infos :

working in the middle row (the one in between the DC sts) make: SLST in first ST. SLST in next ST, CH 21, starting form 2nd CH SC 2 times in each CH, SLST back in the same ST. SLST in next ST, CH 28, starting form 2nd CH SLST in each CH, SLST back in the same ST. SLST in next ST. SLST in next ST, CH 21, starting form 2nd CH SC 2 times in each CH, SLST back in the same ST. SLST in next ST, CH 28, starting form 2nd CH SLST in each CH, SLST back in the same ST. SLST in next ST. SLST in next ST, CH 21, starting form 2nd CH SC 2 times in each CH, SLST back in the same ST, fasten, cut and weave in yarn tail.

Info :

with black thread add a mouth in V shape working through the back, make a knot and tuck in ends.

Assembly Instructions

  • On the second body part do not fasten off; add the safety eyes on each side of the starting centre point (the row above the straight row) before joining.
  • Bring both body sides together and SC along the edges to join, stuffing the jellyfish as you go so the shape fills evenly.
  • When you reach the straight part, SC only in the inside loops until closed; then CH 1 and continue working in the exterior loops to create the ruffled rim.
  • Work DC 3 times in each exterior loop around (39 sts total) and SLST into the CH from the beginning of that round to finish the ruffle edge.
  • Work tentacles by following the middle-row instructions: create chains (CH 21 and CH 28) and work back into those chains to form spiral tentacles; fasten off, cut and weave in tails and embroider a V-shaped mouth using black thread.

Important Notes

  • πŸ’‘On the second body piece do not fasten off so you can join pieces and continue without a visible seam.
  • πŸ’‘Stuff the body gradually while joining to avoid lumps and to maintain a smooth dome shape.
  • πŸ’‘When closing the straight edge, work only into the inside loops to ensure a neat top edge before creating the outer ruffle.
  • πŸ’‘Place safety eyes before fully closing the pieces and double-check spacing to achieve the desired expression.

This tiny Ragdoll Pocket Jellyfish makes a sweet, hand-made gift and a fun quick project for any maker. 🧢 Customize it with bright or muted yarns to match your style and add a keyring to create a portable charm. 🎁 Enjoy stitching the spiral tentacles and adding the little embroidered smile β€” small projects like this are perfect for practicing assembly and finishing skills.

You ask,

we answer.

FAQs

What size will the finished piece be?

The finished jellyfish is pocket-sized, about 6-8 cm tall depending on yarn weight and tentacle length when using DK yarn and a 3.5mm hook.

Can I use different yarn weights for this pattern?

Yes, you can use different yarn weights, but the final size and look will change; use an appropriate hook size for your chosen yarn and expect a denser or chunkier result.

Do I need prior crochet experience for this pattern?

This pattern is beginner friendly and uses basic stitches like SC, DC, SLST and simple increases; basic crochet knowledge is helpful before starting.

How long does this project typically take to complete?

Most crocheters complete this pocket jellyfish in about 2-3 hours, though time will vary based on experience and how many tentacles you make.