About This FNAF Bonnie Amigurumi Pattern
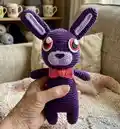
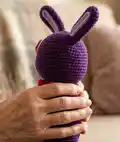
This pattern creates a purple Bonnie-inspired amigurumi complete with expressive anime-style felt eyes, a layered muzzle and a little bow tie. The pattern includes round-by-round instructions for head, body, legs, arms, ears, nose and eyes. Techniques include magic ring, increases, decreases and joining legs to the body for a stable base.
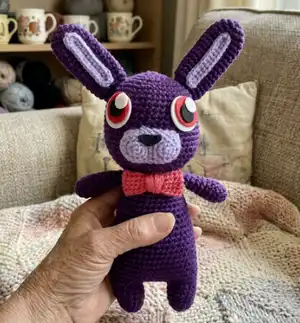
Intermediate skill level with helpful tips on placement and finishing. Use felt or a cutting machine for the anime eyes to achieve the look shown.
Why You'll Love This FNAF Bonnie Amigurumi Pattern
I absolutely love this pattern because it brings a playful character to life with simple shapes and clear shaping rounds. I enjoy how easy it is to customize the facial expression by adjusting eye placement and muzzle size. The joining of the legs into the body gives the finished toy a sturdy, neat silhouette that really stands out. I also appreciate that the pattern includes small pieces like the bow tie and layered ears to add personality.
Switch Things Up
I love how easy it is to change the look of this pattern by swapping colors; try pastel shades for a softer Bonnie or bright contrasting colors for a cartoon effect.
I often make a mini version by using fingering weight yarn and a 2.5mm hook to create keychain-sized pals.
You can swap the felt anime eyes for safety eyes if you prefer, but adjust eye size and placement to match gauge.
I sometimes embroider a mouth instead of using felt for a simpler, softer face that works well for baby-safe toys.
If you want posable limbs, consider adding a short length of craft wire inside the arms before stuffing to give gentle bendability.
Try making a whole set of outfits like tiny scarves, vests or hats to personalize each Bonnie and make a themed collection.
To create a worn, vintage look, use a slightly fuzzy or sport weight yarn and lightly brush the finished fabric for texture.
I like to add small stitched details like whiskers or stitched brows to change expressions and add personality.
For a different head shape, increase or decrease rounds 5-8 to make the head wider or narrower while keeping eye placement proportional.
Don't be afraid to mix fibers—cotton gives a crisp look while acrylic offers softness; always adjust hook size and eyes to suit the new yarn.
Common Mistakes & How to Fix Them
✗ Skipping the stitch marker when joining the left leg to the body will make it hard to track your starting point; place a marker in the last stitch of the left leg before joining to keep rounds aligned.
✗ Leaving large gaps when stuffing will create a lumpy shape and visible stuffing; stuff gradually and evenly while shaping and add small amounts at a time to achieve smooth curves.
✗ Crocheting with loose stitches can let stuffing show through the fabric; use a slightly smaller hook or tighten your tension so your single crochet stitches are dense enough to hide the fiberfill.
✗ Not leaving a long tail when finishing the head can make sewing it to the body difficult; when you slip stitch off at the end of the head, leave enough yarn to sew into the final 6 stitches for a secure attachment.
✗ Failing to check eye placement before permanent attachment can give an uneven look; pin or place the eyes between rounds 13-14 and verify spacing (about two inches apart) before gluing or stitching the felt layers.