🧢 Beautiful ✨ Detailed πŸ’ Adorable

Snowman Gingerbread Amigurumi Pattern

Snowman Gingerbread Amigurumi Pattern
4.9β˜… Rating
5-7 Hours Time Needed
1.4K Made This
βœ‚οΈ

Intermediate Level

Ideal for those with basic crochet experience, featuring slightly more advanced stitches and techniques to expand your skills.

⏱️

Weekend Treat

Takes 5-7 hours, making it an enjoyable project to finish over a couple of days.

🧸

Cute Companion

An adorable friend to cherish, handcrafted with love to bring comfort and joy for years to come.

About This Snowman Gingerbread Amigurumi Pattern

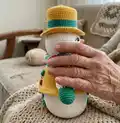
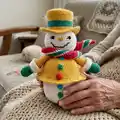
This pattern creates a delightful snowman gingerbread amigurumi with a removable hat, embroidered face, and tiny crocheted buttons. It uses cotton yarn and a small hook for tight, neat stitches perfect for toys. Clear charts and many step photos guide you through shaping, color changes, and assembly.

Snowman Gingerbread Amigurumi Pattern crochet pattern - detailed view of completed project

You will learn magic ring starts, working in back/front loops only, invisible color changes and simple embroidery for facial details. The finished toy measures approximately 22 cm tall when made with the specified yarn and hook.

Why You'll Love This Snowman Gingerbread Amigurumi Pattern

I absolutely love this pattern because it combines classic amigurumi shaping with charming seasonal details like a jaunty hat and bright crocheted buttons. I enjoy the small surface embroidery touches β€” they bring so much personality to the face. The construction uses two-body pieces sewn together for a clean inside and stable base which I find satisfying to assemble. I also love that the removable hat allows for playful display options and makes the finished piece extra giftable.

Snowman Gingerbread Amigurumi Pattern step 1 - construction progress Snowman Gingerbread Amigurumi Pattern step 2 - assembly progress Snowman Gingerbread Amigurumi Pattern step 3 - details and accessories Snowman Gingerbread Amigurumi Pattern step 4 - final assembly and finishing

Switch Things Up

I love how easy it is to customize this pattern to create variations β€” try changing the coat color from ocher to a bright red for a classic holiday look.

Use pastel shades and lighter blush for a soft nursery decoration or choose bold jewel tones for a modern twist on the snowman gingerbread theme.

If you want a mini keychain version, swap to finer yarn and a smaller hook; conversely, use bulky yarn and a larger hook for an oversized cuddly version.

I often add embroidered freckles or a tiny crocheted scarf tassel to give personality: embroidery placement and length change the face expression dramatically.

Consider swapping the removable hat for a small beanie or headband by changing the top rounds and brim shaping for different winter styles.

For stability and weight, I sometimes add a small plastic disc or thick cardboard in the base before final closing to help the toy stand steadily on display.

I like to experiment with surface crochet details like a tiny heart or initials on the coat to personalize gifts for friends and family.

Try mixing yarn textures β€” cotton for the body and a fuzzy acrylic for accessories β€” to add tactile interest and contrast in the finished piece.

Play with button placement and color order to create patterns down the front β€” alternating colors gives a playful effect you can repeat across a set of snowmen.

Finally, I sometimes make matching mini accessories (a tiny crochet broom, mini present or scarf) to create a whole themed display that elevates the single amigurumi into a decorative scene.

Common Mistakes & How to Fix Them

βœ— Skipping stitch markers while working rounds can cause you to lose track of the beginning; use a marker at the start of each round to maintain correct stitch counts. βœ— Not stuffing as you go leads to lumps and uneven shaping; stuff gradually and evenly, especially before closing decreases so the shape remains round and smooth. βœ— Changing colors without securing ends causes loose tails and unraveling; use invisible color change or secure and weave in ends as you switch yarns. βœ— Ignoring the back loop/front loop instructions will change the shape of edges; follow FLO/BLO notes exactly to get the correct brim and separations.

Snowman Gingerbread Amigurumi Pattern

Make a charming snowman gingerbread amigurumi using simple crochet techniques and clear step-by-step instructions. This pattern uses cotton yarn and small hook work to create a detailed, gift-ready toy with a removable hat and sewn-on buttons. Follow the photos and notes to embroider the face and assemble all parts for a polished finish you'll be proud to display or give as a handmade gift.

Intermediate 5-7 Hours

Materials Needed for Snowman Gingerbread Amigurumi Pattern

β€” Main Fabric

  • 01
    Cotton yarn - ST.GEORGE TANGO (use small amounts of each color listed below)
  • 02
    0006 white - main body color (approximately 50-100g)
  • 03
    0420 red - accents and scarf (small amounts, about 10-20g)
  • 04
    0015 green - accents and gloves (small amounts, about 10-20g)
  • 05
    0131 blue - buttons (small amount, about 10g)
  • 06
    0391 orange - nose detail (small amount)
  • 07
    0424 ocher - hat and coat (approx. 50g)
  • 08
    0409 indigo - details (small amount)

β€” Tools Required

  • 01
    Crochet hook 2.0 mm
  • 02
    Embroidery needle
  • 03
    Sewing needle
  • 04
    Scissors
  • 05
    Yarn needle for sewing and weaving ends
  • 06
    Polyester stuffing or small amount from a pillow/combed wool
  • 07
    Pins for assembly
  • 08
    Small piece of cardboard or plastic (inserts for base stability)
  • 09
    Small lip balm (used as blush reference in photos, optional)

Progress Tracker

0% Complete

β€” Head :

Info :

Use the white color yarn. Mark the beginning of each row with wool of a different color (Picture 1).

Round R1 :

start 6 sc in a magic ring (6)

Round R2 :

(inc) x6 (12)

Round R3 :

(sc,inc) x6 (18)

Round R4 :

(sc,inc,sc) x6 (24)

Round R5 :

(3 sc,inc) x6 (30)

Round R6 :

(2 sc,inc,2sc) x6 (36)

Round R7 :

(inc,5 sc) x6 (42)

Round R8 :

(5 sc,inc,sc) x6 (48)

Round R9 :

BLO 48 sc around (Picture 2) (48)

Round R10 :

(3 sc,inc,4 sc) x6 (54)

Round R11-19 :

54 sc around (54)

Info :

While crocheting from round 11 to round 19 mark with a different color yarn spots intended for eyes, nose and mouth. Mark the spot for the eyes between rows 12 and 13. The space between the eyes counts 8 loops (Picture 3). Mark the spot for the nose between rows 14 and 15. The nose is 2 loops wide. Mark the spot for the mouth between rows 18 and 19. The mouth is 2 loops wide.

Round R20 :

(3 sc,dec,4 sc) x6 (48)

Round R21 :

(5 sc,dec,sc) x6 (42)

Round R22 :

(dec,5 sc) x6 (36)

Round R23 :

(2 sc,dec,2 sc) x6 (30)

Round R24 :

(3sc,dec) x6 (24)

Info :

Stuff the head. The remaining part of the head fill with stuffing material. Leave the yarn thread longer (around 40 cm). Do not sew the bottom opening of the head. We shall later sew the head to the body.

Info :

Embroider the eyes by pulling the needle with cotton yarn 8 times through the marked stitches slowly to get a round shape (Picture 6). Embroider the nose vertically 10 times with orange yarn (Picture 7). Embroider the lips following the pattern grid. Use lip balm as snowman blush. Completed the head (Picture 8).

β€” Hat :

Info :

Use the ocher color yarn.

Round R1 :

start 6 sc in a magic ring (6)

Round R2 :

(inc) x6 (12)

Round R3 :

(sc,inc) x6 (18)

Round R4 :

(sc,inc,sc) x6 (24)

Round R5 :

(3 sc,inc) x6 (30)

Round R6 :

(2 sc,inc,2sc) x6 (36)

Round R7 :

(inc,5 sc) x6 (42)

Round R8 :

(5 sc,inc,sc) x6 (48)

Round R9 :

(3 sc,inc,4 sc) x6 (54)

Round R10 :

BLO 54 sc around (Picture 9) (54)

Round R11 :

54 sc (54)

Round R12 :

(3 sc,dec,4 sc) x6 (48)

Round R13-15 :

48 sc (48)

Round R16 :

Use the green color yarn. 48 sc (48)

Round R17-19 :

48 sc (48)

Round R20 :

Use the ocher color yarn. 48 sc (48)

Round R21 :

48 sc (48)

Round R22 :

FLO 48 sc (Picture 12,13) (48)

Round R23 :

(sc,inc) x24 (72)

Round R24 :

72 sc (72)

Round R25 :

(2 sc,inc) x24 (96)

Round R26 :

96 sc (96)

Info :

Leave the yarn thread longer (around 40 cm). The hat is completed (Picture 14). Fill up the hat (Picture 16). Attach the hat to the head with pins and sew (Pictures 17-19).

β€” Arm (make 2) :

Info :

Use the green color yarn.

Round R1 :

start 6 sc in a magic ring (6)

Round R2 :

(inc) x6 (12)

Round R3 :

(sc,inc) x6 (18)

Round R4-5 :

18 sc (18)

Round R6 :

16 sc,dec (17)

Round R7 :

7 sc,dec,8 sc (16)

Round R8-9 :

16 sc (16)

Round R10 :

Use the white color yarn. 16 sc (16)

Round R11 :

BLO 16 sc (Picture 21) (16)

Round R12 :

Use the ocher color yarn. 16 sc (16)

Info :

Fill the arm with stuffing material (Picture 23). R13-26: 16 sc. Fasten off, leave the yarn thread longer (30cm) so that we can later sew arms to the body.

β€” Making the lace around the sleeve :

Info :

Use the white color yarn. Let's go back to the 11th row of the arm (Picture 25).

Round R1 :

16 sc

Round R2 :

(sc,inc) x8

Round R3 :

24 sc

Round R4 :

(2 sc,inc) x8

Round R5 :

32 sc

β€” Body 1 :

Info :

Use the white color yarn.

Round R1 :

start 6 sc in a magic ring (6)

Round R2 :

(inc) x6 (12)

Round R3 :

(sc,inc) x6 (18)

Round R4 :

(2sc, inc) x 6 (24)

Round R5 :

(3sc,inc) x6 (30)

Round R6 :

(4sc, inc) x 6 (36)

Round R7 :

(5sc,inc) x 6 (42)

Round R8 :

(6 sc,inc) x 6 (48)

Round R9 :

BLO 48 sc (Picture 27) (48)

Round R10 :

(7sc,inc) x 6 (54)

Round R11 :

(8sc,inc) x 6 (60)

Round R12 :

(9sc,inc) x 6 (66)

Round R13 :

(10sc,inc) x 6 (72)

Round R14-19 :

72 sc (72)

Info :

Fasten off, leave the yarn thread longer (40cm) so that we can later sew to the body. Cut the pad out of cardboard or plastic (Picture 36,37). Put plastic or cardboard inserts (Picture 38). Insert the second piece snowman into the first and sew 72 sc in a circle on both sides of the two pieces (Picture 39,40).

β€” Button (make 3) :

Info :

Use the red, green and blue color yarn.

Round R1 :

6 sc in magic ring, slip stitch (small crocheted button)

β€” Crochet the second piece snowman body 2 :

Info :

Use the ocher color yarn.

Round R1 :

start 6 sc in a magic ring (6)

Round R2 :

(inc) x6 (12)

Round R3 :

(sc,inc) x6 (18)

Round R4 :

(2sc, inc) x 6 (24)

Round R5 :

BLO 24 sc (Picture 54) (24)

Round R6 :

(3sc,inc) x6 (30)

Round R7 :

(4sc, inc) x 6 (36)

Round R8 :

(5sc,inc) x 6 (42)

Round R9 :

(6 sc,inc) x 6 (48)

Round R10 :

(7sc,inc) x 6 (54)

Round R11 :

(8sc,inc) x 6 (60)

Round R12 :

(9sc,inc) x 6 (66)

Round R13 :

(10sc,inc) x 6 (72)

Round R14-19 :

72 sc (72)

Info :

Fasten off, leave the yarn thread longer (40cm) so that we can later sew to the body. Insert the second piece snowman into the first and sewing 72 sc in a circle on both sides of the two pieces (Picture 56,57). Attach the head to the body with pins and sew the head to the body (Picture 59,60).

β€” Connecting the head to the body :

Info :

Attach the head to the body with pins (Picture 59). Sew the head to the body (Picture 60). Finish sewing and hide ends (Picture 61).

Assembly Instructions

  • Attach the hat to the head: position with pins, fill the hat if desired, then sew the hat to the head securely following picture markers.
  • Sew the head to the body: align the head opening with the top of the body, pin in place and sew around evenly using a sewing needle and yarn tail left when finishing the head.
  • Insert the second body piece into the first and sew 72 sc in a circle through both pieces to join them securely and create a stable two-piece body.
  • Attach arms to the sides of the body using the long yarn tails left when fastening off; position slightly forward and stitch firmly for a natural pose.
  • Sew the small crocheted buttons to the front of the body in the marked positions using corresponding color yarn, securing tightly and weaving in ends.
  • Place a cardboard or plastic insert in the base before final assembly for stability, then close and finish the bottom with hidden stitches.

Important Notes

  • πŸ’‘Work with a 2.0 mm hook and cotton yarn for the same finished size and tight stitches as shown in the photos.
  • πŸ’‘Use stitch markers and change marker color each round if needed to track the beginning and marked facial placement points.
  • πŸ’‘Stuff evenly and firmly but not overstuffed to retain correct shape; stuff more in the upper head and less at the neck opening.

This snowman gingerbread amigurumi is designed to be a cheerful handmade gift that brightens any shelf or table display. The removable hat and colorful buttons let you style it how you like and make it easy to wash or alter. Create one for yourself or as a heartfelt present this season β€” every stitch makes a smile. 🧢🎁

You ask,

we answer.

FAQs

What size will the finished piece be?

The finished amigurumi measures approximately 22 cm tall when using the recommended cotton yarn and a 2.0 mm hook as indicated in the pattern.

Can I use different yarn weights for this pattern?

Yes, you can use different yarn weights but this will affect the final size and stitch counts. Choose an appropriate hook for your yarn and expect a larger or smaller finished toy.

Do I need prior crochet experience for this pattern?

This pattern is rated intermediate; basic knowledge of single crochet, increases/decreases, working in back/front loops, and the magic ring is recommended for best results.

How long does this project typically take to complete?

Most crocheters complete this project in 5-7 hours, though time varies with experience level, speed, and how much time you spend on embroidery and assembly.