🧢 Beautiful ✨ Detailed πŸ’ Adorable

Rabbit Amigurumi Pattern

Rabbit Amigurumi Pattern
4.2β˜… Rating
5-7 Hours Time Needed
3.5K Made This
βœ‚οΈ

Intermediate Level

Ideal for those with basic crochet experience, featuring slightly more advanced stitches and techniques to expand your skills.

⏱️

Weekend Treat

Takes 5-7 hours, making it an enjoyable project to finish over a couple of days.

🧸

Cute Companion

An adorable friend to cherish, handcrafted with love to bring comfort and joy for years to come.

About This Rabbit Amigurumi Pattern

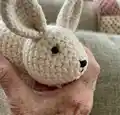
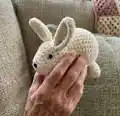
This pattern makes a soft, plush rabbit amigurumi approximately 18 cm tall when crocheted in Himalaya Dolphin Baby yarn. It includes full round-by-round instructions for the head with torso, ears, paws, tail and optional nose. The project uses basic amigurumi shaping techniques and is ideal for crafters who like neat, rounded shapes.

Rabbit Amigurumi Pattern crochet pattern - detailed view of completed project

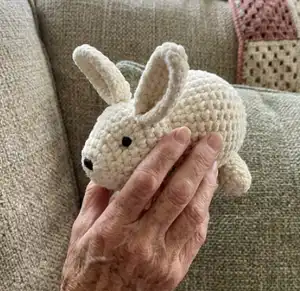
Detailed assembly and finishing steps are included so you can place eyes, sew parts and shape the face with confidence. Photos and clear stitch counts make it easy to follow along and get professional results.

Why You'll Love This Rabbit Amigurumi Pattern

I absolutely love this pattern because it creates a sweet, huggable rabbit using simple shaping techniques that yield a polished result. I enjoy how the plush yarn produces a soft, tactile surface that children and adults both adore. The step-by-step rounds are written clearly so I can focus on placement and finishing rather than figuring out shaping. Sewing the ears and paws in place always brings a sense of satisfaction and turns loose elements into a charming final toy.

Rabbit Amigurumi Pattern step 1 - construction progress Rabbit Amigurumi Pattern step 2 - assembly progress Rabbit Amigurumi Pattern step 3 - details and accessories Rabbit Amigurumi Pattern step 4 - final assembly and finishing

Switch Things Up

I love using different colors to change the mood of this rabbit β€” try pastel pinks for a nursery friend or soft gray for a neutral look.

You can make it smaller or larger by swapping yarn weight and hook size; bulky yarn with a larger hook makes a chunky cuddly rabbit while thinner yarn makes a tiny keychain friend.

I often embroider small details like whiskers or a mouth with contrasting yarn to personalize each rabbit.

Swap safety eyes for French knots or embroidered eyes for a fully handmade and child-safe toy.

Try making ears slightly longer or shorter to create breed variations β€” floppy ears give a more playful character.

Use felt or small buttons for decorative collars and tiny accessories like scarves to create seasonal variations.

I like to add a tiny ribbon or bell to one rabbit to turn it into a gift-ready keepsake.

For a poseable version, you can thread thin wire inside the limbs before stuffing so the rabbit can be positioned.

If you want a plush, squishier finish, add more stuffing and reduce the number of decrease rounds slightly to keep the body rounder.

I sometimes add a little weighted pellet bag to the bottom for extra stability if I want the rabbit to sit upright more securely.

Common Mistakes & How to Fix Them

βœ— Skipping stitch markers when working rounds makes counting difficult; use a marker at the start of each round to keep your place and avoid lost stitches. βœ— Understuffing or overstuffing the head causes poor shaping; stuff gradually and check shape often to maintain a smooth curve. βœ— Not placing safety eyes at the recommended row leads to poor facial proportions; place eyes between specified rows at the recommended stitch distance. βœ— Failing to secure tails and hide yarn ends can cause seams to loosen later; always weave in and burn ends as instructed and hide tails inside the body. βœ— Sewing parts without pinning or checking symmetry results in an unbalanced toy; always pin parts in position and view from multiple angles before stitching.

Rabbit Amigurumi Pattern

Make a cuddly 18 cm rabbit amigurumi using soft plush yarn β€” perfect for gifts or nursery decor. This pattern gives you full, clear step-by-step rounds, assembly notes, and finishing tips so you can create a charming rabbit with realistic ears and a sweet nose. Use the materials listed and follow the stitch-by-stitch instructions to achieve neat shaping and a professional finish.

Intermediate 5-7 Hours

Materials Needed for Rabbit Amigurumi Pattern

β€” Main Fabric

  • 01
    Himalaya Dolphin Baby plush yarn (approx. half a skein of main color - ecru/off white)
  • 02
    Equivalent plush chenille yarn may be used (adjust hook if weight differs)
  • 03
    Small amount of contrasting yarn for nose if not using safe nose (a few grams)

β€” Tools Required

  • 01
    Crochet hook size 4 (mm)
  • 02
    Row/stitch marker
  • 03
    Safety eyes size 6 mm (2 pieces)
  • 04
    Small safety nose (optional) or short length of different color yarn for embroidered nose
  • 05
    Needle with a large eye for sewing pieces
  • 06
    Lighter to slightly seal/cauterize yarn ends (for synthetic yarn ends)
  • 07
    Scissors
  • 08
    Yarn needle for weaving and assembly
  • 09
    Polyester stuffing or small anti-allergic silicone ball (as used by author)

Progress Tracker

0% Complete

β€” Head with torso :

Round 1 :

6 mr (6)

Round 2 :

inc x 6 (12)

Round 3 :

(3 sc, inc) x 3 (15)

Round 4 :

(4 sc, inc) x 3 (18)

Round 5 :

(2 sc, inc) x 6 (24)

Round 6 :

(3 sc, inc) x 6 (30)

Round 7-10 :

30 sc (30) - 4 rows

Round 11 :

(3 sc, dec) x 6 (24)

Round 12 :

(2 sc, dec) x 6 (18)

Info :

Place the eyes between the 6) and 7) row at a distance of 9 sc.

Round 13 :

(2 sc, inc) x 6 (24), slowly we gradually fill,

Round 14 :

(3 sc, inc) x 6 (30)

Round 15 :

(4 sc, inc) x 6 (36)

Round 16-25 :

36 sc (36) - 10 rows

Round 26 :

(4 sc, dec) x 6 (30)

Round 27 :

(3 sc, dec) x 6 (24)

Round 28 :

(2 sc, dec) x 6 (18)

Round 29 :

(1 sc, dec) x 6 (12)

Round 30 :

dec x 6 (6), cut off, leaving 30 cm in lengthy yarns, then thread the needle and pull it successively through each front thread of the stitch from the previous row, tightening it tightly (but not too tightly so as not to break the yarn).

β€” Ears (we make 2 pieces) :

Info :

We make 10 chain stitches, then thread into the 2 stitch and make:

Round 2 :

8 hdc, 3 hdc. in 1 stitch, 8 hdc. (19)

Round 3 :

1 dsl, 19 sc (19), Thread the yarn over the needle and sew the shorter edge together, leave 30 cm.

β€” Paws. We make 4 pieces :

Round 1 :

6 mr (6)

Round 2 :

(2 sc, inc) x 2 (8)

Round 3-6 :

8 sc (8) - 4 rows, fill in, then fold the piece in half and connect the 3 sc, pull the yarn over and leave it 30 cm long.

β€” Tail :

Round 1 :

6 mr (6)

Round 2 :

(1 sc, inc) x 3 (9)

Round 3 :

9 sc (9)

Round 4 :

(1 sc, dec) x 3 (6), we pull the yarn, fill it a little and leave 30 cm in length..

β€” Nose (instead of the safe nose) :

Round 1 :

2 mr (2), we pull the yarn and leave 30 cm.

β€” Assembly / Finishing Notes :

Item :

When we have all the parts ready, we start sewing. Sew the ears to the head at a height of 2 sc above the eyes. Fix the thread from the upper part of the ear in the piece and hide it in your head.

Item :

Place the nose piece just above the middle of the knitting of the head with the body.

Item :

On the back of the torso, in the middle, sew the tail according to the photo.

Item :

Sew the paws to the body in such a way as to provide support for the entire body (2 paws at the front and 2 paws at the back).

Item :

To slim down the face, just below the eyes, thread the yarn (the same color as the body), then pull the yarn back, sticking into 1 single crochet and leaving where we started. Pull gently, tie the threads together, tighten them tightly, and then hide them in the knitting.

Assembly Instructions

  • Sew the ears to the head at a height of 2 sc above the eyes, fix the upper thread from the ear into the head and hide it inside the head.
  • Place the nose piece just above the middle of the head where the head meets the body and sew securely so it sits centered.
  • Sew the tail to the middle of the back of the torso, positioning it according to the reference photos for a natural look.
  • Attach the four paws to the body to provide support (two at the front, two at the back) so the rabbit sits evenly.
  • To narrow the face under the eyes, thread the same-color yarn through a single crochet, pull gently to shape, tie securely and hide yarn tails in the knitting.

Important Notes

  • πŸ’‘Use stitch markers to keep track of the beginning of each round and when placing eyes or shaping the head.
  • πŸ’‘Stuff gradually and evenly β€” overstuffing will distort curves and under-stuffing will collapse shapes.
  • πŸ’‘Pin parts in place and check symmetry from several angles before sewing to ensure balanced placement.
  • πŸ’‘Weave in and hide yarn tails as you go; leave the indicated 30 cm tails for sewing so you have enough length for secure assembly.

This adorable Rabbit Amigurumi pattern is perfect for gifting or decorating a nursery β€” soft, squishy and full of character. Create a trio in different colors and watch them bring smiles to everyone who sees them. Make one for yourself or stitch a set to share handmade joy with loved ones. πŸ§ΆπŸ‡βœ¨

You ask,

we answer.

FAQs

What size will the finished piece be?

The finished amigurumi measures approximately 18 cm long when using the recommended Himalaya Dolphin Baby yarn and a 4 mm hook.

Can I use different yarn weights for this pattern?

Yes, you can use different yarn weights, but the finished size and texture will change; adjust your hook size accordingly and check gauge by making a small swatch.

Do I need prior crochet experience for this pattern?

This pattern is rated intermediate; basic knowledge of single crochet, increases, decreases and working in the round is recommended for the best results.

How long does this project typically take to complete?

Most crocheters finish this rabbit in about 5-7 hours, depending on experience and whether you work continuously or in sessions.