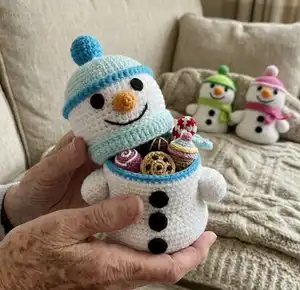
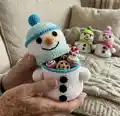
Create a cheerful crochet snowman with this clear, photo-guided pattern. You will make a compact, gift-ready snowman complete with hat, pompom, scarf, nose, buttons and embroidered smile. The instructions are detailed and include tips for seamless joins and closing openings so your finished piece looks professional. Perfect for seasonal decor, gift toppers or a handmade collection.
Progress Tracker
0% Complete
— SNOWMAN - The Pattern :
Info :
Make the small parts first (nose, arms, buttons). You'll need them while making the head and body. Instead of crocheted buttons you can use some to sew or glue on. I'll mention only the crocheted ones here though.
— ARM (make 2, use yarn in WHITE) :
Round 1 :
magic ring of 6 sc – 6
Round 2 :
*2sc in next st* around – 12
Round 3 :
*2sc in next st, sc in next st* around – 18
Round 4 :
*sc in next st* around – 18
Round 5 :
*sc in next st* around – 18
Round 6 :
*inv_dec, sc in next st* around – 12
Round 7 :
*inv_dec, sc in next 4 st* x2 – 10
Round 8 :
flatten the opening so that the stitch you made last sits on the side; both side-stitches remain unworked; crochet the opening closed with: sc in next 4 stitch-pairs – 4
Info :
→ see page 18 for details on crocheting openings closed
Info :
fasten off & weave in the yarn-end
— OPTIONAL: BUTTON (make 2, use yarn in BUTTON-COLOR) :
Info :
I usually make them in black. Instead of crocheting them you can use small buttons, mini pompoms etc (15 mm in diameter). Fasten off & leave long yarn-ends hang for later sewing; pull ring closed and create a seamless connection between round's end and beginning; to create a seamless connection guide the yarn-end through the first stitch – from back to front, and from there through the last stitch – between back loop and front loop; → see page 19 for details
Round 1 :
magic ring of 6 sc – 6
Info :
fasten off & leave long yarn-ends hang for later sewing; pull ring closed and create a seamless connection between round's end and beginning; to create a seamless connection guide the yarn-end through the first stitch – from back to front, and from there through the last stitch – between back loop and front loop; → see page 19 for details
— NOSE (make 1, use yarn in ORANGE) :
Round 1 :
magic ring of 6 sc – 6
Round 2 :
*sc in next st* around – 6
Round 3 :
*2sc in next st, sc in next st* x3 – 9
Round 4 :
*2sc in next st, sc in next 2 st* x3 – 12
Round 5 :
get a second stitch-marker and mark stitch #2 within this round; you need this position later for crocheting the nose to the head; *sc in next st* around (slip stitch in last st) – 12
Info :
fasten off & weave in the yarn-end on the inside; leave the additional stitch-marker in place
— BODY (make 1, begin with yarn in CONTRAST-COLOR) :
Info :
You start here with the body's inner part. If you'd like it to be in another color begin with contrast-color. I usually use the same color I use for the hat's brim & pompom. Otherwise begin in white.
Info :
The number of in- or decreases per round changes frequently, sometimes from round to round. I'm not mentioning this every time. So please pay attention. :)
Round 1 :
magic ring of 8 sc – 8
Round 2 :
*2sc in next st* around – 16
Round 3 :
*2sc in next st, sc in next st* around – 24
Info :
change of sequence from here on there are 6 increases per round instead of 8
Round 4 :
*2sc in next st, sc in next 3 st* around – 30
Round 5 :
*2sc in next st, sc in next 4 st* around – 36
Round 6 :
*2sc in next st, sc in next 5 st* around – 42
Round 7 :
*2sc in next st, sc in next 6 st* around – 48
Round 8 :
*2sc in next st, sc in next 7 st* around – 54
Round 9 :
*2sc in next st, sc in next 17 st* x3 – 57
Round 10 :
*sc in next st* around – 57
Round 11 :
*sc in next st* around – 57
Round 12 :
*sc in next st* around – 57
Round 13 :
*inv_dec, sc in next 17 st* x3 – 54
Round 14 :
*inv_dec, sc in next 7 st* x6 – 48
Round 15 :
*inv_dec, sc in next 4 st* x8 – 40
Round 16 :
in back loops (→ see page 21): *sc in next st* around – 40
Round 17 :
*sc in next st* around – 40
Round 18 :
*sc in next st* around – 40
Round 19 :
*sc in next st* around – 40
Round 20 :
*sc in next st* around – 40
Round 21 :
*sc in next st* around – 40
Round 22 :
*2sc in next st, sc in next 9 st* x4 – 44 change to WHITE with last st; secure the yarn-ends of both colors with several knots on the body's inside; cut off the excess yarn;
Round 23 :
in back loops: *sc in next st* around – 44
Round 24 :
*sc in next st* around – 44
Round 25 :
in this round the arms are crocheted to the body (→ see page 22 for details on that) sc in next 9 st, now place one of the arms in front of the body; guide your hook through the arm's first stitch and from there through the next stitch of the body; that's the first stitch-pair; push both stitches close together; crochet the first arm on with: sc in next 4 stitch-pairs, continue on body with: sc in next 18 st, crochet second arm on with: sc in next 4 stitch-pairs, continue on body with: sc in next 9 st – 44
Round 26 :
*sc in next st* around – 44
Round 27 :
*sc in next st* around – 44
Round 28 :
*sc in next st* around – 44
Round 29 :
*inv_dec, sc in next 20 st* x2 – 42
Round 30 :
*sc in next st* around – 42
Round 31 :
in front loops (→ see page 21): *2sc in next st, sc in next 6 st* around – 48
Round 32 :
sc in next 4 st, *2sc in next st, sc in next 7 st* x5, 2sc in next st, sc in next 3 st – 54
Round 33 :
*2sc in next st, sc in next 8 st* around – 60
Round 34 :
*sc in next st* around – 60
Round 35 :
*sc in next st* around – 60
Round 36 :
*sc in next st* around – 60
Info :
add the edge between the white part and the part in contrast-color (→ see page 23); this later forms the edge around the body's opening; I usually use the color I used for the inner-part; place the body in front of you with the opening facing towards you; connect yarn in CONTRAST-COLOR to one of the front loops between the white part and the part in contrast-color on the body's back side; crochet with slip stitches around the body until all the front loops are used: *slip stitch in next front loop* around – 44; fasten off and create a seamless connection between round's end & beginning; for the seamless connection guide the yarn-end through the round's first stitch – from back to front; from there guide it through the round's last stitch – between front loop and back loop; pull yarn through to create the seamless connection;
Round 37 :
*inv_dec, sc in next 8 st* around – 54
Round 38 :
sc in next 4 st, *inv_dec, sc in next 7 st* x5, inv_dec, sc in next 3 st – 48
Info :
attach the buttons (→ see page 24). I'm using crocheted buttons here; use the two yarn-ends to sew each button to the body with a few stitches; secure the yarn-ends on the body's inside and cut off the excess yarn; the buttons have a distance of about 3 rounds between them; use the 'bend' between upper and lower body as reference; the upper button sits 1 round above that bend, the lower button sits 2 rounds below it;
Round 39 :
*inv_dec, sc in next 6 st* around – 42
Round 40 :
sc in next 3 st, *inv_dec, sc in next 5 st* x5, inv_dec, sc in next 2 st – 36
Round 41 :
in back loops: *dec, sc in next 4 st* around – 30
Round 42 :
*inv_dec, sc in next 3 st* around – 24
Round 43 :
*inv_dec, sc in next st* x8 – 16
Round 44 :
*inv_dec* around – 8
Info :
fasten off, close the remaining opening & hide yarn-end; to close the opening weave the yarn-end through the front loops of each of the remaining stitches; pull tight to close the opening; → see page 25; straighten out the inner part
— HEAD (make 1, begin with yarn in WHITE) :
Info :
Here too you begin with the head's inner part and end with the pompom on top of the hat.
Round 1 :
magic ring of 6 sc – 6
Round 2 :
*2sc in next st* around – 12
Round 3 :
*2sc in next st, sc in next st* around – 18
Round 4 :
*2sc in next st, sc in next 2 st* around – 24
Round 5 :
*2sc in next st, sc in next 2 st* around – 32
Round 6 :
*2sc in next st, sc in next 3 st* around – 40
Round 7 :
*sc in next st* around – 40
Round 8 :
*sc in next st* around – 40
Round 9 :
*sc in next st* around – 40
Round 10 :
*sc in next st* around – 40
Round 11 :
*sc in next st* around – 40
Round 12 :
*sc in next st* around – 40
Round 13 :
in back loops: *2sc in next st, sc in next 9 st* x4 – 44
Round 14 :
*sc in next st* around – 44
Round 15 :
have 3 additional stitch-markers ready; three stitches need to be marked within this round; crochet the round first, then mark them; in back loops: *2sc in next st, sc in next 10 st* x4 – 48; mark stitches #26 & #28; these are the positions you later need for the mouth; also mark front loop #17 of the previous round with an additional marker; this position is later needed for the scarf; tie a knot to make the marker more secure if you like;
Round 16 :
*2sc in next st, sc in next 7 st* around – 54
Round 17 :
get 2 more stitch-markers ready; two more stitches needed for the mouth need to be marked here; again, mark them once the round is done; sc in next 5 st, *2sc in next st, sc in next 8 st* x5, 2sc in next st, sc in next 3 st – 60; mark stitches #30 & #38;
Round 18 :
get the nose ready; it gets partially crocheted to the head in this round (→ see page 25 for details); sc in next 32 st, now place the nose in front of the head with its opening facing up and the nose's marked stitch pointing towards the head; only use the nose's back loops for crocheting (the inner loops closest to the nose's inside); guide your hook through the back loop of the nose's marked stitch (from the nose's inside towards the outside) and from there through the head's next stitch; push both stitches close together; you now have the first stitch-pair on your hook; partially crochet the nose on with: sc in next 3 stitch-pairs (only the inner loops of the nose); continue on head with: sc in next 25 st – 60
Info :
let the nose hang there for the next couple of rounds; just keep crocheting along the head;
Round 19 :
*sc in next st* around – 60
Round 20 :
*sc in next st* around – 60
Round 21 :
get 2 more markers ready; the upper part of the nose is crocheted to the head with 3 stitches here (→ see page 25 for details); on each side of the nose 3 unused stitches will remain; sc in next 32 st, stuff the nose; now skip 3 stitches on the nose and begin crocheting in the next; only use the nose's back loops here as well; crochet the nose's upper part on with: sc in next 3 stitch-pairs, continue on the head with: sc in next 25 st – 60; mark stitches #30 & #39 within this round; these positions are for the eyes;
Info :
optional but recommended if you're making this figure for a child: secure the nose's sides to the head (→ see page 25) use a piece of yarn in ORANGE or WHITE, let it come from the head's inside and sew the nose's sides to the head; only use the back loops for sewing here as well; once done secure the yarn-ends on the head's inside with several knots and cut off the excess yarn;
Info :
embroider the mouth (→ see page 27) use the 4 marked stitches below the nose; begin with the upper two that sit wider apart; get a strand of yarn in BLACK; let it come from the head's inside; guide it out of one of the upper two marked stitches and then back towards the head's inside through the other one; pull yarn through to create a straight mouth-line; let the yarn come out of one of the two marked stitches below the mouth-line; guide the needle under the mouth-line (make sure to not splice it) and then back again through the same stitch; slowly pull tight to pull the mouth-line down; repeat with the second marked stitch to create the smile; secure the yarn-ends on the head's inside with knots; create the corners of the mouth: take two strands of yarn and make a knot in each of them; take the first strand and guide both ends through the first corner of the mouth; pull through until only the knot is left, sitting at the corner of the mouth; secure the yarn-ends on the head's inside; repeat with the second corner of the mouth and the other knotted strand of yarn;
Round 22 :
*inv_dec, sc in next 8 st* around – 54
Round 23 :
sc in next 3 st, *inv_dec, sc in next 7 st* x5, inv_dec, sc in next 4 st – 48
Round 24 :
*inv_dec, sc in next 6 st* around – 42 change to HAT-COLOR with last st; secure the yarn-ends of both colors with several knots on the head's inside; cut off the excess yarn;
Round 25 :
in back loops: *2sc in next st, sc in next 6 st* around – 48
Round 26 :
*sc in next st* around – 48 insert the eyes use the two marked stitches to the right and left above the nose; use your crochet hook to widen the stitches; that makes it a lot easier to insert the eyes; put the eyes in and secure them with their closures; push the head's bottom part to the inside; push it inside so that the first round of visible front loops forms the edge between inside and outside of the head; the second round of front loops is the one with the marker in one of its front loops; this round runs around the head's lower part;
Round 27 :
*inv_dec, sc in next 6 st* around – 42
Round 28 :
sc in next 3 st, *inv_dec, sc in next 5 st* x5, inv_dec, sc in next 2 st – 36
Round 29 :
*inv_dec, sc in next 4 st* around – 30
Round 30 :
sc in next 2 st, *inv_dec, sc in next 3 st* x5, inv_dec, sc in next st – 24
Round 31 :
*inv_dec, sc in next 2 st* around – 18
Round 32 :
*inv_dec, sc in next st* around – 12
Round 33 :
*inv_dec* around – 6 change to POMPOM-COLOR with last st; secure the yarn-ends of both colors with several knots on the head's inside; cut off the excess yarn;
Round 34 :
in front loops: *2sc in next st* around – 12
Round 35 :
*2sc in next st, sc in next st* around – 18
Round 36 :
*sc in next st* around – 18
Round 37 :
*sc in next st* around – 18
Info :
begin stuffing the pompom; stuff more as you go; *inv_dec, sc in next st* around – 12
Round 38 :
*inv_dec, sc in next st* around – 12
Round 39 :
*inv_dec* around – 6
Info :
fasten off, close the remaining opening & hide the yarn-end; leave the stitch-marker that you placed in round 15 where it is for now; crochet the scarf (it's crocheted to the head, along the round of front loops around the head's lower part) → continue from here with the scarf pattern
— SCARF (use yarn in SCARF-COLOR) :
Info :
I usually use the color I used for the hat. Info 2: The head should be completed before you begin with this pattern, since the scarf is directly crocheted to the head. See page 30 for details on crocheting the scarf.
Row 1 :
chain 64, ch 1 + turn, begin in 2nd st from hook, sc in next 10 st, → continue next page
Row 2 :
within this row a loop/a hole is created on the scarf's first end; later you can pull the second end through it; ch 1 + turn, begin in 2nd st from hook, sc in next 6 st, chain 4, skip 4 stitches, *2sc in next st, sc in next 10 st* x4, sc in next 10 st – 68
Row 3 :
ch 1 + turn, begin in 2nd st from hook, *sc in next st* across – 68
Row 4 :
ch 1 + turn, begin in 2nd st from hook, in back loops: *slip stitch in next st* across – 68; chain 1, fasten off & weave in the yarn-ends on the scarf's back side; now tuck one end through the other's hole
— Crocheting openings closed & Seamless connections :
Infos :
Detailed photo steps for flattening openings, guiding your hook through stitch-pairs and closing openings with sc in stitch-pairs are provided on the step-by-step pages. Follow the 6-step photo sequence to close small openings and weave in yarn-ends as shown.
This sweet snowman amigurumi pattern is perfect for holiday makes and quick handmade gifts. It includes step-by-step photos for tricky techniques and tips for seamless finishes to make your project look neat and professional. Make a set in different colors and give them as cheerful little gifts this season! 🧶⛄