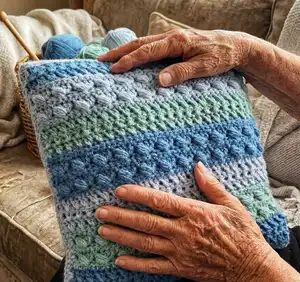
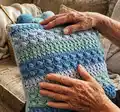
Make a textured Snowberry cushion cover using sideways puff stitches and alternating stripes of soft aran yarns. This pattern walks you through special stitches, row-by-row instructions, edging and finishing so you can create a 14" x 14" cushion cover with neat seams. Suitable for makers who enjoy stitch texture and colour changes.
Progress Tracker
0% Complete
— Special Stitches :
Info :
Sideways Puff Stitch (SWPuff ST): Before you make a sideways puff stitch you always have 3 TR STS (Picture 1). Yarn over hook, insert hook in indicated stitch (this is going to be the ST you put the first TR into the base of the first TR, NOT the TR itself!), pull up a long loop through that stitch/space (3 loops on hook) (Picture 2).
Info :
(Yarn over hook again and insert hook into the same stitch, pull up a loop (same height as previous one) 3 more times. You should have 9 loops on your hook. (Pictures 3-5). Yarn over and pull through 8 loops, (2 loops on your hook) (Pictures 6-7), yarn over and pull through both loops. (Pictures 8-9)
Info :
Pictures 1-9 illustrate the steps for the Sideways Puff Stitch. Practice on a small swatch until the puffs are even in height and tension before working large sections.
Info :
Gauge: 3 HTR = 1" (3 HTR = 2.5 cm) (UK terms) / 3 HDC = 1" (3 HDC = 2.5 cm) (US terms)
Infos :
If a row/round starts with a Chain 1, it is not counted as a stitch, unless stated otherwise. Slip stitches do not count as stitches. Chain 2 always count as treble crochet (UK) / Chain 2 always count as double crochet (US). Use UK terms on the UK section and US terms on the US section. At the end of the round/row, there is a note with the stitch count written in a different colour in bold. Weave in the ends after every 8-10 rows to reduce the amount of ends to weave in at the end. Notes are written in a different colour (in brackets) to help you through the pattern. When working on the corners, always remember that there might be a hidden stitch hiding under the corner stitches which is the first stitch of the previous row. You can start each round as I did in the pattern or you can use a standing stitch or chains, it’s totally up to you!
— Instructions (UK terms) :
Info :
Make 2 (two identical squares, one for each side of the cushion)
Round 1 :
To start: With Color 1 (Dolphin Blue) CH 52
Round 2 :
1 TR into the 4th CH from the hook, 1 TR in each CH to end
Round 3 :
CH 2 (counts as TR), {SK 1 ST, 1 TR in next ST, 1 TR in skipped ST} 24 times, 1 TR in top of 3 CH (50 TR)
Round 4 :
Row 3-4: same as Row 2
Round 5 :
Row 5 (WS): Join Color 2 (Washed Teal) to the last ST of last row with a standing HTR or alternatively, you can CH 1 and HTR in same ST. 1 HTR in next 48 STS, 1 HTR in top of CH 2
Round 6 :
Row 6 (RS): CH 2 (counts as TR), {1 TR in next 3 STS, 1 SWPuff ST, SK 1 ST} 12 times, 1 TR in last ST (38 TR, 12 SWPuff ST)
Round 7 :
Row 7 (WS): CH 1, 1 HTR in same ST, 1 HTR in next 48 STS, 1 HTR in top of CH 2
Round 8 :
Row 8-9: same as Row 6-7
Round 10 :
Row 10 (RS): Join Color 3 (Duck Egg Blue) to the last ST of last row with a standing TR or alternatively, you can CH 1 and TR in same ST. {SK 1 ST, 1 TR in next ST, 1 TR in skipped ST} 24 times, 1 TR in last ST
Info :
(2 TR, 24 TR "crosses")
Round 11 :
Row 11-12: same as Row 2
Round 13 :
Row 13 (WS): Join Color 1 (Dolphin Blue) to the last ST of last row with a standing HTR or alternatively, you can CH 1 and HTR in same ST - same as Row 5
Round 14 :
Row 14-17: repeat Row 6-7 twice
Round 18 :
Row 18-20: Join Color 2 (Washed Teal) to the last ST of last row with a standing TR or alternatively, you can CH 1 and TR in same ST - same as Row 10-12
Round 21 :
Row 21-25: Join Color 3 (Duck Egg Blue) to the last ST of last row with a standing HTR or alternatively, you can CH 1 and HTR in same ST - same as Row 13-17
Round 26 :
Row 26-28: Join Color 1 (Dolphin Blue) the last ST of last row with a standing TR or alternatively, you can CH 1 and TR in same ST - same as Row 10-12
— Edge :
Round 1 :
Join Color 3 (Duck Egg Blue) to the first ST of last Row (that’s the top right corner on the right side). CH 1, 2 DC in same ST, 1 DC in next 48 STS, 3 DC in next ST, DC 48 evenly on the side, 3 DC into the base of 3 CH, 1 DC in next 48 CH, 3 DC in last CH, DC 48 evenly on the side, 1 DC into the first ST with the 2 DC in it, join with a SLST to first DC
Info :
Corner: 3 DC. Sides: 48 DC
Round 2 :
CH 1, 2 DC in same ST, 1 DC in next 50 STS, 3 DC in next ST, 1 DC in next 50 STS, 3 DC in next ST, 1 DC in next 50 STS, 3 DC in next ST, 1 DC in next 50 STS, 1 DC in first ST with the 2 DC in it, join with a SLST to first DC
Info :
Fasten off, weave in all ends. Corner: 3 DC. Sides: 50 DC
— Finishing :
Info :
As you have 2 squares (one for each side), line them up, facing with the right side. Start in one of the corners and start sewing the sides together with the yarn left from the project (used the Duck Egg Blue shade in pictures).
Info :
Keep sewing and when you sew 3 sides together, insert the pillow form. Continue to sew up the last side and then weave in the loose ends.
— Instructions (US terms) :
Info :
Make 2 (US term version shown for those preferring DC/HDC naming)
Round 1 :
To start: With Color 1 (Dolphin Blue) CH 52
Round 2 :
Row 1: 1 DC into the 4th CH from the hook, 1 DC in each CH to end
Round 3 :
Row 2: CH 2 (counts as DC), {SK 1 ST, 1 DC in next ST, 1 DC in skipped ST} 24 times, 1 DC in top of 3 CH (50 DC)
Round 4 :
Row 3-4: same as Row 2. Fasten off. TURN
Round 5 :
Row 5 (WS): Join Color 2 (Washed Teal) to the last ST of last row with a standing HDC or alternatively, you can CH 1 and HDC in same ST. 1 HDC in next 48 STS, 1 HDC in top of CH 2
Round 6 :
Row 6 (RS): CH 2 (counts as DC), {1 DC in next 3 STS, 1 SWPuff ST, SK 1 ST} 12 times, 1 DC in last ST (38 DC, 12 SWPuff ST)
Round 7 :
Row 7 (WS): CH 1, 1 HDC in same ST, 1 HDC in next 48 STS, 1 HDC in top of CH 2
Round 8 :
Row 8-9: same as Row 6-7. Fasten off. TURN
Round 10 :
Row 10 (RS): Join Color 3 (Duck Egg Blue) to the last ST of last row with a standing DC or alternatively, you can CH 1 and DC in same ST. {SK 1 ST, 1 DC in next ST, 1 DC in skipped ST} 24 times, 1 DC in last ST
Info :
(2 DC, 24 DC "crosses"). TURN
Round 11 :
Row 11-12: same as Row 2. Fasten off. TURN
Round 13 :
Row 13 (WS): Join Color 1 (Dolphin Blue) to the last ST of last row with a standing HDC or alternatively, you can CH 1 and HDC in same ST - same as Row 5
Round 14 :
Row 14-17: repeat Row 6-7 twice. Fasten off. TURN
Round 18 :
Row 18-20: Join Color 2 (Washed Teal) to the last ST of last row with a standing DC or alternatively, you can CH 1 and DC in same ST - same as Row 10-12. Fasten off. TURN
Round 21 :
Row 21-25: Join Color 3 (Duck Egg Blue) to the last ST of last row with a standing HDC or alternatively, you can CH 1 and HDC in same ST - same as Row 13-17. Fasten off. TURN
Round 26 :
Row 26-28: Join Color 1 (Dolphin Blue) the last ST of last row with a standing DC or alternatively, you can CH 1 and DC in same ST - same as Row 10-12. Fasten off.
This Snowberry cushion cover pattern is a lovely way to add handmade texture and colour to your home decor. The Sideways Puff stitch creates soft, tactile rows that are both decorative and cozy. Perfect for gifting or keeping — make a matched pair for a sofa or bedroom refresh. 🧶🛋️