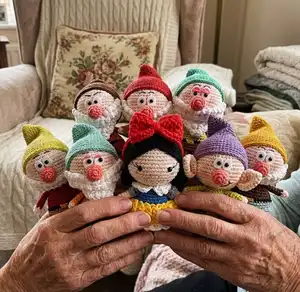
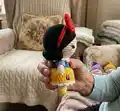
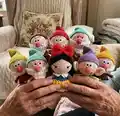
Make an enchanting Snow White and her Seven Dwarfs collection with this detailed crochet pattern. You can make finger puppets or short dolls — both are fun and quick to finish. The pattern includes full step-by-step rounds, color suggestions and assembly tips so you can craft charming characters with confidence.
Progress Tracker
0% Complete
— Master 1st Leg (yarn A) :
Round 1 :
ch 4, start on the 2nd st from the hook, sc 2, (sc 3) on the last st, sc 1, inc (8)
Round 2 :
inc, sc 1, inc 3, sc 1, inc 2 (14)
Round 3-4 :
sc 14 (2 rnds) (14)
Round 5 :
sc 2, dec 5, sc 2, change to yarn B (9)
Round 6-11 :
sc 9 (6 rnds) (9)
— Master 2nd Leg (yarn A) :
Round 1-11 :
Repeat rnd 1-11 of the 1st Leg (9)
Info :
Do not break the yarn, join with the last st of the 1st leg (pic 1-2), continue to crochet the Master’s Body.
— Master Body (yarn B) :
Round 12 :
sc 9 (on the 1st leg), sc 9 (on the 2nd leg) (pic 3) (18)
Round 13-15 :
sc 18 (3 rnds) (18)
Round 16 :
[sc 4, dec] 3x, stuff firmly (15)
Round 17 :
[sc 3, dec] 3x (12)
Round 18 :
[sc 2, dec] 3x (9)
Round 19-24 :
sc 9 (6 rnds) (9)
Round 25 :
[sc 1, dec] 3x (6)
Info :
Break the yarn, weave in the last 6 sts, hide the remaining yarn (pic 4).
— Master Head (yarn B) :
Round 1 :
sc 6 into a magic loop (6)
Round 3-11 :
sc 12 (9 rnds - pic 5), ch 1, turn (12)
Round 12 :
(blo) [sc 1, inc] 6x (18)
Round 13 :
[sc 1, inc, sc 1] 6x (24)
Round 14 :
[sc 3, inc] 6x (30)
Round 15 :
[sc 2, inc, sc 2] 6x (36)
Round 16 :
[sc 5, inc] 6x (42)
Round 17 :
[sc 3, inc, sc 3] 6x (48)
Round 18-26 :
sc 48 (9 rnds - pic 7), insert the 6mm eyes between rnd 19&20, 8 sts apart (I prefer to insert the eyes after finishing, so it would be easier to locate the eyes) (48)
Round 27 :
[sc 3, dec, sc 3] 6x (42)
Round 28 :
[sc 5, dec] 6x (36)
Round 29 :
[sc 2, dec, sc 2] 6x (30)
Round 30 :
[sc 3, dec] 6x (pic 8) (24)
Round 31 :
[sc 1, dec, sc 1] 6x (18)
Round 32 :
[sc 1, dec] 6x (12)
Info :
Before stuffing, if you do not make the body, you can use a 1cm-diameter cylinder (pic 9) or use the body you crocheted (pic 10-11), then stuff firmly and continue to finish the head.
Round 32 (alternate) :
[sc 1, dec] 6x (12)
Round 33 (alternate) :
dec 6 (6)
Info :
Break the yarn, weave in the last 6 sts, hide the remaining yarn (pic 12-13). Join yarn C on the 1st st of the flo on rnd 12 (pic 14).
— Snow White's Dress (yarn C) :
Round 1 :
[sc 3, inc] 3x (15)
Round 2 :
[sc 1, inc, sc 1] 5x (20)
Round 3 :
[sc 3, inc] 5x (25)
Round 4 :
[sc 2, inc, sc 2] 5x (30)
Round 5 :
[sc 5, inc] 5x (35)
Round 6 :
[sc 3, inc, sc 3] 5x, change to yarn D (40)
Round 7 :
(blo) sc 40 (40)
Round 8-12 :
sc 40 (5 rnds) (40)
Round 13 :
(flo) *ch 3, slst on the next st*, repeat ** till the end
Info :
Break the yarn, hide the remaining yarn (pic 15-16). Join yarn A on the 1st of the flo on rnd 7 (pic 17), continue to crochet the following rnds:
Skirt Rnd 1 :
*(sc 1, ch 2, sc 1) on the same st, skip 1 st*, repeat ** till the end (pic 18)
Skirt Rnd 2 :
*(sc 1, ch 2, sc 1) on the chain-space of the last rnd, skip 2 st*, repeat ** till the end
Info :
Break the yarn, hide the remaining yarn (pic 19). Join yarn A and continue with collar and trims as shown in photos.
— Snow White's Collar (yarn D) :
Round 1 :
ch 5, start on the 2nd st from the hook, slst 4, ch 1, turn (4)
Round 2 :
(blo) 4 slst, ch 1, turn (4)
Round 3-41 :
Repeat rnd 2 (39 rnds) (4)
Info :
Break the yarn (pic 20). Sew the collar on the body (pic 21).
— Snow White's Arms (yarn B, X2) :
Round 1 :
sc 7 into a magic loop (7)
Round 2-3 :
sc 7 (2 rnds) (7)
Round 5-6 :
sc 6 (2 rnds), change to yarn E (6)
Round 7 :
ch 2, [(dc 2) in the same st] 6x, slst on the ch 2 (12)
Info :
Break the yarn, sew 2 edges together, then sew the arms on the body (pic 22). Use red yarn to embroider the dotted line on the arms (pic 23-25).
— Snow White's Hair (yarn F) :
Round 1 :
sc 6 into a magic loop (6)
Round 3 :
[sc 1, inc] 6x (18)
Round 4 :
[sc 1, inc, sc 1] 6x (24)
Round 5 :
[sc 3, inc] 6x (30)
Round 6 :
[sc 2, inc, sc 2] 6x (36)
Round 7 :
[sc 5, inc] 6x (42)
Round 8 :
[sc 3, inc, sc 3] 6x (48)
Round 9-18 :
sc 48 (10 rnds) (48)
Round 19 :
sc 13, hdc 2, dc 5, hdc 2, sc 1, slst 1, sc 1, hdc 2, dc 5, hdc 2, sc 14 (48)
Round 20 :
[ch 8, start on the 3rd st from the hook, (hdc 2) 6x, slst on the next st (pic 26-27)] 7x, sc 4, hdc 3, dc 6, hdc 2, sc 1, slst 1, sc 1, hdc 2, dc 6, hdc 3, sc 5, [ch 8, start on the 3rd st from the hook, (hdc 2) 6x, slst on the next st] 7x (pic 28-29)
Info :
Break the yarn. Wear the hair on the head (pic 30-31). Insert the 6mm eyes between rnd 19&20, 8 sts apart. Use brown thread to embroider eyelashes, white yarn to make the eyes bigger, pink thread to embroider the cheeks (pic 33).
— Snow White's Bowtie (yarn G) :
Round 1 :
ch 39, start on the 3rd st from the hook, [sc 1, ch 1, skip 1 st] 18x, sc on the last st, ch 1, turn (38)
Round 2 :
[sc 1 on the chain-space of the last rnd, ch 1, skip 1 st] 18x, sc on the last st, ch 1, turn (38)
Round 3-9 :
Repeat rnd 2 (7 rnds) (38)
Info :
Break the yarn with a really long rest, sew 2 edges together (pic 34-35-36). Use a tapestry needle to make the bowtie shape (pic 37), then wrap the remaining yarn around the bowtie (pic 38).
Bowtie's band :
ch 54, start on the 3rd st from the hook, hdc 52, slst on the 1st ch (52). Break the yarn, sew 2 edges together, and then sew the bowtie to the band (pic 39). Wear the bowtie on the hair (pic 40-41). Put the body inside the head (pic 42-43), you have Snow White Doll.
— 7 Dwarf's Clothes (yarn C) :
Round 1 :
[sc 3, inc] 3x (15)
Round 2 :
[sc 1, inc, sc 1] 5x (20)
Round 3 :
[sc 3, inc] 5x (25)
Round 4 :
[sc 2, inc, sc 2] 5x (30)
Round 5 :
[sc 5, inc] 5x (35)
Round 6 :
[sc 3, inc, sc 3] 5x (40)
Round 7-8 :
sc 40 (2 rnds), change to yarn D (40)
Round 9 :
sc 18, change to yarn E, sc 3, change back to yarn D, sc 19, change to yarn F (40)
Round 10-12 :
sc 40 (3 rnds) (40)
Info :
Break the yarn, hide the remaining yarn (pic 46). Continue with specific dwarf trims and collars shown in photos.
— 7 Dwarf's Arms (yarn B, X2) :
Round 1 :
sc 7 into a magic loop (7)
Round 2 :
sc 7, change to yarn C (7)
Round 5-9 :
sc 6 (5 rnds) (6)
Info :
Break the yarn, sew 2 edges together.
— Long Beard (yarn G) :
Round 1-3 :
Crochet as 1-3 rnd of Short Beard (24)
Round 4 :
ch 1, [sc 4, dec 1] 4x, ch 1, turn (20)
Round 5 :
slst 5, ch 2, [bobble 1, hdc 1] 5x, ch 1, turn (10)
Round 6 :
dec 1, sc 6, dec 1, ch 2, turn (8)
Round 7 :
[Bobble 1, hdc 1] 4x, ch 1, turn (8)
Round 8 :
dec 4, ch 2, turn (4)
Round 9 :
[bobble 1, hdc 1] 2x (4)
Info :
Break the yarn with a long rest to sew later (pic 47).
— Short Beard (yarn G) :
Round 1 :
ch 30, start on the 3rd st from the hook, [bobble 1, hdc 1] 14x, ch 1, turn (28)
Round 2 :
[sc 5, dec] 4x, ch 2, turn (24)
Round 3 :
[bobble 1, hdc 1] 12x, ch 1, turn (24)
Info :
Break the yarn with a long rest to sew later (pic 47).
— Nose (yarn H) :
Round 1 :
sc 5 into a magic loop (5)
Round 3 :
[sc 1, inc] 5x (15)
Info :
Break the yarn with a long rest to sew later (pic 47).
— Hat (yarn I) :
Round 1 :
sc 6 into a magic loop (6)
Round 2 :
[sc 1, inc] 3x (9)
Round 3 :
[sc 2, inc] 3x (12)
Round 4 :
[sc 3, inc] 3x (15)
Round 5 :
[sc 4, inc] 3x (18)
Round 6 :
[sc 5, inc] 3x (21)
Round 7 :
[sc 6, inc] 3x (24)
Round 8 :
[sc 7, inc] 3x (27)
Round 9 :
[sc 8, inc] 3x (30)
Round 10 :
slst 15, sc 15 (30)
Round 11 :
[sc 9, inc] 3x (Tips: if you find it's too hard to crochet on the slst sts, just crochet on the flo of the slst sts) (33)
Round 12 :
slst 17, sc 16 (33)
Round 13 :
[sc 10, inc] 3x (36)
Round 14 :
slst 19, sc 17 (36)
Round 15 :
[sc 11, inc] 3x (39)
Round 16 :
[sc 12, inc] 3x (42)
Round 17 :
[sc 13, inc] 3x (45)
Round 18 :
[sc 14, inc] 3x (48)
Round 19 :
[sc 15, inc] 3x (51)
Round 20 :
[sc 16, inc] 3x (54)
Round 21-24 :
sc 54 (4 rnds) (54)
Info :
Break the yarn with a long rest to sew later (pic 52). Sew on the head as pic 53. Body: see Master Body (pic 54). Put the body inside the head (pic 55), you have a Dwarf Doll.
— Ears (yarn B, X2 for Dopey) :
Round 1 :
sc 3 into a magic loop (3)
Info :
Break the yarn, weave in the last 7 sts, fold the ears in half and sew 2 edges together. Sew the ears for Dopey (pic 56), use black thread to embroider smiley face for him (pic 57).
— 7 Dwarf's Head :
Info :
Head: see Master Head. Cut 2 white oval eye (1cm x 1.5cm) (pic 44), insert 5mm safety eyes between the eyes (pic 45), insert the eyes between rnd 21 & 22 of the head. Insert the 6mm eyes between rnd 19&20, 8 sts apart for dwarfs as instructed. Use brown thread to embroider eyelashes & eyebrows, white yarn to make the eyes bigger, pink thread to embroider the cheeks (pic 63).
— 7 Dwarf's Clothes Assembly :
Info :
Follow the colors and trims on each dwarf's materials page. Break yarn, hide remaining yarn and sew trims as pictured (pic 46-51). For each dwarf, attach beard and nose as shown (pic 48-51).
— Apple (yarn G) :
Round 1 :
sc 6 into a magic loop (6)
Round 2 :
inc 6 (if you do not make finger puppet, skip rnd 3-11, continue to crochet rnd 12, but on both loops, not just blo) (12)
Round 3-11 :
sc 12 (9 rnds - pic 100), ch 1, turn (12)
Round 12 :
(blo) [sc 1, inc] 6x (18)
Round 13 :
[sc 1, inc, sc 1] 6x (24)
Round 14 :
[sc 3, inc] 6x (30)
Round 15 :
[sc 2, inc, sc 2] 6x (36)
Round 16 :
[sc 5, inc] 6x (42)
Round 17-21 :
sc 42 (5 rnds), change to yarn H (42)
Round 23 :
(blo) sc 42 (42)
Round 24-26 :
sc 42 (3 rnds) (42)
Round 27 :
[sc 5, dec] 6x (36)
Round 28 :
[sc 2, dec, sc 2] 6x (30)
Round 29 :
[sc 3, dec] 6x (24)
Round 30 :
[sc 1, dec, sc 1] 6x, stuff firmly (18)
Round 31 :
[sc 1, dec] 6x (12)
Info :
Break the yarn with a long rest, weave in the last 6 sts (pic 102-103). Use a tapestry needle to make a dent as pic 105. Join yarn H on the 1st st of the flo on rnd 23, continue to crochet the poison drops:
Poison drops round 1 :
[sc 1, hdc 1, (dc 3) on the same st, hdc 1, sc 1, ch 8, start on the 3rd st from the hook, (hdc 2), (hdc 2), sc 4, slst on the next st, sc 2, ch 6, start on the 3rd st from the hook, (hdc 2), sc 3, slst on the next st, sc 1, hdc 1, (dc 3), hdc 1, sc 1, ch 4, start on the 2nd st from the hook, inc, sc 2, slst on the next st, sc 3, ch 3, start on the 2nd st from the hook, (hdc 2), sc 3, slst on the next st, sc 2] 2x, sc 1, ch 6, start on the 3rd st from the hook, (hdc 2), sc 3, slst on the next st (long sequence as shown in the pattern)
Info :
Break the yarn with a long rest (pic 107), use a tapestry needle to sew the drops (pic 108-109-110).
Create your own fairy-tale crew with this Snow White and Seven Dwarfs set, perfect for gifts or playful displays. Each tiny character is full of personality and handcrafted charm. Whether you make finger puppets or short dolls, they bring storybook magic to life. 🧶✨