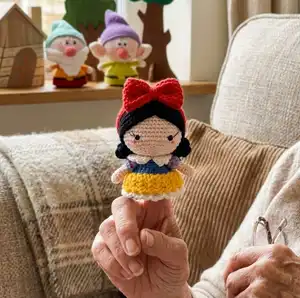
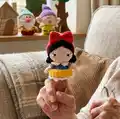
🧢 Beautiful ✨ Detailed πŸ’ Adorable

Snow White & Seven Dwarfs Amigurumi Pattern

Snow White & Seven Dwarfs Amigurumi Pattern
4.8β˜… Rating
5-7 Hours Time Needed
4.0K Made This
βœ‚οΈ

Intermediate Level

Ideal for those with basic crochet experience, featuring slightly more advanced stitches and techniques to expand your skills.

⏱️

Weekend Treat

Takes 5-7 hours, making it an enjoyable project to finish over a couple of days.

🧸

Cute Companion

An adorable friend to cherish, handcrafted with love to bring comfort and joy for years to come.

About This Snow White & Seven Dwarfs Amigurumi Pattern

This pattern teaches you to crochet Snow White and the Seven Dwarfs as finger puppets or short dolls. It features clear step-by-step rounds, photo references, and interchangeable yarn color lists for each character. You will learn shaping techniques, simple bobble stitches, and how to assemble small amigurumi accessories.

Snow White & Seven Dwarfs Amigurumi Pattern crochet pattern - detailed view of completed project

Perfect for gift-making or creating a full fairy-tale set, the pattern includes the Master pieces you can adapt for every character. Follow the photos to sew, place eyes, and add embroidered details for personality.

Why You'll Love This Snow White & Seven Dwarfs Amigurumi Pattern

I absolutely love this pattern because it brings a beloved fairy tale to life in a compact, delightful form. I enjoy the versatilityβ€”make finger puppets for play or add bodies to create keepsake dolls. I love how the master head and body sections are reusable, which saves time and keeps the characters consistent. The pattern mixes simple amigurumi fundamentals with playful details like collars, beards, and a crown that make each figure unique.

Snow White & Seven Dwarfs Amigurumi Pattern step 1 - construction progress Snow White & Seven Dwarfs Amigurumi Pattern step 2 - assembly progress Snow White & Seven Dwarfs Amigurumi Pattern step 3 - details and accessories Snow White & Seven Dwarfs Amigurumi Pattern step 4 - final assembly and finishing

Switch Things Up

I love how versatile this pattern is for customization β€” change colors and yarn types to create different moods and characters.

You can make a tiny finger puppet by skipping the body rounds or a full doll by crocheting the body and stuffing it firmly.

Try pastel shades for a softer Snow White or saturated brights for a bold, modern take on the characters.

To make a chunky version, use a bulkier yarn and a larger hook; for minis, use fingering yarn and a smaller hook to make pocket-sized dolls.

Experiment with embroidering different facial expressions; a few stitches of brown thread can create eyelashes, smiles, or eyebrows that change the character's personality.

Add felt accessories like crowns or tiny belts instead of crocheting them for quicker assembly and contrast in texture.

I often swap the safety eyes for embroidered eyes for a softer, toddler-safe toy β€” it also gives a different hand-stitched charm to the face.

To create a themed set, recolor all dwarfs to coordinate with a seasonal palette or create a rainbow of hats to make the set playful and bright.

Want to personalize? Embroider initials on the dress hem or add tiny buttons sewn from contrasting thread for a custom finish.

Use wire in arm cores for posability, or add a loop to the hat to turn the pieces into hanging ornaments or keychains.

Common Mistakes & How to Fix Them

βœ— Skipping stitch markers when joining legs to the body causes misaligned seams; use stitch markers at the join points and count stitches carefully before sewing. βœ— Forgetting to stuff as you go will make shaping the head and body difficult; stuff gradually and firmly at the recommended rounds to maintain shape. βœ— Changing yarn colors without securing tails can lead to loose ends; weave in or tie off color changes and leave a small tail to sew later. βœ— Not placing safety eyes at the recommended rounds will shift facial placement; insert the eyes between the specified rounds and measure spacing before securing.

Snow White & Seven Dwarfs Amigurumi Pattern

Create a charming Snow White and her seven dwarfs with this detailed crochet pattern. You can make finger puppets or turn them into short dolls β€” both are fun and quick. The pattern includes step-by-step instructions, clear photos, and all materials so you can crochet each character with confidence.

Intermediate 5-7 Hours

Materials Needed for Snow White & Seven Dwarfs Amigurumi Pattern

β€” Main Fabric

  • 01
    YarnArt Jeans (50g, 160m) various colors as listed per character (see materials pages)
  • 02
    Susan Cotton (50g, 120m) skin color and accent colors for cheeks and details
  • 03
    Etrofil Jeans (50g, 160m) for some accent colors where noted
  • 04
    Specific color examples: Color A yellow YarnArt Jeans 35 (50g,160m), Color B skin Susan Cotton 07 (50g,120m), Color C blue YarnArt Jeans 17 (50g,160m), Color D white YarnArt Jeans 01 (50g,160m), Color E light blue YarnArt Jeans 15 (50g,160m), Color F black YarnArt Jeans 53 (50g,160m), Color G red YarnArt Jeans 26 (50g,160m)

β€” Tools Required

  • 01
    Crochet hook size 2.5mm
  • 02
    1 pair of safety eyes size 6mm (some pages also reference 5mm)
  • 03
    Tapestry needles
  • 04
    Brown thread for embroidery
  • 05
    Pins for assembly
  • 06
    Stitch markers
  • 07
    Scissors
  • 08
    Polyester fiberfill (stuffing)

Progress Tracker

0% Complete

β€” Master 1st Leg (yarn A) :

Round 1 :

ch 4, start on the 2nd st from the hook, sc 2, (sc 3) on the last st, sc 1, inc (8)

Round 2 :

inc, sc 1, inc 3, sc 1, inc 2 (14)

Round 3-4 :

sc 14 (2 rnds) (14)

Round 5 :

sc 2, dec 5, sc 2, change to yarn B (9)

Round 6-11 :

sc 9 (6 rnds) (9)

Round 12 :

sc 2 (2)

Info :

Break the yarn.

β€” Master 2nd Leg (yarn A) :

Round 1-11 :

Repeat rnd 1-11 of the 1st Leg (9)

Info :

Do not break the yarn, join with the last st of the 1st leg (pic 1-2), continue to crochet the Master’s Body.

β€” Master Body (yarn B) :

Round 12 :

sc 9 (on the 1st leg), sc 9 (on the 2nd leg) (pic 3) (18)

Round 13-15 :

sc 18 (3 rnds) (18)

Round 16 :

[sc 4, dec] 3x, stuff firmly (15)

Round 17 :

[sc 3, dec] 3x (12)

Round 18 :

[sc 2, dec] 3x (9)

Round 19-24 :

sc 9 (6 rnds) (9)

Round 25 :

[sc 1, dec] 3x (6)

Info :

Break the yarn, weave in the last 6 sts, hide the remaining yarn (pic 4).

β€” Master Head (yarn B) :

Round 1 :

sc 6 into a magic loop (6)

Round 2 :

inc 6 (12)

Info :

Continue to crochet increasing rounds according to the Master Head shaping until you reach the stuffing stage as shown in the photos. Before stuffing, if you do not make the body, you can use a 1cm-diameter cylinder (pic 9) or use the body you crocheted (pic 10-11), then stuff firmly and continue to finish the head.

Round 32 :

[sc 1, dec] 6x (12)

Round 33 :

dec 6 (6)

Info :

Break the yarn, weave in the last 6 sts, hide the remaining yarn (pic 12-13). Join yarn C on the 1st st of the flo on rnd 12 (pic 14).

β€” Snow White's Dress (yarn C) :

Round 1 :

[sc 3, inc] 3x (15)

Round 2 :

[sc 1, inc, sc 1] 5x (20)

Round 3 :

[sc 3, inc] 5x (25)

Round 4 :

[sc 2, inc, sc 2] 5x (30)

Round 5 :

[sc 5, inc] 5x (35)

Round 6 :

[sc 3, inc, sc 3] 5x, change to yarn D (40)

Round 7 :

(blo) sc 40 (40)

Round 8-12 :

sc 40 (5 rnds) (40)

Round 13 :

(flo) *ch 3, slst on the next st*, repeat ** till the end

Info :

Break the yarn, hide the remaining yarn (pic 15-16). Join yarn A on the 1st of the flo on rnd 7 (pic 17), continue to crochet the following rnds:

Round 1 :

*(sc 1, ch 2, sc 1) on the same st, skip 1 st*, repeat ** till the end (pic 18)

Round 2 :

*(sc 1, ch 2, sc 1) on the chain-space of the last rnd, skip 2 st*, repeat ** till the end

Info :

Break the yarn, hide the remaining yarn (pic 19).

β€” Snow White's Collar (yarn D) :

Round 1 :

ch 5, start on the 2nd st from the hook, slst 4, ch 1, turn (4)

Round 2 :

(blo) 4 slst, ch 1, turn (4)

Round 3-41 :

Repeat rnd 2 (39 rnds) (4)

Info :

Break the yarn (pic 20). Sew the collar on the body (pic 21).

β€” Snow White's Arms (yarn B, X2) :

Round 1 :

sc 7 into a magic loop (7)

Round 2-3 :

sc 7 (2 rnds) (7)

Round 4 :

dec, sc 5 (6)

Round 5-6 :

sc 6 (2 rnds), change to yarn E (6)

Round 7 :

ch 2, [(dc 2) in the same st] 6x, slst on the ch 2 (12)

Round 8 :

sc 12 (12)

Round 9 :

dec 6 (6)

Info :

Break the yarn, sew 2 edges together, then sew the arms on the body (pic 22). Use red yarn to embroider the dotted line on the arms (pic 23-24-25).

β€” Snow White's Hair (yarn F) :

Round 1 :

sc 6 into a magic loop (6)

Round 2 :

inc 6 (12)

Round 3 :

[sc 1, inc] 6x (18)

Round 4 :

[sc 1, inc, sc 1] 6x (24)

Round 5 :

[sc 3, inc] 6x (30)

Round 6 :

[sc 2, inc, sc 2] 6x (36)

Round 7 :

[sc 5, inc] 6x (42)

Round 8 :

[sc 3, inc, sc 3] 6x (48)

Round 9-18 :

sc 48 (10 rnds) (48)

Round 19 :

sc 13, hdc 2, dc 5, hdc 2, sc 1, slst 1, sc 1, hdc 2, dc 5, hdc 2, sc 14 (48)

Round 20 :

[Long row with chains and clusters as pictured in pattern - follow pics 26-27 and description] (complex sequence pictured)

Info :

Break the yarn. Wear the hair on the head (pic 30-31). Insert the 6mm eyes between rnd 19&20, 8 sts apart. Use brown thread to embroider eyelashes, white yarn to make the eyes bigger, pink thread to embroider the cheeks (pic 33).

β€” Snow White's Bowtie (yarn G) :

Round 1 :

ch 39, start on the 3rd st from the hook, [sc 1, ch 1, skip 1 st] 18x, sc on the last st, ch 1, turn (38)

Round 2 :

[sc 1 on the chain-space of the last rnd, ch 1, skip 1 st] 18x, sc on the last st, ch 1, turn (38)

Round 3-9 :

Repeat rnd 2 (7 rnds) (38)

Info :

Break the yarn with a really long rest, sew 2 edges together (pic 34-35-36). Use a tapestry needle to make the bowtie shape (pic 37), then wrap the remaining yarn around the bowtie (pic 38). Bowtie's band: ch 54, start on the 3rd st from the hook, hdc 52, slst on the 1st ch (52). Break yarn, sew 2 edges together, and then sew the bowtie to the band (pic 39). Wear the bowtie on the hair (pic 40-41). If you just make the finger puppet, your Snow White is ready to play with. Put the body inside the head (pic 42-43), you have Snow White Doll.

Assembly Instructions

  • Attach head to body by inserting the neck portion (rounds 21-25 of the Master Body) into the opening at the top of the body and sew securely with a yarn needle.
  • Sew two edges of each arm together then position and sew the arms to the body between the dress rounds as shown in photos, angle slightly forward for a natural pose.
  • Place and sew the hair onto the head covering the join line; insert the 6mm eyes between rounds 19 and 20, 8 stitches apart, before final placement.
  • Attach the collar and dress pieces by sewing through the top edge of the body, using photos for alignment. Pin pieces before sewing to ensure symmetry.

Important Notes

  • πŸ’‘Use stitch markers to keep track of rounds, especially when joining legs and changing to the body.
  • πŸ’‘Stuff firmly but not too tightly for best shape β€” overstuffing can distort the head and body.
  • πŸ’‘Pin all parts in place before sewing to ensure correct positioning and symmetry.
  • πŸ’‘Weave in ends as you go to avoid a tedious finishing session at the end.
  • πŸ’‘Insert safety eyes at the recommended rounds (between rnd 19&20 on the head) and secure them before final stuffing.

This Snow White & Seven Dwarfs set is designed to spark imagination and handmade joy. Follow the step-by-step photos and master pieces to make a complete set for play or display. Collect all characters and customize colors to make each one unique. 🧢✨😊

You ask,

we answer.

FAQs

What size will the finished piece be?

The finished amigurumi measures approximately 10-12 cm tall when using the recommended yarn and 2.5mm hook; finger puppets are slightly shorter depending on whether you include the body.

Can I use different yarn weights for this pattern?

Yes, you can use different yarn weights, but this will affect the final size. Adjust your hook accordingly and expect changes in stitch counts and proportions.

Do I need prior crochet experience for this pattern?

This pattern is rated intermediate, so basic knowledge of crochet stitches (sc, inc, dec, hdc) and experience working in rounds is recommended.

How long does this project typically take to complete?

Most crocheters complete a single character in 5-7 hours, though times vary by experience, whether you make finger puppets or full dolls, and how many details you add.

Are the safety eyes required?

Safety eyes are recommended for a professional look and secure placement; you may embroider eyes instead if making toys for very young children.