🧶 Beautiful ✨ Detailed 💝 Adorable

Mini Monkey Amigurumi Pattern

Mini Monkey Amigurumi Pattern
4.6★ Rating
5-7 Hours Time Needed
3.6K Made This
✂️

Intermediate Level

Ideal for those with basic crochet experience, featuring slightly more advanced stitches and techniques to expand your skills.

⏱️

Weekend Treat

Takes 5-7 hours, making it an enjoyable project to finish over a couple of days.

🧸

Cute Companion

An adorable friend to cherish, handcrafted with love to bring comfort and joy for years to come.

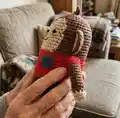
About This Mini Monkey Amigurumi Pattern

This pattern creates a small, stylized monkey amigurumi (approx 15 cm/5.9 in) with color-blocked clothing and cute facial details. The design uses single crochet techniques, simple increases and decreases, and clear color-change symbol charts. You will work continuously from head through body and divide for legs, then add separate arms, ears and a tiny pocket. The layout includes helpful photos and symbol patterns so you can follow color changes accurately.

Mini Monkey Amigurumi Pattern crochet pattern - detailed view of completed project

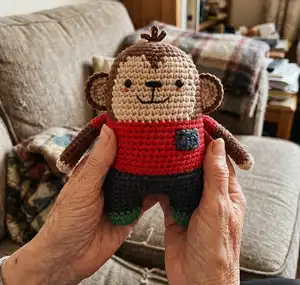
Perfect as a gift or a desktop companion, the Mini Monkey is compact and quick to make. The pattern uses worsted yarn on a 3mm hook for firm stitches and neat shaping.

Why You'll Love This Mini Monkey Amigurumi Pattern

I absolutely love this pattern because it brings a lot of personality with simple shapes and color changes. I enjoyed designing the rounded face and tiny pocket that give the monkey character without complicated techniques. The pattern is compact enough to finish in a weekend yet detailed enough to feel rewarding. I also love how the symbol charts make color changes easy to follow, so the finished toy looks tidy and professional.

Mini Monkey Amigurumi Pattern step 1 - construction progress Mini Monkey Amigurumi Pattern step 2 - assembly progress Mini Monkey Amigurumi Pattern step 3 - details and accessories Mini Monkey Amigurumi Pattern step 4 - final assembly and finishing

Switch Things Up

I love how easily you can customize this Mini Monkey by changing the yarn colors—try pastel shades for a softer look or bright primary colors for a playful toy.

I often swap the navy pants for teal or stripe the shirt in alternating colors to create a family of monkeys with different personalities.

If you want a larger monkey, use a bulkier yarn and increase hook size accordingly; for a tiny keyring buddy, use fingering yarn with a smaller hook.

I sometimes embroider a tiny heart on the pocket or add an initial to personalize the doll as a gift.

Try using safety eyes of different sizes or embroidered eyes for a safer toy for babies—this changes the character of the face dramatically.

I add a little wire into the arms when I want posable limbs, but if you prefer soft toys, keep the stuffing light and skip the wire.

For a winter theme, make a little scarf or hat in contrasting colors and stitch it on or make it removable.

I recommend experimenting with textured stitches for the shirt area to add visual interest—try a couple of rounds of half double crochet for a ribbed effect.

Consider using a different yarn fiber, such as cotton for a firmer fabric, or acrylic for easy care—each fiber changes the feel of the finished toy.

I also enjoy making matching accessories like tiny shoes or a mini backpack to expand play possibilities and make the set more special.

Common Mistakes & How to Fix Them

✗ Skipping stitch markers when dividing the legs leads to miscounted stitches; place markers to mark leg boundaries and count stitches regularly. ✗ Not changing yarn colors exactly at the stitch indicated will shift the color blocks; follow the symbol chart and change yarn at the exact stitch shown. ✗ Overstuffing the head or legs makes shaping awkward and stretched; stuff gradually and moderately to retain smooth curving and shape. ✗ Sewing ears or arms without pinning causes uneven placement; pin and check locations (round references provided) before sewing to ensure symmetry.

Mini Monkey Amigurumi Pattern

Make a charming Mini Monkey amigurumi with clear step-by-step rounds, color-change charts, and simple assembly guidance. You will enjoy crocheting this 15 cm (5.9 in) toy using worsted yarn and a 3mm hook. The pattern includes head, body, legs, arms, ears and a pocket with detailed finishing notes so your plushie looks neat and professional.

Intermediate 5-7 Hours

Materials Needed for Mini Monkey Amigurumi Pattern

— Main Fabric

  • 01
    Worsted weight yarn (#4) Brown yarn - small amount (main head and arms)
  • 02
    Worsted weight yarn (#4) Black yarn - small amount (nose/face details)
  • 03
    Worsted weight yarn (#4) Beige yarn - small amount (face inset, inner ears, hands)
  • 04
    Worsted weight yarn (#4) Green yarn - small amount (feet tips)
  • 05
    Worsted weight yarn (#4) Red yarn - small amount (shirt)
  • 06
    Worsted weight yarn (#4) Navy yarn - small amount (pants and pocket), used also for second leg and pocket
  • 07
    Worsted weight yarn (#4) Orange yarn - small amount (optional accents)

— Tools Required

  • 01
    Crochet hook size 5/0 (3mm)
  • 02
    Yarn needle (for sewing and weaving in ends)
  • 03
    Stitch markers
  • 04
    Scissors
  • 05
    Polyester fiberfill stuffing
  • 06
    Glue (to glue the eyes on the face if desired)
  • 07
    5mm black plastic safety eyes x2
  • 08
    Wooden pins for feet (to straighten doll, optional)

Progress Tracker

0% Complete

— Head / Body / Legs :

Info :

*Change the color of the yarn according to the SYMBOL PATTERNS. Changing the yarn color is not mentioned in the descriptive design.

Info :

Use the Brown yarn to make MAGIC RING.

Round 1 :

scx6 in the yarn loop, tighten the loop [6 sts]

Round 2 :

(2-sc inc) x 6 [12]

Round 3 :

(scx1, 2-sc inc) x 6 [18]

Round 4 :

(scx2, 2-sc inc) x 6 [24]

Round 5 :

(scx3, 2-sc inc) x 6 [30]

Round 6 :

(scx4, 2-sc inc) x 6 [36]

Round 7 :

(scx5, 2-sc inc) x 6 [42]

Round 8 :

(scx6, 2-sc inc) x 6 [48]

Round 9~36 :

sc in all 48 st [48]

Info :

Do not forget to change the color as shown in the illustration to the right. (Check page 1 for more details.)

Info :

DIVIDE THE LEGS: To make a leg, identify the center space between the legs by the 6 stitches, and each leg identifies the other by 18. (Use stitch markers to help.) Sc at the 31th st of the Rnd 36. This sc is the first st of the first leg (left leg). Continue working on the first leg (left leg).

Round 37~40 :

sc in all 18 st [18]

Round 41 :

(scx1, sc2tog) x 6 [12]

Round 42 :

(sc2tog) x 6 [6]

Info :

Fasten off, leaving a long tail. Stuff the leg. Using a yarn needle, weave the yarn tail through the front loop of each remaining st and pull tight to close.

Second leg (Right leg) :

Rejoin the Navy yarn to 7th back unworked st of Rnd 36. This sc is the first st for the second leg (right Leg). Continue working the second leg (right leg) the same way as the first leg (left leg), from Rnd 37~42. Using a yarn needle, sew the 6 sts between the legs.

— Arm x2 :

Info :

Use the Beige yarn to make MAGIC RING.

Round 1 :

scx5 in the yarn loop, tighten the loop [5 sts]

Round 2 :

(2-sc inc) x 5 [10]

Round 3~16 :

sc in all 10 st [10]

Info :

Fasten off, Leaving a long tail for sewing. Flatten the ARM, do not stuff.

— Pocket :

Info :

Use the Navy yarn to make 5 chains.

Round 1 :

hdcx1 in third ch from hook, hdcx2 [4 sts] *ch 2 = hdcx1

Round 2 :

ch 2, turn, hdcx3 [4]

Info :

Fasten off, Leaving a long tail for sewing.

— Ear x2 :

Info :

Use the Beige yarn to make MAGIC RING.

Round 1 :

scx6 in the yarn loop, tighten the loop [6 sts]

Round 2 :

ch 1, turn, sc, hdc, dcx2, hdc, sc [6]

Round 3 :

ch 1, turn, sc, (2-sc inc) x 4, sc [10]

Info :

Fasten off, and make another Beige ear, two Brown ears by the same way.

Item Name (Edging) :

Edging: Locate beige colored ear part on the brown ear, join the brown yarn into the bottom right corner of both ears and SC together. (Beige: the stitches only through backloop/ Brown: go through both loops). [10]

Info :

Fasten off, Leaving a long tail for sewing.(Fold the ears slightly.)

Assembly Instructions

  • Position and glue or attach 5mm black eyes between rounds 13 and 14 on the face, spaced as shown in the illustration, then embroider or attach nose and mouth details.
  • Sew the ears to the head, aligning inner beige portion with the head edge; fold slightly and stitch at indicated positions (see ear location illustration between rounds 6-8 / eye and cheek location references).
  • Attach arms on either side of the body between rounds 20 and 21, angling slightly forward for a natural pose, and sew securely with whipstitch.
  • Sew the pocket onto the body between rounds 22 and 24 using the long tail left from finishing the pocket; secure all edges neatly.
  • Sew the legs to the body and then sew the 6 sts between the legs together to close the gap for a smooth crotch seam.
  • Weave in all loose ends with a yarn needle and trim excess yarn; add a small dab of glue behind each safety eye if using glued eyes for security.

Important Notes

  • 💡Use stitch markers to keep track of the beginning of each round and to mark leg division points for accurate shaping.
  • 💡Stuff parts gradually and evenly—stuff the head and legs firmly but not overpacked to preserve shape and stitch definition.
  • 💡Pin all parts in place before sewing to check placement and symmetry; use the provided round references to match positions exactly.
  • 💡Flatten the arms and do not stuff them; leave long tails on pieces intended for sewing to the body.
  • 💡Follow the SYMBOL PATTERNS carefully when changing yarn colors; color change locations are shown in the charts and not all color changes are written in the descriptive rounds.

This adorable Mini Monkey is designed to be a quick, lovable companion you can finish in a weekend. Crocheted in worsted yarn on a 3mm hook, it has a neat color block shirt, tiny pocket, and sweet facial details. Whether you make one for yourself or give it as a gift, it will bring a smile and handmade charm. 🧶🐒✨

You ask,

we answer.

FAQs

What size will the finished piece be?

The finished amigurumi measures approximately 15 cm (5.9 inches) tall when using the recommended worsted yarn and 3mm crochet hook.

Can I use different yarn weights for this pattern?

Yes, you can use different yarn weights, but this will affect the final size. Use a larger hook for bulkier yarn or a smaller hook for lighter yarn, and expect a change in finished dimensions.

Do I need prior crochet experience for this pattern?

This pattern is rated intermediate, so basic knowledge of single crochet, increases, decreases, and sewing amigurumi pieces is recommended for best results.

How long does this project typically take to complete?

Most crocheters complete this project in 5-7 hours, though time may vary based on experience level, yarn choice, and working pace.