๐Ÿงถ Beautiful โœจ Detailed ๐Ÿ’ Adorable

Snow Globe Pattern

Snow Globe Pattern
4.3โ˜… Rating
5-7 Hours Time Needed
3.3K Made This
โœ‚๏ธ

Intermediate Level

Ideal for those with basic crochet experience, featuring slightly more advanced stitches and techniques to expand your skills.

โฑ๏ธ

Weekend Treat

Takes 5-7 hours, making it an enjoyable project to finish over a couple of days.

๐Ÿก

Cozy Accent

A warm touch for your space that transforms ordinary corners into inviting nooks filled with handmade charm.

About This Snow Globe Pattern

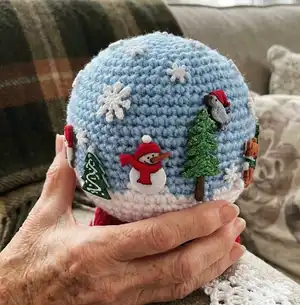
This pattern creates a small, decorative crochet snow globe approximately 5" (13 cm) tall, worked in continuous rounds. It uses tapestry crochet color changes to create the snowy horizon and a contrasting base. The pattern includes clear round-by-round instructions for the globe, the base, and a separate bottom circle to finish neatly.

Snow Globe Pattern crochet pattern - detailed view of completed project

Youll learn invisible decreases and back-loop-only stitches for a crisp edge and stable base. The pattern also covers how to add cardboard and weighted stuffing for stability.

Why You'll Love This Snow Globe Pattern

I absolutely love this pattern because it transforms simple stitches into a delightful winter decoration that you can personalize. I enjoy the tapestry colorwork in Round 20-21 โ€” it creates a pretty horizon line that really sells the snow globe look. The base construction with a cardboard insert and weighted filling makes it feel substantial and display-ready. I also love that you can embellish it with flat-back buttons or little trinkets to make each globe uniquely yours.

Snow Globe Pattern step 1 - construction progress Snow Globe Pattern step 2 - assembly progress Snow Globe Pattern step 3 - details and accessories Snow Globe Pattern step 4 - final assembly and finishing

Switch Things Up

I love how easy it is to customize this pattern with different color combinations; try pastel tones for a soft, winter wonderland or bold jewel tones for a modern look.

You can change the size by switching yarn weight and hook size โ€” bulky yarn with a larger hook will make a chunky statement piece while finer yarn creates a delicate mini globe.

I often swap the burgundy base for a metallic or sparkly yarn to add holiday shimmer and a dressy finish to the globe.

Try adding embroidered details or tiny crocheted characters glued inside the globe for extra charm and storytelling possibilities.

If you prefer a secure embellishment method, stitch buttons on with thread before gluing, or use flat-back buttons so they sit flush against the fabric.

I like to hide a small pouch of weighted pellets inside the base so the globe stands firmly on display and resists tipping.

To make a keychain version, use thinner yarn, smaller hook, and add a jump ring before finishing the top โ€” perfect for gifts and small keepsakes.

If you want a snowier look, sew small fleece or felt snowflakes inside the white band or glue tiny sequins around the globe for sparkle.

You can also make a collection in different sizes and colors to create a seasonal vignette or mantel display that feels cohesive yet varied.

Experiment with different button shapes and themes โ€” trees, snowmen, stars โ€” arranged around the horizon to tell a little scene around your globe.

Common Mistakes & How to Fix Them

โœ— Skipping the stitch marker for continuous rounds leads to lost round starts; always place a marker at the first stitch of each round to keep track. โœ— Not carrying unused yarn correctly during tapestry crochet can create bulky floats; lay the unused color on top of the previous row and work over it to keep the fabric flat. โœ— Forgetting to leave a long tail when making the bottom circle makes sewing the base difficult; leave a long tail so you can securely sew the bottom to the base. โœ— Under stuffing the globe causes a saggy, misshapen sphere; stuff gradually and firmly for a nice spherical shape while leaving room to finish the bottom seam.

Snow Globe Pattern

Make a charming crochet snow globe to brighten your home or give as a handmade gift. This pattern walks you through the spherical globe, the sturdy base, and finishing touches so you can embellish with buttons or tiny decorations. Youll use tapestry crochet techniques and learn invisible decreases for a neat finish. Perfect for holiday decor or a cozy winter craft.

Intermediate 5-7 Hours

Materials Needed for Snow Globe Pattern

โ€” Main Fabric

  • 01
    Red Heart Super Saver medium weight #4 yarn - Color A: light blue (main globe color)
  • 02
    Red Heart Super Saver medium weight #4 yarn - Color B: white (snow layer)
  • 03
    Red Heart Super Saver medium weight #4 yarn - Color C: burgundy (base color)

โ€” Tools Required

  • 01
    Crochet hook E/4 (3.5 mm)
  • 02
    Stitch marker
  • 03
    Large sewing needle
  • 04
    Poly-fil stuffing
  • 05
    Piece of cardboard (for base insert)
  • 06
    Scissors
  • 07
    Hot glue gun
  • 08
    Weighted stuffing material (I used Poly Pellets weighted stuffing beads)
  • 09
    Winter-themed flat back buttons (or buttons with shanks removed)
  • 10
    Craft cutter to remove shanks

Progress Tracker

0% Complete

โ€” Notes :

Infos :

Make a large loop by putting the yarn tail behind the working yarn (the yarn coming from the skein) leaving a 4-6 inch tail. Draw the working yarn through the loop, now you have one loop on the hook. Work the final stitch with the first color, but do not complete the stitch. You will have 2 loops remain on the hook. Drop first color and draw through the loops on the hook new color and complete the stitch. The snow globe is worked in continuous rounds. Use stitch marker to mark first stitch of each round. This pattern uses tapestry crochet technique โ€“ working over the color not in use. To carry the unused color, lay it on top of the previous row and work over it.

โ€” Special Stitch :

Info :

INV DEC (invisible decrease) - put hook through the front loop only of two consecutive stitches. You have three loops on hook. Yarn over and pull through two loops. You have two loops on hook. Yarn over and pull through those two loops.

โ€” Snow globe :

Info :

With Color A, make magic ring;

Round 1 :

Ch 1, 6 SC in magic ring. Total โ€“ 6 SC.

Round 2 :

2 SC in each St around. Total โ€“ 12 SC.

Round 3 :

[2 SC in first St, SC in next St] 6 times. Total โ€“ 18 SC.

Round 4 :

SC in first St, [2 SC in next St, SC in each of next 2 Sts] 5 times, 2 SC in next St, SC in next St. Total - 24 SC.

Round 5 :

[2 SC in first St, SC in each of next 3 Sts] 6 times. Total โ€“ 30 SC.

Round 6 :

SC in first St and in next St, [2 SC in next St, SC in each of next 4 Sts] 5 times, 2 SC in next St, SC in each of next 2 Sts. Total โ€“ 36 SC.

Round 7 :

[2 SC in first St, SC in each of next 5 Sts] 6 times. Total โ€“ 42 SC.

Round 8 :

SC in first St and in each of next 2 Sts, [2 SC in next St, SC in each of next 6 Sts] 5 times, 2 SC in next St, SC in each of next 3 Sts. Total โ€“ 48 SC.

Round 9 :

[2 SC in first St, SC in each of next 7 Sts] 6 times. Total โ€“ 54 SC.

Round 10 :

SC in first St and in each of next 3 Sts, [2 SC in next St, SC in each of next 8 Sts] 5 times, 2 SC in next St, SC in each of next 4 Sts. Total โ€“ 60 SC.

Round 11-19 :

SC in each St around.

Round 20 :

A:(SC โ€“ 4), B:(SC โ€“ 4), A:(SC โ€“ 9), B:(SC โ€“ 4), A:(SC โ€“ 7), B:(SC โ€“ 5), A:(SC โ€“ 7), B:(SC โ€“ 4), A:(SC โ€“ 7), B:(SC โ€“ 6), A:(SC โ€“ 3). Total โ€“ 60 SC.

Round 21 :

A:(SC โ€“ 3), B:(SC โ€“ 20), A:(SC โ€“ 3), B:(SC โ€“ 9), A:(SC โ€“ 3), B:(SC โ€“ 9), A:(SC โ€“ 2), B:(SC โ€“ 11). Fasten off Color A. Total โ€“ 60 SC.

Info :

Continue with Color B.

Round 22 :

[SC in each of next 8 Sts, INV DEC] 6 times. Total โ€“ 54 SC.

Round 23 :

SC in each of next 3 Sts, INV DEC, [SC in each of next 7 Sts, INV DEC] 5 times, SC in each of next 4 Sts. Total โ€“ 48 SC.

Round 24 :

[SC in each of next 6 Sts, INV DEC] 6 times. Total โ€“ 42 SC.

Round 25 :

SC in each of next 2 Sts, INV DEC, [SC in each of next 5 Sts, INV DEC] 5 times, SC in each of next 3 Sts. Total โ€“ 36 SC.

Round 26 :

Sl St in each St around. Fasten off Color B. Total โ€“ 36 Sl Sts.

โ€” Base :

Info :

Continue working on base. Join Color C to BL of first St of previous round,

Round 1 :

Ch 1, BLO: SC in same St and in each of next 7 Sts, 2 SC in next St, [SC in each of next 8 Sts, 2 SC in next] 3 times. Total โ€“ 40 SC.

Round 2 :

SC in each St around. Total โ€“ 40 SC.

Round 3 :

[SC in each of next 9 Sts, 2 SC in next St] 4 times. Total โ€“ 44 SC.

Round 4 :

SC in each St around. Total โ€“ 44 SC.

Round 5 :

[SC in each of next 10 Sts, 2 SC in next St] 4 times. Total โ€“ 48 SC.

Round 6 :

SC in next St, Sl St in each of next 2 Sts. Fasten off.

โ€” Bottom :

Info :

With Color C, make magic ring;

Round 1 :

Ch 1, 6 SC in magic ring

Round 2 :

2 SC in each St around. Total โ€“ 12 SC.

Round 3 :

[2 SC in first St, SC in next St] 6 times. Total โ€“ 18 SC.

Round 4 :

SC in first, [2 SC in next St, SC in each of next 2 Sts] 5 times, 2 SC in next St, SC in next St. Total โ€“ 24 Sts.

Round 5 :

[2 SC in first St, SC in each of next 3 Sts] 6 times. Total โ€“ 30 Sts.

Round 6 :

SC in first St and in next St, [2 SC in next St, SC in each of next 4 Sts] 5 times, 2 SC in next St, SC in next St. Total โ€“ 36 Sts.

Round 7 :

[2 SC in first St, SC in each of next 5 Sts] 6 times. Total โ€“ 42 Sts.

Round 8 :

SC in first St and in each of next 2 Sts, [2 SC in next St, SC in each of next 6 Sts] 5 times, 2 SC in next St, SC in each of next 3 Sts. Total โ€“ 48 Sts. Leave long tail for sewing bottom to the base.

โ€” Assembly :

Info :

Stuff your snow globe and the base, leave some space at the bottom. Stuff the snow globe well, make sure it has a nice, spherical shape.

Info :

Cut out a circular piece of cardboard that is slightly smaller than the diameter of the bottom. A compass is very useful for this purpose.

Info :

Using a sewing needle and saved long tail, start sewing the bottom to the base (don't forget to insert the cardboard circle inside). Sew about 3/4 of the diameter, add more stuffing as necessary. Add weighted material for stability, and finish sewing the bottom.

Info :

Your snow globe is now ready for embellishment! If your buttons have shanks, cut the shanks off. Using a hot glue gun, glue the buttons to the snow globe in any pattern that you like.

Info :

Congratulations! Your crochet snow globe is complete!

Assembly Instructions

  • Cut a circular piece of cardboard slightly smaller than the diameter of the bottom and insert it into the base before final sewing for stability.
  • Using the saved long tail from the bottom circle, start sewing the bottom to the base and sew about three quarters of the diameter before adding cardboard and weighted material.
  • Add weighted stuffing material (poly pellets or beads) inside the base for stability, then finish sewing the bottom closed securely.
  • Stuff the globe firmly to create a nice spherical shape, leaving a small gap at the bottom for the final assembly and added stuffing if needed.
  • Glue flat-back buttons and winter-themed embellishments onto the globe with a hot glue gun; if using shank buttons, remove the shanks first and then glue.

Important Notes

  • ๐Ÿ’กUse a stitch marker to mark the first stitch of each round because the snow globe is worked in continuous rounds.
  • ๐Ÿ’กCarry unused yarn across the back when tapestry crocheting to avoid long floats and maintain an even fabric surface.
  • ๐Ÿ’กLeave a long tail on the bottom circle to sew the bottom securely to the base and to hide the tail inside the finished piece.
  • ๐Ÿ’กStuff the globe firmly and evenly to achieve a nice, spherical shape; under stuffing will make it look saggy.
  • ๐Ÿ’กCut shanks off buttons before gluing so embellishments lay flat against the crochet surface.

This festive Snow Globe makes a wonderful handmade decoration or gift โ€” bright, cozy, and full of charm. Add your favorite tiny buttons and embellishments to make each globe unique and personal. Enjoy crocheting this seasonal accent and display it proudly in your winter decor! ๐ŸŽ„๐Ÿงถ

You ask,

we answer.

FAQs

What size will the finished piece be?

The finished snow globe is about 5" (13 cm) tall when using the recommended yarn and hook size.

Can I use different yarn weights for this pattern?

Yes, you can use different yarn weights, but the finished size and stitch gauge will change; adjust hook size accordingly for best results.

Do I need prior crochet experience for this pattern?

This pattern is rated intermediate and uses tapestry crochet and invisible decreases, so basic crochet experience and familiarity with these techniques are recommended.

How long does this project typically take to complete?

Most crocheters complete this project in 5-7 hours, depending on experience, colorwork, and the time spent embellishing.