🧢 Beautiful ✨ Detailed πŸ’ Adorable

Ball of (almost) any size Amigurumi Pattern

Ball of (almost) any size Amigurumi Pattern
4.8β˜… Rating
2-4 Hours Time Needed
1.1K Made This
βœ‚οΈ

Beginner Friendly Level

Perfect for those just starting their crochet journey, with clear instructions and simple techniques

⏱️

Bite-Sized Project

Finishes in 2-4 hoursβ€”perfect for an afternoon of creative relaxation.

🎁

Tiny Treasure

Small, sweet, and gift-worthy creations that fit perfectly in the palm of your hand with detailed charm.

About This Ball of (almost) any size Amigurumi Pattern

This pattern teaches you how to crochet a neat spherical ball by breaking the work into a top circle section, a middle of plain rounds, and a mirrored bottom section. It includes a full eight-row example and explains how to scale the method up or down for other sizes. You can use a variety of yarn weights and hook sizes to make anything from tiny beads to larger soft balls. The instructions are written in UK terms (dc = US sc) and include helpful notes on tension and stuffing.

Ball of (almost) any size Amigurumi Pattern crochet pattern - detailed view of completed project

Follow the top, middle and bottom sections exactly to make a true sphere, and adjust the number of middle rows to change the ball's height. The guide also explains how to work out the size you will get from your yarn and how to make larger or smaller balls mathematically.

Why You'll Love This Ball of (almost) any size Amigurumi Pattern

I absolutely love this pattern because it makes a fiddly shaping problem surprisingly simple and repeatable. I enjoy how it turns different yarns and hook sizes into a predictable range of ball sizes, which means I can use up leftovers creatively. The method is satisfying β€” you make a tidy dome, add middle rows, then mirror the shaping and finish neatly. It gives consistently round results with minimal sewing and fuss. I also love that you can scale it up for soft toys or down to make beads and decorations.

Ball of (almost) any size Amigurumi Pattern step 1 - construction progress Ball of (almost) any size Amigurumi Pattern step 2 - assembly progress Ball of (almost) any size Amigurumi Pattern step 3 - details and accessories Ball of (almost) any size Amigurumi Pattern step 4 - final assembly and finishing

Switch Things Up

I love how versatile this pattern is for customization; change the yarn weight and hook to create very different sizes and textures.

I often use thinner yarn and a tiny hook to make little beads for a necklace or garland.

For chunky, cuddly balls I choose aran yarn with a larger hook and add extra middle rows for more height.

I sometimes change colour every round or every few rounds to create stripes or a gradient effect for festive baubles.

I like to insert a small bell or rattle before finishing tiny balls to make baby-safe toys (ensure the bell is fully enclosed and sewn securely).

I sometimes cover a small wooden or plastic bead with the last one or two rounds to create stable, smooth beads for jewellery.

If I want a weighted ball, I add a small pouch of rice or poly pellets inside the stuffing so the weight sits in the centre.

I add embroidered faces or felt cutouts to turn a ball into a character head or tiny creature for toys.

I use different hook tensions to tweak the firmness; a tighter fabric will give a smoother finish for ornament-style balls.

I like to experiment with novelty and sparkly yarns for seasonal decorations β€” the middle section is great for adding patterns or colour changes.

Common Mistakes & How to Fix Them

βœ— Not marking the start of rounds can easily lead to lost stitches and uneven increases; use a stitch marker at the beginning of every round and move it up as you work so you always know where the round begins. βœ— Stuffing the ball too firmly will distort the sphere and create bulges; stuff gradually, working in small amounts and smoothing the stuffing as you add it for an even, round shape. βœ— Skipping counting stitches after increases or decreases leads to incorrect shaping and mismatched rows; count your stitches after each shaping row to confirm you have the expected stitch count. βœ— Using a hook that is too large for the yarn produces a loose fabric and a misshapen ball; use one size smaller than the yarn recommends for a firmer fabric (for example, use 3.5mm for DK instead of 4mm). βœ— Pulling the closing tail too short or not finishing through the front loops can leave a gap; leave a long tail, thread it through the front loops of the remaining stitches in the same working direction, pull tight and hide the end inside the ball. βœ— Failing to follow the mirrored bottom section exactly will make the ball lopsided; follow the bottom rows in descending order to match the top section and maintain symmetry.

Ball of (almost) any size Amigurumi Pattern

Make perfectly shaped crochet balls in almost any size with clear, practical instructions. This pattern breaks the ball into top, middle and bottom sections so you can scale up or down easily. You can use DK, sport or aran yarn and adjust hook size to get the size and firmness you want. Ideal for toys, beads, ornaments or doll heads β€” a versatile stash-busting project you'll return to again and again.

Beginner Friendly 2-4 Hours

Materials Needed for Ball of (almost) any size Amigurumi Pattern

β€” Main Fabric

  • 01
    PaintBox DK cotton (used for main samples) - quantity: as required per ball size
  • 02
    Catania sport weight cotton (example used for six-row balls) - quantity: as required per ball size
  • 03
    PaintBox cotton Aran (example used with 4mm hook) - quantity: as required per ball size

β€” Tools Required

  • 01
    Crochet hook size 3.5mm (recommended for DK samples)
  • 02
    Crochet hook size 4mm (used with Aran examples)
  • 03
    Crochet hook size 2.5mm (used with Catania sport weight example)
  • 04
    Large-eye needle or smaller hook to finish ends (pull through inside)
  • 05
    Sewing/yarn needle for finishing and closing
  • 06
    Scissors
  • 07
    Stitch markers
  • 08
    Polyester stuffing or fill
  • 09
    Scale or ruler (optional, for measuring gauge and yarn weight)

Progress Tracker

0% Complete

β€” Pattern Overview :

Info :

Work this in amigurumi style, in spirals, marking your row start (or end, as you please) so you don't lose track. No stepping up. This is written in UK style – US, see the abbreviations to translate.

Infos :

After making a lot of amigurumi items that had ball shapes in them, I realised that there was a simple mathematical way of working out how to get whatever size ball I was trying to make, more or less, knowing how many rows were needed between the shaping for the top and bottom of the ball (sphere). The first eight sizes are here in full, after that I tell you how to continue if you want to make larger ones.

β€” Materials :

Info :

Firm yarn – I’ve used PaintBox DK cotton for the main set of samples. Crochet hook to match the yarn – one size less than the yarn usually asks for is a good idea, to get a firmer fabric, so I used a 3.5mm hook instead of a 4mm for the DK cotton. Large-eye needle (or smaller hook) to finish the ends (pull through inside).

β€” Size :

Info :

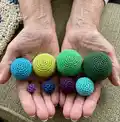
Just about any size you like. The balls in the main picture have circumferences of about 2.5, 5, 7.5, 10, 12.5, 15, 17.5 and 20 cm (1, 2, 3, 4, 5, 6, 7 and 8 inches). See Choosing the Size of your Ball for how to work out how to make the size you want – or to work out what size you are going to get from the number of rows and the yarn you have.

β€” Tension :

Info :

Absolutely depends on your yarn, but ideally firm. The basis of this pattern is that a dc (US – sc) crochet stitch is more-or-less the same height as its width. See the section on Choosing the Size of your Ball for more about tension and size.

β€” Abbreviations :

Info :

dc – double crochet, (what the US calls sc). dec – decrease, work two stitches together, dc two together (US, sc two together). Either pull one loop through each of the next two stitches so you have three loops on the hook and then finish them off together, or do an invisible decrease.

β€” Method :

Info :

Read the method notes in the original pattern if you are interested in the maths; you do not need to understand that to make the balls. The basis is that the circle sections produce a circumference and the number of middle rows determines the height so that if the number of middle rows equals the number of rows in the top circle section you get a ball roughly as high as it is wide.

β€” Top Section for an eight-row circle ball :

Round 1 :

6 dc into a magic ring.

Round 2 :

2dc into each dc (12)

Round 3 :

(dc, 2dc in next dc) repeat 6 times (18)

Round 4 :

1 dc, 2dc in next dc, (2 dc, 2dc in next dc) repeat 5 times, 1 dc (24)

Round 5 :

(3 dc, 2dc in next dc) repeat 6 times (30)

Round 6 :

2 dc, 2dc in next dc, (4 dc, 2dc in next dc) repeat 5 times, 2 dc (36)

Round 7 :

(5 dc, 2dc in next dc) repeat 6 times (42)

Round 8 :

3 dc, 2dc in next dc, (6 dc, 2dc in next dc) repeat 5 times, 3 dc (48)

β€” Middle section (any ball) :

Round 1 :

Middle Row: 1dc in each dc to end – repeat until you have as many 'middle rows' as you have rows in your top (circle) section.

β€” Bottom Section for an eight-row circle ball :

Round 8 :

3 dc, dec, (6 dc, dec) repeat 5 times, 3 dc (42)

Round 7 :

(5 dc, dec) repeat 6 times (36)

Round 6 :

2 dc, dec, (4 dc, dec) repeat 5 times, 2 dc (30)

Round 5 :

(3 dc, dec) repeat 6 times (24)

Round 4 :

1 dc, dec, (2 dc, dec) repeat 5 times, 1 dc (18)

Round 3 :

(dc, dec) repeat 6 times (12)

Round 2 :

dec 6 times (6)

Round 1 :

Cut the yarn, leaving a long tail. Put the tail in a sewing needle, and thread through the front loop of each of the remaining 6 stitches going around the ring in the same direction you were working. Pull tight and finish the end, hiding it inside the ball.

β€” Stuffing :

Info :

Do not stuff the ball too firmly, it will distort the shape. Try to stuff evenly, if possible with small balls just use one piece of stuffing pushed in at perhaps the 18 stitch row (balls smaller than this may not need stuffing at all). If you need a lot of stuffing, try putting in a fairly large amount to start with and then spreading it out so that you can put the rest into the middle of the stuffing you've already put in – this tends to give a smoother, more even result. When you've finished off the ball, roll it in your hands for a while (or on a flat surface if it's too big for that) until it's as round as you can make it.

β€” The other 7 smallest sizes :

Info :

Take the first however many rows you want from the eight-row ball, the middle section, and the last same-number of rows, counting from the end. So for the tiniest ball with the yarn you have, just the first row, one middle row, and the last row. For the next size, the first two rows, two middle rows, and the last two rows. And so on for the first seven sizes.

β€” Larger Sizes :

Info :

Every row of the top circle section you increase (2dc in next dc) six stitches, evenly spread around the ball. The number of stitches between the increases gets bigger by one stitch on each row. If this is an odd number, start the row with that number of stitches, increase, then repeat that until the end of the row. If it is an even number, start with HALF that number of stitches, increase, then (the full number, increase) five times, then that half number again and you should be at the end of the row. The bottom circle works exactly the same way, except that instead of spacing your increases, as described above, you are spacing your decreases.

β€” Choosing the size of your ball :

Info :

Make a little sample about 15 stitches wide and ten rows high. Measure the width of six of the stitches in the middle (ish) of the last row. This is your Unit Measurement. Each size of ball has a circumference of the Unit Measurement multiplied by the number of rows in the top circle section. Use the table of stitches to find how many stitches and how much yarn you need for a given size, or weigh a sample to estimate yarn usage.

β€” Number of stitches in a ball (table summary) :

Info :

Table for first 12 sizes (rows in circle section vs stitches): 1 row: 6 stitches in circle section, 6 middle section stitches, total 18. 2 rows: 18 / 24 / 60. 3 rows: 36 / 54 / 126. 4 rows: 60 / 96 / 216. 5 rows: 90 / 150 / 330. 6 rows: 126 / 216 / 468. 7 rows: 168 / 294 / 630. 8 rows: 216 / 384 / 816. 9 rows: 270 / 486 / 1026. 10 rows: 330 / 600 / 1260. 11 rows: 396 / 726 / 1518. 12 rows: 486 / 864 / 1836.

β€” Ideas for using balls :

Info :

Balls work well as soft toys for children, baubles for holidays (change colours every row), beads for a necklace (use small or sparkly yarns), or as heads for dolls and animals. You can make half balls for hair or add a few middle rows to make an oval body for a toy.

Assembly Instructions

  • Finish the ball by cutting the yarn leaving a long tail, thread the tail through a large-eye or yarn needle and sew through the front loop of each remaining stitch in the same direction you were working, pull tight and hide the tail inside the ball.
  • Stuff gradually: add a small amount of stuffing, distribute it evenly, then add more until the ball is filled to avoid lumps and distortion.
  • Roll or shape the finished ball in your hands or on a flat surface to help even out the stuffing and achieve a uniform round shape.
  • For very small balls used as beads, you may complete the last one or two rounds with the bead in place (if covering a wooden bead) so the bead is held securely and finishes the shape neatly.
  • If using the ball as a head or for sewing onto a toy, pin the position first and use matching yarn and a mattress or whip stitch to attach securely, then weave in and hide ends.

Important Notes

  • πŸ’‘Work in spiral rounds (no joining) and mark the start of the round with a stitch marker to avoid losing track of where each round begins.
  • πŸ’‘Use a firmer fabric by choosing a hook one size smaller than recommended for the yarn to help the ball keep its shape.
  • πŸ’‘Do not overstuff the ball as this will distort the sphere; stuff evenly and in stages for a smooth finish.
  • πŸ’‘Count your stitches regularly after shaping rounds to ensure increases and decreases are accurate and the symmetry of the ball is preserved.
  • πŸ’‘Pin parts in place before sewing if you are attaching balls to other components to ensure correct placement and symmetry.

This versatile ball pattern helps you make neat spheres from tiny beads to larger soft toys using the same method.🧢 Adjust the top, middle and bottom rows to create the exact size and firmness you need for toys, ornaments or craft projects.✨ Have fun experimenting with yarns and colours β€” these little balls are perfect for gifts, decorations and stash-busting projects! 🎁

You ask,

we answer.

FAQs

What size will the finished piece be?

The finished ball size depends on your Unit Measurement (width of six stitches with your yarn and hook). Use the number of rows in the circle section multiplied by your unit measurement to get the circumference.

Can I use different yarn weights for this pattern?

Yes, you can use different yarn weights (sport, DK, aran) but the finished size will change; adjust hook size and make a small gauge sample to determine your Unit Measurement.

Do I need prior crochet experience for this pattern?

This pattern is beginner friendly and uses only basic stitches (dc and dec) but you should be comfortable working in the round and following stitch counts.

How long does this project typically take to complete?

Most small to medium-sized balls can be completed in 2-4 hours depending on size and experience; larger balls will take longer.