🧢 Beautiful ✨ Detailed πŸ’ Adorable

Snow Globe Amigurumi Pattern

Snow Globe Amigurumi Pattern
4.3β˜… Rating
5-7 Hours Time Needed
3.1K Made This
βœ‚οΈ

Intermediate Level

Ideal for those with basic crochet experience, featuring slightly more advanced stitches and techniques to expand your skills.

⏱️

Weekend Treat

Takes 5-7 hours, making it an enjoyable project to finish over a couple of days.

🧸

Cute Companion

An adorable friend to cherish, handcrafted with love to bring comfort and joy for years to come.

About This Snow Globe Amigurumi Pattern

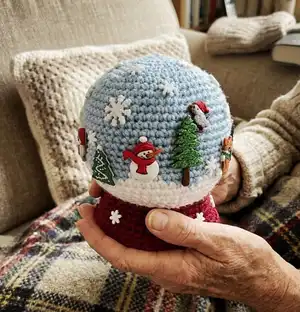
This pattern creates a small crocheted snow globe amigurumi with a removable base for stuffing and a cardboard circle for stability. It uses color changes and tapestry crochet to form the globe and a contrasting burgundy base. You will sew the bottom in place and embellish the globe with winter-themed buttons or tiny decorations.

Snow Globe Amigurumi Pattern crochet pattern - detailed view of completed project

Detailed round-by-round instructions are included for the globe, base, and bottom, plus notes on the magic ring and invisible decrease. The finished snow globe measures about 5" (13 cm) tall and is perfect for seasonal displays or gifts.

Why You'll Love This Snow Globe Amigurumi Pattern

I absolutely love this pattern because it turns familiar crochet techniques into a charming seasonal decoration I can proudly display. I enjoy the colorworkβ€”switching between the sky and snow sections gives the piece personality and allows for creative embellishment. The base is sturdy and easy to personalize with buttons, which makes each finished globe unique. I also appreciate how the project is compact, quick to stitch, and very satisfying to finish and gift.

Snow Globe Amigurumi Pattern step 1 - construction progress Snow Globe Amigurumi Pattern step 2 - assembly progress Snow Globe Amigurumi Pattern step 3 - details and accessories Snow Globe Amigurumi Pattern step 4 - final assembly and finishing

Switch Things Up

I love how easy it is to customize the colors β€” try pastels for a winter wonderland, or deep jewel tones for a modern look.

You can change yarn weight and hook size to make minis for keychains or larger display pieces for shelves.

I often substitute textured yarn for the base to give a tactile contrast against the smooth globe.

Swap the flat buttons for tiny felt appliques or embroidered motifs if you prefer a softer finish.

Try stitching a tiny scene inside the globe with surface embroidery or small crochet appliques before stuffing.

I sometimes add a loop at the top to turn the piece into a hanging ornament for the tree or a gift topper.

To make a weighted paperweight version, increase the amount of pellets in the base and use a tighter tension to reduce stretch.

If you want a transparent look, embroider tiny white snowflakes across the blue section instead of using buttons.

I recommend experimenting with metallic yarn or a sparkly thread carried along the blue rounds for a frosty shimmer effect.

For gift sets, create matching mini globes in different colors and group them together in a decorative box.

Common Mistakes & How to Fix Them

βœ— Skipping the magic ring instructions can create a loose center and an uneven top; follow the magic ring steps carefully and tighten the tail to close the hole. βœ— Not carrying unused yarn correctly in tapestry crochet causes loops and lumps; lay the unused color across the previous row and crochet over it consistently to keep tension even. βœ— Forgetting to mark the start of rounds leads to uneven stitch counts; use a stitch marker and move it each round to avoid losing your place. βœ— Overstuffing the globe results in a distorted sphere; stuff gradually and evenly, leaving a little room at the bottom for finishing and to insert the cardboard base. βœ— Sewing the bottom without inserting the cardboard first makes the base unstable; cut the cardboard slightly smaller than the diameter and insert it before finishing the seam for a flat stable base.

Snow Globe Amigurumi Pattern

Make a delightful crochet snow globe to brighten your holiday decor or give as a handmade gift. This pattern guides you through color changes, tapestry crochet, and a sturdy base for embellishment. You will enjoy shaping a spherical globe with clear step-by-step rounds and simple assembly instructions. Perfect for stitching festive details and attaching buttons or tiny ornaments.

Intermediate 5-7 Hours

Materials Needed for Snow Globe Amigurumi Pattern

β€” Main Fabric

  • 01
    Red Heart Super Saver medium weight #4 yarn - Color A: light blue (main globe)
  • 02
    Red Heart Super Saver medium weight #4 yarn - Color B: white (snow band and details)
  • 03
    Red Heart Super Saver medium weight #4 yarn - Color C: burgundy (base)
  • 04
    Weighted stuffing material (Poly Pellets or similar) for stability (small amount)
  • 05
    Poly-fil stuffing for the globe interior

β€” Tools Required

  • 01
    Crochet hook E/4 (3.5 mm)
  • 02
    Stitch marker
  • 03
    Large sewing needle
  • 04
    Poly-fil stuffing
  • 05
    Piece of cardboard (cut to fit base)
  • 06
    Scissors
  • 07
    Hot glue gun
  • 08
    Weighted stuffing material (Poly Pellets weighted stuffing beads)
  • 09
    Winter-themed flat-back buttons (remove shanks if needed)
  • 10
    Craft cutter to remove shanks

Progress Tracker

0% Complete

β€” Abbreviations :

Info :

BL, BLO – back loop, back loop only. Ch – chain. SC – single crochet. Sl St – slip stitch. St (Sts) – stitch (stitches).

β€” Skill Level :

Info :

Intermediate (must know tapestry crochet)

β€” Finished Size :

Info :

Snow globe is about 5” (13 cm) tall

β€” Yarn :

Info :

Red Heart Super Saver medium weight #4 yarn. Color A – light blue, Color B – white, Color C - burgundy.

β€” Hook and other materials :

Info :

Crochet hook E/4 (3.5 mm). Stitch marker. Large sewing needle. Poly-fil stuffing. Piece of cardboard. Scissors. Hot glue gun. Weighted stuffing material (I used Poly Pellets weighted stuffing beads). Winter-themed buttons of your choice (try to get flat back buttons. If you get shank buttons, you will need to remove the shanks). Craft cutter to remove the shanks.

β€” Notes :

Infos :

1. How to make magic ring: Make a large loop by putting the yarn tail behind the working yarn (the yarn coming from the skein) leaving a 4-6 inch tail. Draw the working yarn through the loop, now you have one loop on the hook. 2. How to change to a new color: Work the final stitch with the first color, but do not complete the stitch. You will have 2 loops remain on the hook. Drop first color and draw through the loops on the hook new color and complete the stitch. 3. The snow globe is worked in continuous rounds. Use stitch marker to mark first stitch of each round. 4. This pattern uses tapestry crochet technique – working over the color not in use. To carry the unused color, lay it on top of the previous row and work over it.

β€” Special Stitch :

Info :

INV DEC (invisible decrease) - put hook through the front loop only of two consecutive stitches. You have three loops on hook. Yarn over and pull through two loops. You have two loops on hook. Yarn over and pull through those two loops.

β€” Snow globe :

Round 1 :

With Color A, make magic ring; Ch 1, 6 SC in magic ring. Total – 6 SC.

Round 2 :

2 SC in each St around. Total – 12 SC.

Round 3 :

[2 SC in first St, SC in next St] 6 times. Total – 18 SC.

Round 4 :

SC in first St, [2 SC in next St, SC in each of next 2 Sts] 5 times, 2 SC in next St, SC in next St. Total - 24 SC.

Round 5 :

[2 SC in first St, SC in each of next 3 Sts] 6 times. Total – 30 SC.

Round 6 :

SC in first St and in next St, [2 SC in next St, SC in each of next 4 Sts] 5 times, 2 SC in next St, SC in each of next 2 Sts. Total – 36 SC.

Round 7 :

[2 SC in first St, SC in each of next 5 Sts] 6 times. Total – 42 SC.

Round 8 :

SC in first St and in each of next 2 Sts, [2 SC in next St, SC in each of next 6 Sts] 5 times, 2 SC in next St, SC in each of next 3 Sts. Total – 48 SC.

Round 9 :

[2 SC in first St, SC in each of next 7 Sts] 6 times. Total – 54 SC.

Round 10 :

SC in first St and in each of next 3 Sts, [2 SC in next St, SC in each of next 8 Sts] 5 times, 2 SC in next St, SC in each of next 4 Sts. Total – 60 SC.

Round 11-19 :

SC in each St around.

Round 20 :

A:(SC – 4), B:(SC – 4), A:(SC – 9), B:(SC – 4), A:(SC – 7), B:(SC – 5), A:(SC – 7), B:(SC – 4), A:(SC – 7), B:(SC – 6), A:(SC – 3). Total – 60 SC.

Round 21 :

A:(SC – 3), B:(SC – 20), A:(SC – 3), B:(SC – 9), A:(SC – 3), B:(SC – 9), A:(SC – 2), B:(SC – 11). Fasten off Color A. Total – 60 SC.

Info :

Continue with Color B.

Round 22 :

[SC in each of next 8 Sts, INV DEC] 6 times. Total – 54 SC.

Round 23 :

SC in each of next 3 Sts, INV DEC, [SC in each of next 7 Sts, INV DEC] 5 times, SC in each of next 4 Sts. Total – 48 SC.

Round 24 :

[SC in each of next 6 Sts, INV DEC] 6 times. Total – 42 SC.

Round 25 :

SC in each of next 2 Sts, INV DEC, [SC in each of next 5 Sts, INV DEC] 5 times, SC in each of next 3 Sts. Total – 36 SC.

Round 26 :

Sl St in each St around. Fasten off Color B. Total – 36 Sl Sts.

Info :

Continue working on base. Join Color C to BL of first St of previous round.

β€” Base :

Round 1 :

Ch 1, BLO: SC in same St and in each of next 7 Sts, 2 SC in next St, [SC in each of next 8 Sts, 2 SC in next] 3 times. Total – 40 SC.

Round 2 :

SC in each St around. Total – 40 SC.

Round 3 :

[SC in each of next 9 Sts, 2 SC in next St] 4 times. Total – 44 SC.

Round 4 :

SC in each St around. Total – 44 SC.

Round 5 :

[SC in each of next 10 Sts, 2 SC in next St] 4 times. Total – 48 SC.

Round 6 :

SC in next St, Sl St in each of next 2 Sts. Fasten off.

β€” Bottom :

Round 1 :

With Color C, make magic ring; Ch 1, 6 SC in magic ring.

Round 2 :

2 SC in each St around. Total – 12 SC.

Round 3 :

[2 SC in first St, SC in next St] 6 times. Total – 18 SC.

Round 4 :

SC in first, [2 SC in next St, SC in each of next 2 Sts] 5 times, 2 SC in next St, SC in next St. Total – 24 Sts.

Round 5 :

[2 SC in first St, SC in each of next 3 Sts] 6 times. Total – 30 Sts.

Round 6 :

SC in first St and in next St, [2 SC in next St, SC in each of next 4 Sts] 5 times, 2 SC in next St, SC in next St. Total – 36 Sts.

Round 7 :

[2 SC in first St, SC in each of next 5 Sts] 6 times. Total – 42 Sts.

Round 8 :

SC in first St and in each of next 2 Sts, [2 SC in next St, SC in each of next 6 Sts] 5 times, 2 SC in next St, SC in next St. Total – 48 Sts. Leave long tail for sewing bottom to the base.

Info :

Stuff your snow globe and the base, leave some space at the bottom. Stuff the snow globe well, make sure it has a nice, spherical shape.

Info :

Cut out a circular piece of cardboard that is slightly smaller than the diameter of the bottom. A compass is very useful for this purpose.

Info :

Using a sewing needle and saved long tail, start sewing the bottom to the base (don’t forget to insert the cardboard circle inside). Sew about 3/4 of the diameter, add more stuffing as necessary. Add weighted material for stability, and finish sewing the bottom.

Info :

Your snow globe is now ready for embellishment! If your buttons have shanks, cut the shanks off.

Info :

Using a hot glue gun, glue the buttons to the snow globe in any pattern that you like.

Info :

Congratulations! Your crochet snow globe is complete!

Assembly Instructions

  • Insert the circular cardboard into the base before finishing the seam to ensure a flat, stable bottom.
  • Using the saved long tail and a sewing needle, sew the bottom piece to the base about three quarters around, add more stuffing as needed, insert weighted material, then finish sewing securely.
  • Stuff the globe evenly to create a nice spherical shape, leaving space at the bottom so the base can close comfortably over cardboard.
  • Add a small amount of weighted pellets or beads inside the base for stability before completing the final seam.
  • Remove shanks from any decorative buttons and use a hot glue gun to attach the winter-themed buttons around the globe in the pattern you prefer.
  • Pin placements for buttons or embellishments before gluing to ensure even spacing and desired layout.

Important Notes

  • πŸ’‘Use a stitch marker to mark the first stitch of each round to maintain accurate stitch counts and shaping.
  • πŸ’‘Carry the unused yarn on top of the previous row when tapestry crocheting to maintain even tension and avoid loose floats.
  • πŸ’‘Stuff gradually and evenly for a smooth spherical shape; overstuffing can distort the globe and under-stuffing will cause collapse.
  • πŸ’‘Insert the cardboard circle slightly smaller than the bottom diameter before closing the base to ensure stability and a neat finish.

This adorable snow globe makes a cozy seasonal accent perfect for gifting or decorating your home.🧢 Follow the clear rounds and assembly steps to create a stable, stitch-perfect globe that you can embellish any way you like.πŸŽ„ Add buttons, tiny ornaments, or embroidered details to personalize each globe and make it a special handmade keepsake.

You ask,

we answer.

FAQs

What size will the finished piece be?

The finished snow globe measures approximately 5 inches (13 cm) tall when made with Red Heart Super Saver medium weight #4 yarn and a 3.5 mm hook.

Can I use different yarn weights for this pattern?

Yes, you can use different yarn weights, but the finished size will change. Use an appropriate hook for your chosen yarn and expect different stitch counts and a different final size.

Do I need prior crochet experience for this pattern?

This pattern is rated intermediate. You should be comfortable with single crochet, working in continuous rounds, tapestry crochet, and the invisible decrease technique for best results.

How long does this project typically take to complete?

Most crocheters complete this project in about 5-7 hours, depending on experience level, speed, and time spent on embellishment and assembly.