🧶 Beautiful ✨ Detailed 💝 Adorable

Circus Clown Amigurumi Pattern

Circus Clown Amigurumi Pattern
4.8★ Rating
5-7 Hours Time Needed
3.6K Made This
✂️

Intermediate Level

Ideal for those with basic crochet experience, featuring slightly more advanced stitches and techniques to expand your skills.

⏱️

Weekend Treat

Takes 5-7 hours, making it an enjoyable project to finish over a couple of days.

🧸

Cute Companion

An adorable friend to cherish, handcrafted with love to bring comfort and joy for years to come.

About This Circus Clown Amigurumi Pattern

This pattern creates a cheerful Circus Clown amigurumi with colourful hair, a tiny hat, striped legs and curled shoes. Youll crochet and assemble small pieces like ears, cheeks, nose and buttons, then stitch everything together for a playful finished toy. The pattern uses standard US terms and includes special stitch notes for spike single crochet.

Circus Clown Amigurumi Pattern crochet pattern - detailed view of completed project

Detailed round-by-round instructions guide you through every piece and assembly step. Photos and close-up assembly notes help position parts accurately for a polished result.

Why You'll Love This Circus Clown Amigurumi Pattern

I absolutely love this pattern because it combines simple amigurumi construction with whimsical details that really bring the character to life. I enjoy the contrast between neat rounds for the head and playful textured hair and shoes. The small parts (nose, cheeks, buttons) allow for satisfying quick finishes while the body and legs give a nice shaping challenge. I especially like how the spike single crochet adds a delightful textured effect on the overalls and legs.

Circus Clown Amigurumi Pattern step 1 - construction progress Circus Clown Amigurumi Pattern step 2 - assembly progress Circus Clown Amigurumi Pattern step 3 - details and accessories Circus Clown Amigurumi Pattern step 4 - final assembly and finishing

Switch Things Up

I love how versatile this clown pattern is for customization! Try swapping the color palette to pastels for a softer look or neon brights for a modern twist; different colors change the whole mood.

To make a mini keychain version, use thinner yarn and a smaller hook (and decrease rounds proportionally) for a pocket-sized clown perfect as a gift.

If youd like a larger, cuddlier toy, use a bulkier yarn and a bigger hook — results will be chunkier and great for toddlers (adjust stuffing accordingly).

I often change the hair texture by crocheting a looser BLO section or adding fringe to create different hairstyles; you can also use novelty yarn for an extra fluffy effect.

Try embroidering different facial expressions: moving the eyes or eyebrow stitches slightly will produce a sleepy, surprised, or cheerful clown personality.

For seasonal versions, swap the color scheme: red/green for a holiday clown, or pastel Easter shades for a springtime toy — they make adorable themed decorations.

I like to create mini outfits or accessories like a bow tie, tiny scarf or a pocket prop; these small additions make each clown unique and photo-ready.

To add posability, consider inserting thin armature wire into the limbs before stuffing (securely wrap wire end) so you can pose the arms and legs on display.

If you want to mass-produce the same design, make templates for placement (eye distance, hair position) so each doll stays consistent — it speeds up finishing and assembly.

Dont be afraid to experiment with embellishments like felt cheeks, safety eyes (for older children), or small bells sewn into the shoes for playful sound details.

Common Mistakes & How to Fix Them

✗ Skipping stitch markers during rounds will make counting increases and decreases confusing; place a marker at the start of every round and move it after each round to stay aligned. ✗ Forgetting to stuff as you go causes awkward shaping and lumps; stuff gradually and firmly where needed, especially when shaping the neck and legs to keep smooth contours. ✗ Changing yarns without noting the exact round can misalign colorwork; write down the round number when you switch colors and weave in ends promptly for neat joins. ✗ Not checking the back loops vs both loops instruction will affect texture in parts like shoes and overalls; follow BLO/FLO notes exactly and check the special stitch descriptions to keep the intended look.

Circus Clown Amigurumi Pattern

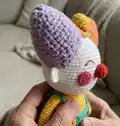
Make a bright, playful Circus Clown amigurumi that adds instant charm to your handmade collection. This pattern walks you through each small piece — head, ears, hair, nose, body, legs, arms, shoes and details — with clear round-by-round instructions. Youll build skills like back-loop-only rows and spike single crochet while creating a colourful, huggable toy. Perfect as a thoughtful gift or a colourful addition to your decor.

Intermediate 5-7 Hours

Materials Needed for Circus Clown Amigurumi Pattern

— Main Fabric

  • 01
    Color A: white YarnArt Jeans 62 (50g, 160m)
  • 02
    Color B: orange YarnArt Jeans 23 (50g, 160m)
  • 03
    Color C: purple YarnArt Jeans 89 (50g, 160m)
  • 04
    Color D: red YarnArt Jeans 26 (50g, 160m)
  • 05
    Color E: hot pink YarnArt Jeans 59 (50g, 160m)
  • 06
    Color F: yellow YarnArt Jeans 35 (50g, 160m)
  • 07
    Color G: turquoise Alize Cotton Gold 610 (100g, 330m)

— Tools Required

  • 01
    Crochet hook size 2.5mm
  • 02
    Tapestry needles
  • 03
    Brown thread (for embroidery)
  • 04
    Pins for assembly
  • 05
    Stitch markers
  • 06
    Scissors
  • 07
    Polyester fiberfill

Progress Tracker

0% Complete

— Head :

Round 1 :

sc 6 into a magic loop (6)

Round 2 :

inc 6 (12)

Round 3 :

[sc 1, inc 1] 6x (18)

Round 4 :

sc 1, inc 1, [sc 2, inc 1] 5x, sc 1 (24)

Round 5 :

[sc 3, inc 1] 6x (30)

Round 6 :

sc 2, inc 1, [sc 4, inc 1] 5x, sc 2 (36)

Round 7 :

[sc 5, inc 1] 6x (42)

Round 8 :

sc 3, inc 1, [sc 6, inc 1] 5x, sc 3 (48)

Round 9 :

[sc 7, inc 1] 6x (54)

Round 10 :

sc 4, inc 1, [sc 8, inc 1] 5x, sc 4 (60)

Round 11-23 :

sc 60 (13 rnds) (60)

Round 24 :

[sc 8, dec 1] 6x (54)

Round 25 :

[sc 7, dec 1] 6x (48)

Round 26 :

[sc 6, dec 1] 6x (42)

Round 27 :

[sc 5, dec 1] 6x (36)

Round 28 :

[sc 4, dec 1] 6x (30)

Round 29 :

[sc 3, dec 1] 6x (24)

Info :

Break the yarn with a long rest. Stuff firmly.

— Hairs (yarn B X1, yarn C X1) :

Round 1 :

sc 6 into a magic loop (6)

Round 2 :

BLO [sc 1, inc] 3x (9)

Round 3 :

BLO [sc 2, inc] 3x (12)

Round 4 :

BLO [sc 3, inc] 3x (15)

Round 5 :

BLO [sc 4, inc] 3x (18)

Round 6 :

BLO [sc 5, inc] 3x (21)

Round 7 :

BLO [sc 6, inc] 3x (24)

Round 8 :

BLO, sc 24 (24)

Round 9 :

BLO [sc 7, inc] 3x (27)

Round 10 :

BLO, sc 27 (27)

Round 11 :

BLO [sc 8, inc] 3x (30)

Round 12 :

BLO, sc 30 (30)

Round 13 :

BLO [sc 9, inc] 3x (33)

Round 14 :

BLO, sc 33 (33)

Info :

Break the yarn with a long rest. Use the tapestry needle to sew 2 edges together.

— Ears (yarn A, X2) :

Round 1 :

sc 6 into a magic loop (6)

Round 2 :

inc 6 (12)

Round 3-4 :

sc 12 (2 rnds) (12)

Info :

Break the yarn with a long rest to sew, use the tapestry needle to sew 2 edges together.

— Nose (yarn D) :

Round 1-4 :

Repeat rnd 1-4 of the Ear (12)

Round 5 :

[sc 2, dec] 3x (9)

Info :

Break the yarn with a long rest to sew.

— Cheeks (yarn E, X2) :

Round 1 :

sc 6 into a magic loop (6)

Round 2 :

inc 6, slst on the 1st st of this rnd (12)

Info :

Break the yarn with a long rest to sew.

— Hat (yarn F) :

Round 1-3 :

Repeat rnd 1-3 of the Head (18)

Round 4-6 :

sc 18 (3 rnds), change to yarn D (18)

Round 7-8 :

sc 18 (2 rnds), change to yarn F (18)

Round 9 :

FLO, inc 18 (36)

Info :

Break the yarn with a long rest to sew.

— Legs (yarn B X1, yarn C X1) :

Round 1 :

sc 3 into a magic loop (3)

Round 2 :

inc 3 (6)

Round 3 :

sc 2, inc 2, sc 2 (8)

Round 4 :

dec 1, sc 1, inc 2, sc 1, dec 1 (8)

Round 5 :

sc 3, inc 2, sc 3 (10)

Round 6 :

dec 1, sc 2, inc 2, sc 2, dec 1 (10)

Round 7 :

sc 4, inc 2, sc 4 (12)

Round 8 :

sc 5, inc 2, sc 5 (14)

Round 9 :

sc 6, inc 2, sc 6 (16)

Round 10 :

sc 7, inc 2, sc 7 (18)

Round 11 :

sc 8, inc 2, sc 8 (20)

Round 12-13 :

sc 20 (2 rnds) (20)

Round 14 :

sc 9, sc 1 on the 3rd loop (see Assembling part), sc 10 (20)

Round 15 :

dec 1, sc 6, dec 2, sc 6, dec 1 (16)

Round 16 :

dec 1, sc 4, dec 2, sc 4, dec 1, start stuffing firmly (12)

Round 17 :

FLO, dec 1, sc 3, inc 2, sc 3, dec 1 (12)

Round 18-19 :

dec 1, sc 3, inc 2, sc 3, dec 1 (2 rnds) (12)

Round 20 :

dec 1, sc 3, inc 1, slst on the remaining loops of the 10th st of rnd 14 (see Assembling part), inc 1, sc 3, dec 1 (12)

Round 21 :

sc 6, skip the slst st of the previous rnd, sc 6 (12)

Round 22 :

FLO, *ch 3, slst 1 on the next st*, repeat ** to the end, break yarn B/C, change to yarn E (12)

Round 23 :

continue to crochet on the back loops of rnd 22, sc 12, change to yarn F (12)

Round 24-28 :

sc 12 (change to yarn E/F each rnd) (5 rnds), change to yarn G (12)

Round 29 :

[sc 1, inc 1] 6x (18)

Round 30-33 :

sc 18 (4 rnds) (18)

Round 34 :

sc 3, break the yarn (3)

Info :

Make the 2nd leg the same way but do not break the yarn, join with the 1st leg by slst 1 on the last st of the 1st leg, continue to crochet the body.

— Body (yarn G) :

Round 35 :

sc 18 (on the 1st leg), sc 18 (on the 2nd leg) (36)

Round 36 :

[sc 5, inc 1] 6x (42)

Round 37 :

BLO, sc 42 (42)

Round 38-41 :

sc 42 (4 rnds), change to yarn F (42)

Round 42-46 :

sc 42 (5 rnds) (42)

Round 47 :

[sc 5, dec 1] 6x (36)

Round 48 :

sc 36 (36)

Round 49 :

[sc 4, inc 1] 6x (30)

Round 50 :

sc 30 (30)

Round 51 :

[sc 3, inc 1] 6x (24)

Round 52 :

sc 24 (24)

Info :

Break the yarn with a long rest to sew later, stuff. Turn to the back side of the body, join yarn G on the 1st of the remaining loop of the 37th rnd (see Assembling Part), continue to crochet the overalls.

— Overalls (joined to body, yarn G) :

Round 1 :

[sc 1, inc 1] 21x (63)

Round 2 :

sc 63 (63)

Round 3 :

[sc 1, spike sc 1] 31x, sc 1 (see Special Stitches at page for Spike sc) (63)

Round 4 :

[spike sc 1, sc 1] 31x, spike sc 1 (63)

Round 5-10 :

repeat (rnd 3 & 4) 3 more times (6 rnds) (63)

Round 11 :

ch 30, slst on the 23, slst on all remaining chains, continue to crochet on the overalls, [sc 1, spike sc 1] 3x, ch 30, slst on the 23, slst on all remaining chains, slst on the next st of the overalls

Info :

Break & hide the remaining yarn.

— Arms (yarn A, X2) :

Round 1 :

sc 6 in a magic loop (6)

Round 2 :

[sc 1, inc 1] 3x (9)

Round 3 :

sc 4, Bobble 1, sc 4 (9)

Round 4 :

sc 9, change to yarn F (9)

Round 5-18 :

sc 9 (14 rnds) (9)

Info :

Break the yarn with a long rest, stuff slightly the lower part, use the tapestry needle to sew 2 edges together.

— Buttons (yarn F, X2) :

Round 1 :

sc 9 in a magic loop (9)

Round 2 :

slst 9 (9)

Info :

Break the yarn with a long rest.

— Shoe's Balls (yarn B X1, yarn C X1) :

Round 1-4 :

Repeat rnd 1-4 of the Ear, start stuffing slightly (12)

Round 5 :

dec 6 (6)

Info :

Break the yarn with a long rest, weave in the last 6 sts on the last rnd.

— Special Stitches :

Info :

Spike Single Crochet (Spike sc): Work 1 normal sc, insert hook from front to back in the row below, pull yarn over and complete sc. Spike sc will be longer than a normal sc. Work *sc, spike sc* to the end as used in overalls and special texture rows.

Assembly Instructions

  • Define the 3rd loop of the 10th st of the leg's 14th rnd; Sc 1 on the 3rd loop to anchor the curled shoe shape, then continue to crochet as normal following the shoe shaping instructions.
  • Make the 2nd leg the same way but do not break the yarn; join the last st of the 1st leg with slst 1 to the 2nd leg and continue crocheting the body (this joins legs seamlessly before the body rounds).
  • Use brown thread to embroider each eye with 4 sts at the position of rnd 14; the distance between two eyes is approximately 4-5 sts. Follow the step photos to guide stitch placement.
  • Attach cheeks on each side of the face below the eyes; sew the nose 1 rnd below the eyes and embroider smile/eyebrows with brown thread as shown in photos to create the clown expression.
  • Attach hair pieces on each side of the head covering rounds 3rd to 15th of the head; sew the hat between two hair pieces and secure the hat to the top centre of the head.
  • Turn the body to the back side, join yarn G on the 1st of the remaining loop of the 37th rnd to start the overalls; crochet the overalls as instructed and sew two buttons on the front for straps.

Important Notes

  • 💡Use stitch markers to mark the beginning of each round and any special stitches or marked sts for assembly; this helps when joining legs and aligning hair and hat.
  • 💡Stuff firmly but in small increments to achieve smooth shaping; start stuffing the legs and body early and add more as you close decreases to avoid lumps.
  • 💡When joining two pieces (legs, ears, hair edges), pin or use stitch markers to check symmetry before sewing to ensure even placement.
  • 💡Follow BLO and FLO notes exactly for textured sections like the hair and overalls to achieve the intended look and stitch direction.
  • 💡Weave in ends as you go where possible to keep the final finish neat and reduce final finishing time.

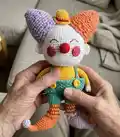
This Circus Clown brings bright color and cheerful charm to any shelf or nursery — a handmade friend full of personality. The pattern includes every small piece and assembly photo tips so you can create a neat, professional-looking toy. Make one for a loved one or craft a whole circus troupe to display. 🧶🎪

You ask,

we answer.

FAQs

What size will the finished piece be?

The finished amigurumi measures approximately 20-25 cm tall depending on your yarn tension and exact hook size when using the recommended yarns and a 2.5 mm hook.

Can I use different yarn weights for this pattern?

Yes, you can use different yarn weights, but this will affect the final size and stitch count. If you choose a different weight, adjust the hook accordingly and test gauge on one head or leg to determine sizing.

Do I need prior crochet experience for this pattern?

This pattern is rated intermediate; familiarity with single crochet, increases, decreases, back/front loop work and working in the round is recommended for best results.

How long does this project typically take to complete?

Most crocheters complete the project over a weekend—about 5-7 hours—though time may vary depending on experience level and how many small parts you make.