🧢 Beautiful ✨ Detailed πŸ’ Adorable

Snail Amigurumi Pattern

Snail Amigurumi Pattern
4.8β˜… Rating
5-7 Hours Time Needed
1.8K Made This
βœ‚οΈ

Intermediate Level

Ideal for those with basic crochet experience, featuring slightly more advanced stitches and techniques to expand your skills.

⏱️

Weekend Treat

Takes 5-7 hours, making it an enjoyable project to finish over a couple of days.

🧸

Cute Companion

An adorable friend to cherish, handcrafted with love to bring comfort and joy for years to come.

About This Snail Amigurumi Pattern

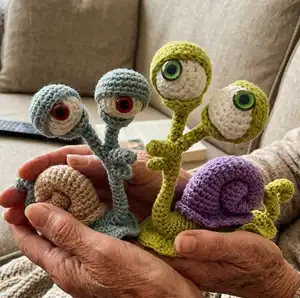
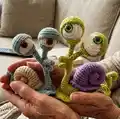
This pattern creates a charming snail amigurumi with tall eye stalks, glass eyes and a spiral shell. It uses small-gauge yarn and a steel hook to produce a neat, sculpted finish. The instructions include wire-frame assembly for posable eye stems and detailed steps for eyelids, jaws, body and mantle.

Snail Amigurumi Pattern crochet pattern - detailed view of completed project

Step-by-step rounds are written out clearly for each part so you can follow along easily. Photographic references and finishing tips help you assemble and stabilize the finished toy.

Why You'll Love This Snail Amigurumi Pattern

I absolutely love this pattern because it turns simple stitches into a character with loads of personality. I enjoy the combination of amigurumi shaping with a little wirework β€” it makes the eyes seem alive and allows playful posing. The shell construction and mantle detail are satisfying to stitch and give the snail a finished, polished look. I also love that the pattern uses small amounts of yarn, so it is a great stash-busting project I keep returning to.

Snail Amigurumi Pattern step 1 - construction progress Snail Amigurumi Pattern step 2 - assembly progress Snail Amigurumi Pattern step 3 - details and accessories Snail Amigurumi Pattern step 4 - final assembly and finishing

Switch Things Up

I love experimenting with color combinations β€” try a variegated yarn for the shell and a solid contrast for the body to make the spiral pop.

To change the size, alter your yarn weight and hook: bulky yarn and a larger hook makes a chunky snail, while finer yarn makes a tiny collectible version.

I sometimes add embroidered details on the mantle or shell spiral to give more texture and personality to each snail.

If you want poseable eye stalks, increase the length of the craft wire and wrap extra textile band-aid for sturdier movement.

Try swapping the glass eyes for painted or embroidered irises if you want a fully soft, child-safe toy that requires no glue.

To create a family of snails, use the same pattern but vary shell sizes, eye spacing and mantle shapes for a charming display.

For a weathered look, use a linen or natural fiber yarn to give the snail a rustic, vintage feel.

Make seasonal snails by using holiday colors and small accessories like tiny crowns or scarves crocheted separately and sewn on.

I like to add weighted beads in the base for extra stability if my snail tips easily β€” place them inside before final closing.

Finally, consider crocheting a matching tiny snail friend or a little leaf bed as a display accessory to make a cohesive handmade set.

Common Mistakes & How to Fix Them

βœ— Crocheting too loosely results in holes and stuffing showing through; use a smaller hook or tighten your tension to keep the fabric dense enough to hide filling. βœ— Forgetting to leave long yarn tails for sewing pieces together leads to awkward joins; always leave a 15-20 cm tail where sewing or shaping will be required and hide ends later. βœ— Not adding wire or wrapping it securely makes eye stems floppy; use the recommended craft wire, fold the loop and wrap with textile band-aid for stable, safe attachment. βœ— Skipping the step to hide and knot pulling threads inside the shell will let the coil come undone; when pulling threads to shape the shell, make a firm knot inside and hide the tail securely. βœ— Neglecting to stuff gradually can produce lumps and uneven shaping; fill little by little while shaping to keep even, smooth curves and volume.

Snail Amigurumi Pattern

Make a whimsical crocheted snail with expressive eyes and a curled shell β€” perfect as a gift or a quirky shelf friend. This pattern guides you step-by-step through crocheting the shell, eyes, eyelids, jaws, body and decorative mantle, with clear shaping and assembly instructions. You will learn a few handy finishing techniques like wire-framing the eye stems and attaching the shell securely for a stable finished toy.

Intermediate 5-7 Hours

Materials Needed for Snail Amigurumi Pattern

β€” Main Fabric

  • 01
    YarnArt Jeans, 160 m (174 yds) per 50 g skein (55% cotton, 45% pac): light green (color 29) - 14 g
  • 02
    YarnArt Jeans, 160 m per 50 g: purple (color 72) - 7 g
  • 03
    YarnArt Jeans, 160 m per 50 g: white (color 62) - 3 g
  • 04
    Small amounts of neutral/beige for alternate shell color - approx 10-20 g (optional)
  • 05
    Fiberfill for stuffing - small amount to lightly fill shell and body

β€” Tools Required

  • 01
    Steel crochet hook size 1.75 mm (#4 US)
  • 02
    Yarn needle for sewing and hiding ends
  • 03
    Scissors
  • 04
    Wooden skewer and a toothpick with broken tips for stuffing
  • 05
    Gypsy needle
  • 06
    2 glass eyes 14 mm (0.55 inch)
  • 07
    Glue Moment Crystal (or clear craft glue)
  • 08
    Craft wire (aluminum or copper) thick 0.75-1 mm (0.03-0.039 inch) - approx 115 cm (45.28 inch)
  • 09
    Round pliers and wire cutters
  • 10
    Textile band-aid (for wrapping wire loops)
  • 11
    Stitch markers (optional)

Progress Tracker

0% Complete

β€” Shell :

Info :

We knit in a spiral.

Round 1 :

6 sc in MC

Round 2 :

6 inc = 12

Round 3-12 :

12 sc

Round 13 :

inc, 11 sc = 13 (photo 1)

Round 14-23 :

13 sc

Round 24 :

inc, 12 sc = 14

Round 25-29 :

14 sc

Round 30 :

3 sc in 1, 13 sc = 16

Round 31 :

sc, 3 sc in 1, 14 sc = 18

Round 32 :

2 sc, 3 sc in 1, 15 sc = 20

Round 33 :

3 sc, 3 sc in 1, 16 sc = 22

Round 34 :

4 sc, 3 sc in 1, 17 sc = 24 (photo 2)

Round 35 :

5 ps, 3 ps in 1, 18 ps = 26 (photo 3-4)

Info :

Fasten off, hide the tip of the thread. Fill the shell with fiberfill lightly.

Info :

Make a tie from the narrow part of the shell and fix it at the first round (photo 5-6).

Info :

Fold the second round and stretch the ends of the pulling thread through the tip of the shell, make a knot on the inside of the shell (photo 1-2). Bend the side (photo 3).

β€” Eye :

Info :

We knit in a spiral with white yarn.

Round 1 :

6 sc in MC

Round 2 :

6 inc = 12

Round 3 :

(sc, inc) * 6 = 18

Round 4 :

(2 sc, inc) * 6 = 24

Round 5-7 :

24 sc

Round 8 :

(2 sc, dec) * 6 = 18

Round 9 :

(sc, dec) * 6 = 12, fill with fiberfill.

Round 10 :

6 dec = 6, pull the hole by the front loops. Hide the tip of the thread inside the ball (photo 4).

Info :

Pick up the eye in the 7th row for 2 columns on a long wire. Align the ends of the wire and twist it under the eye (photo 1-2). Bend the ends of the wire.

Info :

Stretch the ends of the wire through the tube of the lower eyelid, thereby inserting the eye into the socket (photo 3-5). The eye does not need to be sewn in any way; it is remarkably fixed between the eyelids (photo 6).

β€” Upper eyelid :

Info :

We knit in a spiral with light green yarn.

Round 1 :

6 sc in MC

Round 2 :

6 inc = 12

Round 3 :

(sc, inc) * 6 = 18

Round 4 :

(2 sc, inc) * 6 = 24

Round 5-8 :

24 sc, fasten off, hide the tip of the thread (photo 1).

β€” Lower eyelid :

Info :

We knit in a spiral with light green yarn. Immediately leave the tip for sewing 20 cm (8 inch).

Round 1 :

5 sc in MC, we do not tighten the ring tightly - there should be a hole for the frame (photo 2-3).

Round 2-6 :

5 sc

Round 7 :

7 inc = 12 (the marker of the beginning of the row will shift by 2 loops)

Round 8 :

(sc, inc) * 6 = 18, sl st. Cut the yarn leaving a tail for sewing (photo 4).

Info :

Fold the upper and lower eyelid and combine 8 sc in pairs (photo 5).

β€” Upper jaw :

Info :

We knit in a spiral with light green yarn.

Round 1 :

6 sc in MC

Round 2 :

6 sc

Round 3 :

inc, 5 sc = 7

Round 4 :

7 sc

Round 5 :

inc, 6 sc = 8

Round 6 :

8 sc

Round 7 :

3 sl st, sc, 4 hdc = 8 (photo 1), finish, hide the tip of the thread. Fold the wire with a loop (photo 2), wrap it with a textile band-aid (photo 3). Insert it into the upper jaw. To add volume, fill it slightly (photo 4).

β€” Lower jaw :

Info :

We knit in a spiral with light green yarn.

Round 1 :

4 sc in MC

Round 2 :

(inc, sc) * 2 = 6

Round 3 :

6 sc, sl st. Do not fill.

Round 4 :

ch, rotate, 3 join sc with upper jaw on sl st (photo 1-2), when knit on upper jaw: sc, 3 hdc, sc, on lower jaw: 3 sl st = 8 (photo 3).

Info :

Insert the eye wires at the base of the first and last half double crochet of the 7th row of the upper jaw (photo 4). Stretch the frame into the neck (photo 5-6). Wrap the wires with a textile band-aid.

β€” Body :

Info :

We continue to knit from the united jaws in a spiral around the frame.

Round 1-2 :

8 sc

Round 3 :

dec, 6 sc = 7

Round 4 :

dec, 5 sc = 6

Round 5-7 :

6 sc

Round 8 :

inc, 5 sc = 7

Round 9 :

7 sc

Round 10 :

inc, 6 sc = 8

Round 11 :

8 sc

Round 12 :

inc, 7 sc = 9 (photo 1)

Round 13 :

inc, 8 sc = 10

Round 14 :

(inc, 4 sc) * 2 = 12

Round 15 :

(3 sc, inc) * 3 = 15

Round 16 :

(4 sc, inc) * 3 = 18

Round 17-19 :

18 sc

Round 20 :

dec, 16 sc = 17

Round 21-23 :

17 sc

Round 24 :

dec, 15 sc = 16

Round 25-27 :

16 sc

Round 28 :

dec, 14 sc = 15

Round 29 :

15 sc

Round 30 :

dec, 13 sc = 14

Round 31 :

dec, 12 sc = 13

Round 32 :

dec, 11 sc = 12. Fill the body with fiberfill lightly.

Round 33 :

dec, 10 sc = 11

Round 34 :

dec, 9 sc = 10

Round 35 :

dec, 8 sc = 9

Round 36 :

dec, 7 sc = 8

Round 37 :

dec, 6 sc = 7

Round 38-51 :

7 sc, cut off the excess tip of the frame (photo 2), complete, pull the hole by the front loops, hide the tip (photo 3-4).

β€” Mantle :

Info :

Make 47 loops on the body. To do this, it is convenient to mark 3 columns on the chest (photo 3) and count another 22 rows on the sides of them. For each row and for each single crochet, make 1 loop. The mantle line should be in 2 loops below the shell. The line does not have to be flat. The curves of the line will create the illusion of mobility of the mantle (photo 4-5).

Round 1 :

rotate, 10 sc, 7 hdc, 5 dc, 3 inc dc, 5 dc, 7 hdc, 10 sc = 50

Round 2 :

sl st on the body, rotate, skip 1, 10 inc, 7 inc hdc, 16 inc dc, 7 inc hdc, 10 inc, sl st, fasten off, hide the tip of the thread (photo 1).

β€” Assembly :

Item Name (P1) :

Press a recess on the abdomen with your finger and sew it around the perimeter so that the snail stands more stable (photo 2-3).

Item Name (P2) :

Glue the eyes (photo 4-5).

Info :

We bend the body of the snail in the place of thickening with the letter L. We sew the shell to the body with invisible stitches, picking up the border between 34 and 35 rows. The stitch length is 1 column or 1 row. We bend 35 Row up (photo 1-2).

Assembly Instructions

  • Sew the shell to the body with invisible stitches picking up the border between rows 34 and 35 so the snail shell sits naturally on the back.
  • Press a small recess on the abdomen and stitch around the perimeter to stabilize the snail so it stands more securely.
  • Insert the eye frame wires through the 7th row tube of the lower eyelid and twist the ends under the eye; wrap the wire loop with textile band-aid and insert into the upper jaw.
  • Glue the glass eyes into the eyelid sockets with clear glue (Moment Crystal) and hide any glue excess; the eyelids and frame will secure the eyeballs.
  • Wrap exposed wire ends with textile band-aid and cut off excess frame wire, then pull the frame into the neck and weave/secure ends to prevent movement.

Important Notes

  • πŸ’‘The toy must be crocheted with tight stitches to avoid visible holes when stuffing.
  • πŸ’‘Stuff the body and shell lightly and gradually to maintain smooth shaping and avoid lumps.
  • πŸ’‘If you notice tiny holes in your fabric, switch to a smaller hook size and increase tension to close gaps.
  • πŸ’‘For toddlers under three years, use safety eyes or glue eyes securely and avoid buttons and loose parts.
  • πŸ’‘Wrap and finish the wire frames thoroughly with textile band-aid to cover sharp wire ends before inserting into the toy.

This cute snail will bring a smile to any shelf or desk and makes a thoughtful handmade gift. Its tall eye-stalks and spiral shell add personality and whimsy to your craft collection. Make a pair in different colors β€” they are quick, satisfying and adorable to display. 🧢🐌

You ask,

we answer.

FAQs

What size will the finished piece be?

The finished snail measures approximately 13.5 cm x 11.5 cm (5.31 x 4.53 inches) when using the recommended yarn and hook size, though size may vary by yarn and tension.

Can I use different yarn weights for this pattern?

Yes, you can use different yarn weights, but the finished size and stitch definition will change; choose an appropriate hook and adjust wire/frame length as needed.

Do I need prior crochet experience for this pattern?

This pattern is rated intermediate β€” basic experience with single crochet, increases and decreases, and working in spirals is recommended for best results.

How long does this project typically take to complete?

Most crocheters complete this project in 5-7 hours, depending on experience, assembly time and how many details (wire wrapping, glueing eyes) you include.