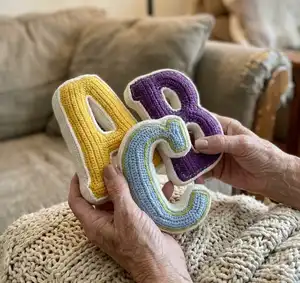
Create bold, plush 3D letters for home decor, nurseries, banners or personalized gifts with this full alphabet crochet pattern. You will find step-by-step instructions, stitch dictionary, edging and joining techniques to make clean, professional letters. The pattern includes special techniques like invisible decreases, needle join and short rows to shape corners and curves. Perfect for makers who love customizing color and thickness for each letter.
Progress Tracker
0% Complete
— Material :
Info :
Cotton yarn in different colors. I used: Name CATANIA. Brand Schachenmayr nomotta. Yardage 136 yds. (125 m). Weight 50g (1.76 ounce). Yarn Weight Fingering /Sport. Fiber Content 100% Cotton. Texture Plied, 5 ply (12 wpi). Hook size 2.5 mm (see Gauge, below). Fiberfill. Tapestry needle. Scissor. Stitch marker.
— Gauge :
Info :
Gauge is unimportant for this pattern, provided the pieces are crocheted sufficiently tightly that they will not gape visibly when stuffed. To test a swatch, crochet a few rounds and then push a piece of fiberfill behind it: If the stitches stretch too much and the fiberfill is clearly visible, reduce the hook size. If you cannot insert the hook into the previous stitches, reduce your tension or increase the hook size. My letters measures 7 ½ ” (19 cm) tall. Of course final measurements will change with yarn or hook substitutions.
— Abbreviations :
Infos :
This pattern uses American Standard Abbreviations. rd - round. row - row. st(s) - stitch(es). slst - slip stitch. ch - chain. sc - single crochet. fsc - foundation single crochet. hdc - half double crochet. dc - double crochet. dec - decrease over 2 single crochet. sc3tog - decrease over 3 single crochet. hdc-dec - decrease over 2 half double crochet. inv-sc-dec - invisible decrease over 2 single crochet. inv-sc3tog - invisible decrease over 3 single crochet. inv-hdc-dec - invisible decrease over 2 half double crochet. [...] work directions inside brackets into stitch as indicated. *...* *crochet directions following * as many times as indicated. RS right side of the crochet piece. WS wrong (= left) side of the crochet piece. sk skip. yo yarn over. lp(s) loop(s). NJ needle join. FL(s) front loop(s). BL(s) back loop(s).
— Stitch Dictionary :
Info :
slst (slip stitch) = Insert hook in indicated st, yo and pull through both st and lp on hook. sc (single crochet) = Insert hook in indicated st, yo, pull through lp, yo and pull through both lps on hook. fsc (foundation single crochet) = insert hook in indicated st, YO and pull through a loop, YO and pull through one loop on hook (the “chain”), YO and pull through 2 loops on hook (the “sc”). The following stitch is worked under the forward 2 loops of the stem of the previous stitch (into the “chain”). *Insert hook into the face of the “chain” and under the nub at the back of the “chain” (under two strands), YO and pull through a loop, YO and pull through one loop (the “chain”), YO and pull through 2 loops (the “sc”). Repeat from * for the length of foundation. dec (decrease over 2 single crochet) = *Insert hook in indicated st, yo, pull through lp* crochet twice, yo and pull through all 3 lps on hook. sc3tog (decrease over 3 single crochet) = *Insert hook in indicated st, yo, pull through lp* crochet 3 times, yo and pull through all 4 lps on hook. inv-sc-dec (invisible decrease over 2 single crochet) = (insert hook into FL/BL only of the indicated st) twice, yo, pull through both FL/BLs, yo, pull through both lps on hook. inv-sc3tog (invisible decrease over 3 single crochet) = (insert hook into FL/BL only of the indicated st) twice, yo, pull through both FL/BLs, yo, pull through both lps on hook. hdc (half double crochet) = Yo, insert hook in indicated st, yo, pull through lp, yo, pull through all 3 lps on hook. hdc-dec (decrease over 2 half double crochet) = *Yo, insert hook in indicated st, yo, pull through lp* crochet twice, yo, pull through all 5 lps on hook. inv-hdc-dec (invisible decrease over 2 half double crochet) = Yo, (insert hook into FL/BL only of the indicated st) twice, yo, pull through both FL/BLs, yo, pull through all 3 lps on hook. dc (double crochet) = Yo, insert hook in indicated st, yo, pull through lp, (yo, pull through 2 lps) twice. dc-dec (decrease over 2 double crochet) = Yo, insert hook in indicated st, yo, pull through lp, yo, pull through 2 lps, yo, insert hook in next st, yo, pull through lp, yo, pull through 2 lps, yo, pull through all 3 lps on hook.
— Crochet Chart Symbols :
Info :
Standard crochet chart symbols are shown in the pattern for start, end, pull through a loop to FO st, needle join (NJ), work sts over ch or slst, direction of crochet, slip stitch (slst), chain (ch), single crochet (sc), foundation single crochet (fsc), increase (2 sc in one stitch), increase (3 sc in one stitch), decrease symbols for dec, inv-sc-dec, sc3tog, inv-sc3tog, half double crochet (hdc), increase 2 hdc in one stitch, decrease over 2 hdc (hdc-dec), invisible decrease over 2 half double crochet (inv-hdc-dec), double crochet (dc), decrease over 2 double crochet (dc-dec).
— Special Crochet Techniques :
Needle Join (NJ) :
You will use this technique to join the last round of your side piece(s). If you use this technique you do not create a further "V", what would happen if you join the round with a slst. Fig. 1: Fasten off and thread the yarn tail onto a yarn needle. Fig. 2: Pull the yarn through under the "V" of the st after the next of the previous round and pull through. Fig. 3: ... pull through. Fig. 4: Insert the needle into the center of the last stitch at the end of the last round and ... Fig. 5: ... pull the yarn through to secure. In this manner you create a "V" for the skipped st.
— Special Crochet Techniques Continued :
Infos :
Use the needle join (NJ) to join the line of slip stitches you used to embellish your letters. Work slip stitches around the stitches of the indicated row/round and join the last slst with the first slst using NJ (fasten off, thread tail on needle, pull yarn through under the "V" of the first slst, insert needle into the center of last slst, pull through to secure).
— Invisible Decreases :
Info :
For letters like "B", "Z" and symbol "&" invisible decreases are used. Figures show how to make inv-sc-dec: insert hook from front to back into the FLs only of the next two stitches, yo, pull through both FLs, yo pull through both loops on hook. The same principle applies for inv-sc3tog and inv-hdc-dec; work into FLs or BLs depending on which side will be visible on finished letter. Keep unworked loops on the side that will be WS so the RS of the finished front will face outside.
— Short Rows :
Info :
Short rows are used to shape letters. Work a short row by not ending the actual row so the last sts of the previous row are unworked, or by using chains and/or slip stitches. Then in the following row work over the chains and slip stitches of the previous row (meaning work into the sts one row below) to create shaping (see fig. 20-28).
— Work over a slst / over a ch :
Info :
To work a sc over a slst: 1 ch, turn work; insert hook through the marked slst (one row below), yo, pull through lp, yo, pull through both lps on hook. To work a sc over a chain: insert hook through next st one row below, pass under the chain, yo and pull through, yo and pull through both loops on hook. Details and photos are provided (fig. 21-28).
— Embellish the Letters :
Back Stitch :
Bring the needle up through the crochet piece one stitch ahead of the starting point. Go down through the crochet piece one stitch behind, then out again one stitch ahead. Continue in this way (fig. 33).
Line of slip stitches :
Bring the hook from front to back in any gap between two stitches, yo and pull through both gap and loop on hook, *bring the hook from front to back in next gap, yo and pull through both gap and loop on hook* repeat to the end. Crochet slip stitches around; see photos. Embellish the letters before joining the pieces.
— Instructions :
General :
Most of the letters consists of three pieces: The front and the back piece which are equal and the side piece. The letters "A", "D", "O", "P", "Q" and "R" consist of four pieces: The front and the back piece which are equal and the inner and outer side piece. The letter "B" and the symbol "&" consist of five pieces: The front and the back piece which are equal, two inner and one outer side piece. Use the written instructions and the crochet charts to work the single letters. Crochet all letters and symbols except for the letter "O" and "Q" in rows. Turn work after each row.
— Preparation to Join the Pieces (Edging) :
Info :
For all letters and symbols except for the letter "O": Mark any outer corner of the front piece, mark the same outer corner of the back piece. For "O": Mark any stitch of the last round of the front piece. Mark the same stitch on the back piece. For all letters and symbols: Mark any stitch on one edge of the (inner/outer) side piece. Also mark the stitch on the other edge which is directly located opposite. When you crochet in rounds the same stitches of the single rounds do not lie on top of each other but they are off-center; check how many stitches lie off-center if you add rounds for thickness.
— Join Front and Side Piece (Edging) :
Info :
To join the side piece with the front and back pieces use the yarn color of the side piece. Holding the WS of the front piece and the RS of the side piece together (WS of the side piece outside facing), with front piece facing, begin to sc around the edge crocheting through both pieces. Fasten on and work the first sc through the marked outer corner (for "O": marked st) of the front piece and the marked st of the side piece. Work 3 sc in each outer corner, work 1 sc in each other st and in each row of sc. Add some additional sts when you work in rows with hdc. Join the round with a NJ.
— Join Back and Side Piece (Edging) :
Info :
Holding the RS of the back piece and the RS of the side pieces together (for some letters hold WS of back piece and RS of side pieces). With back piece facing, begin to sc around the edge, crocheting through both pieces. Fasten on and work the first sc through the marked outer corner (for "O": marked st) of the back piece and marked st of the side piece. Work 3 sc in each outer corner, 1 sc in each other st and each row of sc. Add additional sts when working with hdc. Join the round with a NJ.
— Instructions for the Letter "A" :
Info :
Despite being apparently made up of three strokes the "A" is worked all in one. Starting on the left stroke and at the start of the stroke on the right extending the first row of this stroke to make the cross bar, then catching in the end of the cross bar at the end of the right stroke. At the final end you only have to add the right little bar on the bottom of the left stroke and the left little bar on the bottom of the right stroke. Front Piece: Use the yarn color for the front piece of the letter. Use the crochet chart on page 6. Start with the left stroke:
Row 1 :
(RS) 11 ch, 1 sc in 6th ch from hook, 5 sc, 1 ch, turn work (6 sts) – see fig. 1
Row 2 :
6 sc, 1 sc in 7th and 8th ch of row 1, 4 ch, turn work (8 sts) – see fig. 2 and 3
Row 3 :
sk 4 sts, 4 sc, 41 ch, turn work (4 sts)
Row 4 :
1 sc in 2nd ch from hook, 1 sc in next 39 ch, 1 sc in next 4 sc of row 3, 1 sc in the last 4 sc of row 2 (work over the ch of row 3), 1 ch, turn work (48 sts) – see fig. 4
Row 5 :
48 sc, 1 ch, turn work (48 sts)
Row 6 :
[2 sc], 45 sc, 1 dec, 1 ch, turn work (48 sts)
Row 7-9 :
48 sc, 1 ch, turn work (48 sts)
Row 10 :
[2 sc], 45 sc, 1 dec, 1 ch, turn work (48 sts)
Row 11-12 :
48 sc, 1 ch, turn work (48 sts)
Row 13 :
44 sc, 3 ch, sk 3 sts, 1 slst, 1 ch, turn work (44 sts)
Row 14 :
1 sc in next 4 sts of row 12 (work over the slst and the 3 ch of row 13), 1 sc in next 2 sc - see fig. 5 ...
Cross Bar Intro :
Now crochet the cross bar (row A-G). ... 27 ch, sk 19 sts, 2 slst, turn work – see fig. 6 ...
Row A :
sk the 2 slst, 1 sc in next 8 ch, 1 ch, turn work (8 sts) – see fig. 7
Row B :
8 sc, 1 slst in next 2 sts of row 13, turn work (8 sts) – see fig. 8
Row C :
sk the 2 slst, 3 sc, [2 sc], 4 sc, 1 ch, turn work (9 sts)
Row D :
9 sc, 1 slst in next 2 sts of row 13, turn work (9 sts)
Row E :
sk the 2 slst, 9 sc, 1 ch, turn work (9 sts)
Row F :
4 sc, [2 sc], 4 sc, 1 slst in next 2 sts of row 13, turn work (10 sts)
Finish row 14 :
... 16 ch (6 sts) – see fig. 9
Right Stroke Intro :
Now crochet the right stroke.
Row 15 :
1 sc in 2nd ch from hook, 1 sc in next 14 ch, work 7 sc sidewise in the row A-G and 1 sc in the gap of the ch in which you worked the last sc of row A (see fig. 10), 1 sc in next 19 ch, 1 sc in next 2 sc of row 14, 3 ch, sk 3 sts, 1 slst, 1 ch, turn work (44 sts)
Row 16 :
1 sc in next 4 sc of row 14 (work over the slst and the 3 ch of row 15), 44 sc, 1 ch, turn work (48 sts)
Row 17 :
48 sc, 1 ch, turn work (48 sts)
Row 18 :
1 dec, 45 sc, [2 sc], 1 ch, turn work (48 sts)
Row 19-21 :
48 sc, 1 ch, turn work (48 sts)
Row 22 :
1 dec, 45 sc, [2 sc], 1 ch, turn work (48 sts)
Row 23 :
48 sc, 1 ch, turn work (48 sts)
Row 24 :
48 sc, 4 ch, turn work (48 sts)
Row 25 :
4 ch, sk 4 sts, 4 sc, 1 ch, turn work (4 sts)
Row 26 :
4 sc, 1 sc in last 4 sc of row 24 (work over the ch), 1 ch, turn work (8 sts)
Row 26 (cont) :
sk 1 st, 1 slst, 6 sc (6 sts)
These 3D letters bring a handmade statement to any room, nursery or party — bold, customizable and wonderfully tactile. Choose colors and sizes to match your decor or create personalized gifts full of charm. The pattern includes clear photos and charts to guide you every step of the way. 🧶 Make something memorable and have fun stitching! ✨