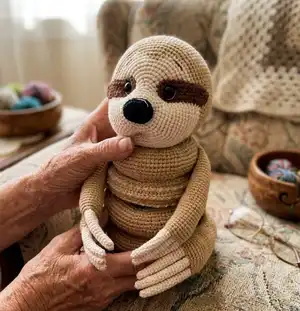
🧢 Beautiful ✨ Detailed πŸ’ Adorable

Sloth Stacking Toy Amigurumi Pattern

Sloth Stacking Toy Amigurumi Pattern
4.2β˜… Rating
8-10 Hours Time Needed
1.9K Made This
βœ‚οΈ

Intermediate Level

Ideal for those with basic crochet experience, featuring slightly more advanced stitches and techniques to expand your skills.

⏱️

All-Day Adventure

Requires 8-10 hours, ideal for a full day of immersive crocheting.

🧸

Cute Companion

An adorable friend to cherish, handcrafted with love to bring comfort and joy for years to come.

About This Sloth Stacking Toy Amigurumi Pattern

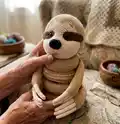
This pattern creates a sloth stacking toy composed of rings, limbs and a removable head for playful posing. It features step-by-step round instructions for each piece and clear connection steps for assembly. Techniques include working in rounds, front/back loop (BLO/FLO) variations and neat color changes to shape the face.

Sloth Stacking Toy Amigurumi Pattern crochet pattern - detailed view of completed project

Suitable for crocheters comfortable with single crochet, increases and decreases, and comfortable sewing pieces together. The finished toy is designed to be soft, stackable and full of character.

Why You'll Love This Sloth Stacking Toy Amigurumi Pattern

I absolutely love this pattern because it combines simple amigurumi building blocks into a delightful stacking toy that feels whimsical and practical. I enjoy the way the rings and removable head let you customize the pose and display. The face shaping and eye patches bring so much personality with only basic stitches. Making the claws and connecting them into limbs is such a satisfying assembly step that finishes with a professional look. This design is a joy to make and shares well as a handmade gift for kids and grown-up sloth lovers alike.

Sloth Stacking Toy Amigurumi Pattern step 1 - construction progress Sloth Stacking Toy Amigurumi Pattern step 2 - assembly progress Sloth Stacking Toy Amigurumi Pattern step 3 - details and accessories Sloth Stacking Toy Amigurumi Pattern step 4 - final assembly and finishing

Switch Things Up

I love how easy it is to customize this design with color changes β€” try pastel shades for a nursery-friendly sloth, or add brighter rings for a playful look.

You can make the toy larger or smaller by changing yarn weight and hook size; bulky yarn with a larger hook creates a chunky statement, while thin yarn with smaller hooks makes a dainty mini version.

I often add embroidered mouth shapes or tiny felt leaves to personalize expressions and accessories for holiday or seasonal themes.

If you want posable limbs, insert thin wire inside the arms and legs before sewing them shut, then wrap with a bit of yarn to keep the wire from showing.

For safer baby toys, substitute safety eyes with embroidered eyes or crochet small eye circles from black yarn to avoid small parts.

Try mixing yarn textures β€” cotton for a crisp look, or acrylic for extra softness and washability depending on who will use the toy.

Change the number of rings to make different stacking heights β€” fewer rings give a compact figure while more rings create an oversized, decorative piece.

Add a hanging loop to the top of the head and make a wall ornament variation that showcases the face and rings decoratively.

I also like making themed versions β€” give the sloth a tiny crocheted hat or scarf to match holidays and make thoughtful gifts.

Lastly, experiment with stitch tension and stuffing levels to alter firmness; slightly looser tension gives a squishier toy while tighter tension creates crisp shaping.

Common Mistakes & How to Fix Them

βœ— Skipping stitch markers when joining rounds can cause misaligned seams and uneven shapes; use markers at each round start and after color changes to stay consistent. βœ— Not stuffing evenly can lead to lumpy rings or misshapen limbs; stuff gradually in small amounts and shape with your fingers as you go for a smooth finish. βœ— Changing hook size or tension without adjusting stitch count will alter final size and fit; keep tension consistent and check gauges, adjusting only when you intend a size change. βœ— Forgetting to switch to BLO/FLO as instructed can flatten decorative edges; follow directions exactly for rounds specified BLO or FLO to achieve the intended look. βœ— Pulling yarn tails too short during sewing will make secure attachments difficult; leave generous tails for sewing and weave them in for a neat finish.

Sloth Stacking Toy Amigurumi Pattern

Make a cuddly sloth stacking toy you can assemble and stack for playful decor or a sweet handmade gift. This pattern guides you step-by-step through rings, legs, arms, tail and a detailed headβ€”perfect for creating a poseable, soft toy. Clear round-by-round instructions help you track progress and achieve neat, consistent results. Grab your hooks and yarn and enjoy crafting this charming sloth companion.

Intermediate 8-10 Hours

Materials Needed for Sloth Stacking Toy Amigurumi Pattern

β€” Main Fabric

  • 01
    Beige - Alize Cotton Gold 262 (2 balls - 660m / 722 yd total indicated)
  • 02
    Ivory - Alize Cotton Gold 67 (small amount for face and claws)
  • 03
    Brown - Alize Cotton Gold 493 (small amount for eye patches and details)
  • 04
    Black yarn - small amount for nose detail

β€” Tools Required

  • 01
    Crochet hook size 1.5 mm (for claws, nose details)
  • 02
    Crochet hook size 3 mm (main body and rings, or adjust in accordance with the yarn you use)
  • 03
    Safety eyes diameter 12 mm (2 pieces) or bits of black yarn for crochet eyes
  • 04
    Fiberfill for stuffing
  • 05
    Scissors
  • 06
    Tapestry needle for sewing
  • 07
    Stitch markers
  • 08
    Tweezers for stuffing claws (optional)

Progress Tracker

0% Complete

β€” BASE :

Round 1 :

6 sc in MR (6)

Round 2 :

6 inc (12)

Round 3 :

12 sc (12)

Round 4 :

(1 sc; inc)*6 (18)

Round 5-6 :

18 sc (18)

Round 7 :

(2 sc; inc)*6 (24)

Round 8-10 :

24 sc (24)

Round 11 :

(3 sc; inc)*6 (30)

Round 12-15 :

30 sc (30)

Round 16 :

(4 sc; inc)*6 (36)

Round 17-21 :

36 sc (36)

Round 22 :

(5 sc; inc)*6 (42)

Round 23-28 :

42 sc (42)

Round 29 :

(6 sc; inc)*6 (48)

Round 30-36 :

48 sc (48)

Round 37 :

(7 sc; inc)*6 (54)

Round 38-45 :

54 sc (54)

Round 46 :

(8 sc; inc)*6 (60)

Round 47 :

FLO (9 sc; inc)*6 (66)

Round 48 :

5 sc; inc; (10 sc; inc)*5; 5 sc (72)

Round 49 :

(11 sc; inc)*6 (78)

Round 50 :

6 sc; inc; (12 sc; inc)*5; 6 sc (84)

Round 51 :

(13 sc; inc)*6 (90)

Round 52 :

7 sc; inc; (14 sc; inc)*5; 7 sc (96)

Round 53 :

(15 sc; inc)*6 (102)

Round 54 :

8 sc; inc; (16 sc; inc)*5; 8 sc (108)

Round 55 :

(17 sc; inc)*6 (114)

Round 56-62 :

114 sc (114)

Round 63 :

(17 sc; dec)*6 (108)

Round 64 :

8 sc; dec; (16 sc; dec)*5; 8 sc (102)

Round 65 :

(15 sc; dec)*6 (96)

Round 66 :

7 sc; dec; (14 sc; dec)*5; 7 sc (90)

Round 67 :

(13 sc; dec)*6 (84)

Round 68 :

6 sc; dec; (12 sc; dec)*5; 6 sc (78)

Round 69 :

(11 sc; dec)*6 (72)

Round 70 :

5 sc; dec; (10 sc; dec)*5; 5 sc (66)

Round 71 :

(9 sc; dec)*6 (60)

Round 72 :

connect round 71 with round 47 (BLO) with 60 sc (60) fill with stuffing as you go, then continue to work in rounds.

Round 73 :

(8 sc; dec)*6 (54)

Round 74 :

(7 sc; dec)*6 (48)

Round 75 :

(6 sc; dec)*6 (42)

Round 76 :

(5 sc; dec)*6 (36)

Round 77 :

(4 sc; dec)*6 (30)

Round 78 :

(3 sc; dec)*6 (24)

Round 79 :

(2 sc; dec)*6 (18)

Round 80 :

(1 sc; dec)*6 (12)

Round 81 :

6 dec (6) cut the yarn, pull off hole, hide a tail.

β€” LEGS (make 2) :

Info :

With ivory yarn and 1.5 mm hook make 3 claws, middle claw will be a bit longer, then other two.

Long claw (make 1) :

Round 1: 6 sc in MR (6)

Round 2-6 :

6 sc (6)

Round 7 :

inc; 5 sc (7)

Round 8-12 :

7 sc (7)

Round 13 :

1 sc; inc; 5 sc (8)

Round 14-17 :

8 sc (8)

Round 18 :

2 sc; inc; 5 sc (9)

Round 19-22 :

9 sc (9) fasten off.

Short claws (make 2) :

Round 1: 6 sc in MR (6)

Round 2-5 :

6 sc (6)

Round 6 :

inc; 5 sc (7)

Round 7-10 :

7 sc (7)

Round 11 :

1 sc; inc; 5 sc (8)

Round 12-15 :

8 sc (8)

Round 16 :

2 sc; inc; 5 sc (9)

Round 17-20 :

9 sc (9) fasten off one claw and in second short claw change yarn to beige and from now on use 3 mm hook.

Connect short, long and short claw :

Round 1: 9 sc in a short claw; 5 sc in a long claw; 9 sc in a second short claw; 4 sc in a long claw (27)

Round 2 :

9 sc; inc; 3 sc; inc; 10 sc; inc; 2 sc (30)

Round 3-7 :

30 sc (30)

Round 8 :

9 sc; dec; (3 sc; dec)*2; 4 sc; inc; (1 sc; inc)*2 (30)

Round 9-13 :

23 sc; BLO 7 slst (30)

Round 14 :

30 sc (30)

Round 15 :

(3 sc; dec)*6 (24)

Round 16-30 :

24 sc (24)

Round 31 :

(2 sc; dec)*6 (18)

Round 32 :

5 sc, turn fold in half and crochet 9 sc closing the hole (fill with stuffing, not too tight - 3/4 of the leg)

β€” TAIL :

Round 1 :

6 sc in MR (6)

Round 2 :

6 inc (12)

Round 3 :

12 sc (12)

Round 4 :

(1 sc; inc)*6 (18)

Round 5 :

18 sc (18)

Round 6 :

(2 sc; inc)*6 (24)

Round 7 :

24 sc (24)

Round 8 :

(3 sc; inc)*6 (30)

Round 9-13 :

30 sc (30)

Round 14 :

BLO(3 sc; dec)*6 (24)

Round 15 :

(2 sc; dec)*6 (18) fill with stuffing

Round 16 :

(1 sc; dec)*6 (12)

Row 17 :

6 dec (6) fasten off, leave a tail for sewing.

Info :

Sew the tail to the base as you can see in the photos.

β€” LARGE RING :

Round 1 :

60 ch; slst in 1st ch (60)

Round 2 :

(9 sc; inc)*6 (66)

Round 3 :

5 sc; inc; (10 sc; inc)*5; 5 sc (72)

Round 4 :

(11 sc; inc)*6 (78)

Round 5 :

6 sc; inc; (12 sc; inc)*5; 6 sc (84)

Round 6 :

(13 sc; inc)*6 (90)

Round 7 :

7 sc; inc; (14 sc; inc)*5; 7 sc (96)

Round 8 :

(15 sc; inc)*6 (102)

Round 9-11 :

102 sc (102)

Round 12 :

BLO 102 sc (102)

Round 13-15 :

102 sc (102)

Round 16 :

(15 sc; dec)*6 (96)

Round 17 :

7 sc; dec; (14 sc; dec)*5; 7 sc (90)

Round 18 :

(13 sc; dec)*6 (84)

Round 19 :

6 sc; dec; (12 sc; dec)*5; 6 sc (78)

Round 20 :

(11 sc; dec)*6 (72)

Round 21 :

5 sc; dec; (10 sc; dec)*5; 5 sc (66)

Round 22 :

(9 sc; dec)*6 (60)

Info :

Sew round 22 with round 1, fill with stuffing as you go.

β€” MIDDLE RING :

Round 1 :

48 ch; slst in 1st ch (48)

Round 2 :

(7 sc; inc)*6 (54)

Round 3 :

4 sc; inc; (8 sc; inc)*5; 4 sc (60)

Round 4 :

(9 sc; inc)*6 (66)

Round 5 :

5 sc; inc; (10 sc; inc)*5; 5 sc (72)

Round 6 :

(11 sc; inc)*6 (78)

Round 7 :

6 sc; inc; (12 sc; inc)*5; 6 sc (84)

Round 8 :

(13 sc; inc)*6 (90)

Round 9 :

90 sc (90)

Round 10 :

BLO 90 sc (90)

Round 11 :

90 sc (90)

Round 12 :

BLO 90 sc (90)

Round 13 :

90 sc (90)

Round 14 :

BLO 90 sc (90)

Round 15 :

90 sc (90)

Round 16 :

(13 sc; dec)*6 (84)

Round 17 :

6 sc; dec; (12 sc; dec)*5; 6 sc (78)

Round 18 :

(11 sc; dec)*6 (72)

Round 19 :

5 sc; dec; (10 sc; dec)*5; 5 sc (66)

Round 20 :

(9 sc; dec)*6 (60)

Round 21 :

4 sc; dec; (8 sc; dec)*5; 4 sc (54)

Round 22 :

(7 sc; dec)*6 (48)

Info :

Sew round 22 with round 1, fill with stuffing as you go.

β€” SMALL RING :

Round 1 :

36 ch; slst in 1st ch (36)

Round 2 :

(5 sc; inc)*6 (42)

Round 3 :

3 sc; inc; (6 sc; inc)*5; 3 sc (48)

Round 4 :

(7 sc; inc)*6 (54)

Round 5 :

4 sc; inc; (8 sc; inc)*5; 4 sc (60)

Round 6 :

(9 sc; inc)*6 (66)

Round 7 :

5 sc; inc; (10 sc; inc)*5; 5 sc (72)

Round 8 :

(11 sc; inc)*6 (78)

Round 9-15 :

78 sc (78)

Round 16 :

(11 sc; dec)*6 (72)

Round 17 :

5 sc; dec; (10 sc; dec)*5; 5 sc (66)

Round 18 :

(9 sc; dec)*6 (60)

Round 19 :

4 sc; dec; (8 sc; dec)*5; 4 sc (54)

Round 20 :

(7 sc; dec)*6 (48)

Round 21 :

3 sc; dec; (6 sc; dec)*5; 3 sc (42)

Round 22 :

(5 sc; dec)*6 (36)

Info :

Sew round 22 with round 1, fill with stuffing as you go. Then sew arms to the small ring as you can see in the photos.

β€” ARMS (make 2) :

Info :

With ivory yarn and 1.5 mm hook make 3 claws, middle claw will be a bit longer, then other two.

Long claw (arm) :

Round 1: 6 sc in MR (6)

Round 2-7 :

6 sc (6)

Round 8 :

inc; 5 sc (7)

Round 9-15 :

7 sc (7)

Round 16 :

1 sc; inc; 5 sc (8)

Round 17-18 :

8 sc (8) fasten off.

Short claws (arm) (make 2) :

Round 1: 6 sc in MR (6)

Round 2-6 :

6 sc (6)

Round 7 :

inc; 5 sc (7)

Round 8-13 :

7 sc (7)

Round 14 :

1 sc; inc; 5 sc (8)

Round 15-16 :

8 sc (8) fasten off one claw and in second short claw change yarn to beige and from now on use 3 mm hook. Connect short, long and another short claw:

Connect claws (arm) Round 1 :

8 sc in a short claw; 4 sc in a long claw; 8 sc in a second short claw; 4 sc in a long claw (24)

Round 2-7 :

24 sc (24)

Round 8 :

5 sc; dec; (3 sc; dec)*2; 4 sc; 3 inc (24)

Round 9-13 :

18 sc; BLO 6 slst (24)

Round 14 :

24 sc (24)

Round 15 :

(2 sc; dec)*6 (18)

Round 16-34 :

18 sc (18)

Round 35 :

6 sc, turn fold in half and crochet 9 sc closing the hole (fill with stuffing, not too tight - 3/4 of the arm)

β€” HEAD :

Info :

Start with black yarn for nose (hook 1.5 mm). Work nose as a small piece then switch to main head shaping.

Row 1 :

5 ch; turn and continue to work in rounds

Round 2 :

inc; 2 sc; 2 inc in first ch; 2 sc; inc in fourth ch (12)

Round 3 :

(1 sc; inc)*6 (18)

Round 4 :

(2 sc; inc)*6 (24)

Round 5-6 :

24 sc (24)

Round 7a :

BLO (2 sc; dec)*6 (18) fill with stuffing

Round 8a :

(1 sc; dec)*6 (12) fasten off, close the hole.

Info :

Start to crochet in front loops of round 6 with ivory yarn and 3 mm hook for head main color.

Round 7 :

(3 sc; inc)*6 (30)

Round 8 :

30 sc (30)

Round 9 :

(4 sc; inc)*6 (36)

Round 10 :

(5 sc; inc)*6 (42)

Round 11 :

(6 sc; inc)*6 (48)

Round 12 :

(7 sc; inc)*6 (54)

Round 13 :

(8 sc; inc)*6 (60)

Round 14 :

6 sc; 6 inc; 48 sc (66)

Round 15-16 :

66 sc (66)

Round 17 :

6 sc; (1 sc; inc)*6; 48 sc (72)

Round 18 :

72 sc (72)

Round 19 :

14 sc; change to beige-3 sc; change to ivory-55 sc (72)

Round 20 :

6 sc; (2 sc; inc)*2; change to beige - 1 sc; inc; 2 sc; inc; change to ivory - (2 sc; inc)*2; 48 sc (78)

Round 21 :

13 sc; change to beige - 11 sc; change to ivory - 54 sc (78) change to beige color

Round 22 :

(12 sc; inc)*6 (84)

Round 23 :

(13 sc; inc)*6 (90)

Round 24 :

(14 sc; inc)*6 (96)

Round 25 :

62 sc; 18 ch (skip 18 sc); 16 sc (96)

Round 26-34 :

96 sc (96)

Round 35 :

(14 sc; dec)*6 (90)

Round 36 :

(13 sc; dec)*6 (84)

Round 37 :

(12 sc; dec)*6 (78)

Round 38 :

(11 sc; dec)*6 (72)

Round 39 :

(10 sc; dec)*6 (66)

Round 40 :

(9 sc; dec)*6 (60)

Round 41 :

(8 sc; dec)*6 (54)

Round 42 :

(7 sc; dec)*6 (48)

Round 43 :

(6 sc; dec)*6 (42)

Round 44 :

(5 sc; dec)*6 (36)

Round 45 :

(4 sc; dec)*6 (30)

Round 46 :

(3 sc; dec)*6 (24)

Round 47 :

(2 sc; dec)*6 (18)

Round 48 :

(1 sc; dec)*6 (12)

Round 49 :

6 dec (6) fasten off.

β€” EYE PATCHES (make 2) :

With brown yarn Row 1 :

11 ch; turn and continue to work in rounds

Round 2 :

9 sc; 3 sc in 1st ch; 8 sc; inc (22)

Round 3 :

inc; 8 sc; 3 inc; 8 sc; 2 inc (28) leave a tail for sewing.

Info :

Sew 'eye patches', insert safety eyes as shown in the photos.

After attaching :

After attaching (or sewing eyes) fill the head with stuffing and continue to crochet, starting in the spot between rounds 26-27:

Round 1 :

BLO 36 sc (36)

Round 2-4 :

36 sc (36)

Round 5 :

(4 sc; dec)*6 (30)

Round 6-7 :

30 sc (30)

Round 8 :

(3 sc; dec)*6 (24)

Round 9-10 :

24 sc (24)

Round 11 :

(2 sc; dec)*6 (18)

Round 12 :

18 sc (18)

Round 13 :

(1 sc; dec)*6 (12)

Round 14 :

6 dec (6) fasten off.

Assembly Instructions

  • Sew legs to the base as shown in the photos, connecting rings and sewing securely while matching the shapes and spacing for a balanced look.
  • Sew the tail to the base in the position shown in the reference photos, reinforcing the seam for durability during play.
  • Attach the small ring and sew the arms to the small ring, then secure the ring into the stack sequence so the arms wrap naturally around the body.
  • Sew eye patches onto the head, insert safety eyes behind them, then sew the nose in position and finish by sewing the head onto the top of the stacked rings.
  • Join the rings by sewing round edges (sew round 22 to round 1) and fill each with stuffing as you go so the rings maintain a neat profile.

Important Notes

  • πŸ’‘Follow BLO and FLO instructions exactly for the decorative edges to achieve the pictured finish and avoid unintended flattening.
  • πŸ’‘Use stitch markers at the start of rounds and when connecting rounds to keep increases and decreases aligned for smooth shaping.
  • πŸ’‘Stuff the rings and limbs gradually β€” understuffing will cause them to collapse, overstuffing can distort the shape; aim for firm but malleable filling.
  • πŸ’‘When changing colors for the face, secure color changes with a tidy knot and weave ends inside pieces to keep the outside neat.

This charming sloth stacking toy is a warm and playful handmade gift idea, perfect for nurseries or as a quirky shelf companion. The pattern combines neat round shaping, layered rings and expressive facial details to bring personality to your crocheted creation. Happy stitching and enjoy making a slow-moving friend who will bring smiles! 🧢🐻

You ask,

we answer.

FAQs

What size will the finished piece be?

The finished amigurumi measures approximately 30-35 cm tall when assembled, using the recommended yarn and hook sizes; exact size varies with tension.

Can I use different yarn weights for this pattern?

Yes, you can use different yarn weights, but this will affect the final size and proportion; use an appropriate hook for the chosen yarn and expect changes in ring diameter and limb length.

Do I need prior crochet experience for this pattern?

This pattern is rated intermediate, so basic knowledge of single crochet, increases, decreases, and working in the round is recommended for best results.

How long does this project typically take to complete?

Most crocheters complete this project in 8-10 hours depending on experience, the number of pieces made and time spent on assembly.