🧢 Beautiful ✨ Detailed πŸ’ Adorable

Sheep Security Blanket Amigurumi Pattern

Sheep Security Blanket Amigurumi Pattern
4.4β˜… Rating
5-7 Hours Time Needed
1.5K Made This
βœ‚οΈ

Intermediate Level

Ideal for those with basic crochet experience, featuring slightly more advanced stitches and techniques to expand your skills.

⏱️

Weekend Treat

Takes 5-7 hours, making it an enjoyable project to finish over a couple of days.

🧸

Cute Companion

An adorable friend to cherish, handcrafted with love to bring comfort and joy for years to come.

About This Sheep Security Blanket Amigurumi Pattern

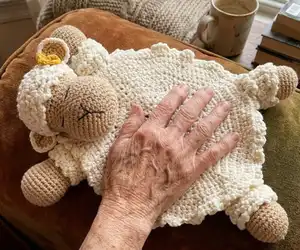
This pattern guides you through crocheting a sheep security blanket (lovey) with a textured looped blanket body and a plush amigurumi head and feet. It uses back loop only (BLO) rounds for the blanket texture and simple amigurumi shaping for head and limbs. You will finish with embroidery for the face and a tiny crocheted bow for a charming final touch.

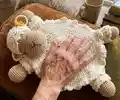
Sheep Security Blanket Amigurumi Pattern crochet pattern - detailed view of completed project

Clear, photo-accompanied instructions show each step and the rounds for all pieces. The design is perfect for gift making and is customizable in color and size.

Why You'll Love This Sheep Security Blanket Amigurumi Pattern

I absolutely love this pattern because it combines the cozy appeal of a lovey with the personality of a little sheepβ€”perfect for babies and toddlers. I enjoyed designing the textured blanket using the back loop technique; it gives such a tactile, cloud-like finish. I love how the simple shaping of the head and feet creates a friendly face with minimal sewing. The little bow and embroidered features let you personalize each lovey, making every finished piece unique and special.

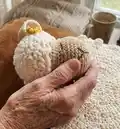
Sheep Security Blanket Amigurumi Pattern step 1 - construction progress Sheep Security Blanket Amigurumi Pattern step 2 - assembly progress Sheep Security Blanket Amigurumi Pattern step 3 - details and accessories Sheep Security Blanket Amigurumi Pattern step 4 - final assembly and finishing

Switch Things Up

I love how easy it is to customize this pattern by changing yarn color; I often use pastel shades for a softer baby look or bright colors for a playful version.

If you want a larger lovey, I change to a thicker yarn and a larger hookβ€”this makes the blanket chunkier and cuddlier.

For a mini keychain or travel-sized lovey, I switch to finer yarn and a smaller hook to make a compact version perfect for gifting.

I sometimes replace the embroidered features with small safety eyes for toddlers, but only after considering safety recommendations for the recipient.

Try adding a scalloped or picot edging around the blanket for a decorative finish; a contrasting color makes the border pop.

I like to embroider a small initial or heart on the back of the head for a personalized keepsake.

Swap the little bow for a crocheted flower or a felt applique to match nursery themes or outfit colors.

Use a boucle or textured yarn for the blanket body if you want an even more cloud-like surfaceβ€”just test loops first to ensure curls form well.

I sometimes add a thin wire inside the leg seams to pose the limbs slightly; just be sure to cover wire ends and avoid for toys meant for babies.

Experiment with different loop sizes when making the curlsβ€”shorter loops give a tighter texture while longer loops create loose, fluffy curls.

If you prefer no detachable decorations for safety, skip the bow and embroider a small flower instead; it stays securely stitched to the piece.

Common Mistakes & How to Fix Them

βœ— Crocheting too loosely will make stuffing visible through the stitches; use a smaller hook for the amigurumi parts and maintain tight tension to hide filling properly. βœ— Forgetting to work the blanket in the back loops only when instructed will remove the textured curls; always check the instruction 'BLO' and work those rounds on the back loop. βœ— Not stuffing gradually during head and limb shaping can create lumps or flattening; stuff little by little and shape as you go for smooth, even curves. βœ— Missing increases or decreases in rounds will change stitch counts and distort shapes; count your stitches at the end of each round to stay on track. βœ— Skipping the slip stitch closures and chain start details can shift your round orientation; always close rounds exactly as written (sl st or ch counts) to keep shaping consistent.

Sheep Security Blanket Amigurumi Pattern

Make a cuddly sheep security blanket (lovey) with this step-by-step crochet pattern. You will create a soft textured blanket body with a cute amigurumi sheep head, feet, ears, tail and a tiny bow for detail. The pattern explains construction, loops technique, and finishing touches so your finished lovey is both adorable and durable for baby snuggles.

Intermediate 5-7 Hours

Materials Needed for Sheep Security Blanket Amigurumi Pattern

β€” Main Fabric

  • 01
    Medium cotton yarn, approximately 100g (beige/white) for body, head and feet
  • 02
    Small amount of light cotton yarn (black) for facial embroidery
  • 03
    Small amount of light cotton yarn (yellow) for the little bow
  • 04
    Polyester fiberfill stuffing for head and feet

β€” Tools Required

  • 01
    Crochet hook size 3.5mm
  • 02
    Crochet hook size 2mm (for the head and legs)
  • 03
    Crochet hook size 1mm (for the little bow)
  • 04
    Tapestry needle
  • 05
    Polyester fiberfill stuffing

Progress Tracker

0% Complete

β€” Suggestions before starting :

Info :

Make sure to crochet tight stitches so the filling is not visible. For that, it's better to work the sheep parts with a hook of 1 or 2 points smaller than the size it's used to crochet the blanket. The amigurumi technique requires tension.

Info :

Stuff with polyester filling until it's firm. Though the stitches are tight at the beginning, it will yield.

Info :

The yarn thickness will change noticeably the size of your toys.

Infos :

Remember that there are 3 factors that modify your crochet (size, tension, etc): *the hook size *the yarn thickness *the crocheter's hand (every person crochets with different tension)

β€” Materials :

Info :

hook size 3.5mm. hook size 2mm for the head and legs. hook size 1mm for the little bow. 100grs of medium cotton yarn (beige/white). Polyester fiberfill stuffing. Tapestry needle. Small amount of light cotton yarn (black/yellow).

β€” Abbreviations :

Info :

sl st: slip stitch. sc: single crochet. hdc: half double crochet. dc: double crochet. tr: treble crochet. inc: increase (2 single crochet stitches in the same stitch). dec: decrease (2 single crochet stitches together). ch: chain. BLO: back loop only.

β€” Body or Blanket :

Info :

The whole piece is crocheted on the back loop

Round 1 :

start with a magic ring, ch 1 and 11 hdc, close with sl st (12 hdc)

Round 2 :

ch 2, 1 hdc in the same stitch, hdc inc in the next 11 stitches, close with sl st (24hdc)

Round 3 :

ch 2, 1 inc of hdc, *1hdc, 1inc in the next stitch*, close with sl st (36 hdc)

Round 4 :

ch 2, 1 hdc, 1 inc, *2 hdc, 1 inc in the next stitch*, close with sl st (48 hdc)

Round 5 :

ch 2, 2 hdc, 1 inc, *3 hdc, 1 inc in the next stitch*, close with sl st (60 hdc)

Round 6 :

ch 2, 3 hdc, 1 inc, *4 hdc, 1 inc in the next stitch*, close with sl st (72 hdc)

Round 7 :

ch 2, 4 hdc, 1 inc, *5 hdc, 1 inc in the next stitch*, close with sl st (84 hdc)

Round 8 :

ch 2, 5 hdc, 1 inc, *6 hdc, 1 inc in the next stitch*, close with sl st (96 hdc)

Round 9 :

ch 2, 6 hdc, 1 inc, *7 hdc, 1 inc in the next stitch*, close with sl st (108 hdc)

Round 10 :

ch 2, 7 hdc, 1 inc, *8 hdc, 1 inc in the next stitch*, close with sl st (120 hdc)

Info :

Keep crocheting with this frequency until you have 22cm of diameter.

Info :

On the rounds where the loops remained unworked, keep working below the first free loop, in the center of the beginning, to make the curls. Make 5 ch, 1 sl st in the next stitch and make 5 ch, 1 sl st again in all the loops, all the rounds. Here is a link of a video where you can see this process: https://www.youtube.com/watch?v=nb-liMSQqpk

β€” Head :

Info :

With beige yarn

Round 1 :

6 sc in a magic ring (6)

Round 2 :

6 inc (12)

Round 3 :

1 sc, 1 inc (18)

Round 4 :

2 sc, 1 inc (24)

Round 5 :

3 sc, 1 inc (30)

Round 6 :

4 sc, 1 inc (36)

Round 7 :

5 sc, 1 inc (42)

Round 8 :

6 sc, 1 inc (48)

Round 9-14 :

48 sc (6 rounds) (48)

Round 15 :

6 sc, 1 dec (42)

Round 16 :

5 sc, 1 dec (36)

Round 17 :

36 sc (36)

Round 18 :

5 sc, 1 inc (42)

Round 19 :

6 sc, 1 inc (48)

Round 20 :

48 sc (48)

Round 21 :

change colour to white and make all the next rounds on BLO, repeat 48 sc

Round 22-26 :

48 sc (5 rounds) (48)

Round 27 :

6 sc, 1 dec (42)

Round 28 :

5 sc, 1 dec (36)

Round 29 :

4 sc, 1 dec (30)

Round 30 :

3 sc, 1 dec (24)

Round 31 :

2 sc, 1 dec (18) Start stuffing

Round 32 :

1 sc, 1 dec (12)

Round 33 :

6 dec (6)

Info :

Close the opening with a tapestry needle.

Info :

On the rounds where the loops remain unworked, make 3 ch, 1 sl st, as you did with the blanket part, working from top to bottom.

β€” Embroidering the Eyes and Nose :

Info :

With black embroidery thread, make a V shaped nose with the edges on rnd 8, 4 stitches apart, and the base on rnd 6. Then make a small vertical line of 2 stitches, starting on the base of the nose and going down.

Info :

Embroider the eyes on rnd 14, each eye taking up 3 stitches. The distance between each eye is also 3 stitches. Then embroider the eyelashes as seen in the picture below.

β€” Ears :

Info :

It's 2 pieces for each ear. 1 piece in white, 1 piece in beige.

Round 1 :

6 sc in a magic ring (6)

Round 2 :

6 inc (12)

Round 3 :

1 sc, 1 inc (18)

Info :

With white yarn, join the 2 pieces, making 2 sc, 1 inc (24)

β€” Front Feet :

Info :

With beige yarn

Round 1 :

6 sc in a magic ring (6)

Round 2 :

6 inc (12)

Round 3 :

1 sc, 1 inc (18)

Round 4 :

2 sc, 1 inc (24)

Round 5 :

3 sc, 1 inc (30)

Round 6 :

4 sc, 1 inc (36)

Round 7-10 :

36 sc (4 rounds) (36)

Round 11 :

4 sc, 1 dec (30)

Round 12 :

3 sc, 1 dec (24)

Round 13-15 :

24 sc (3 rounds) (24)

Round 16 :

change to white color, 24 sc BLO (24)

Round 17-18 :

24 sc (2 rounds) (24) Start stuffing

Round 19 :

2 sc, 1 dec (18)

Round 20 :

1 sc, 1 dec (12)

Round 21 :

6 dec (6)

Info :

Close the opening with a tapestry needle.

Info :

On the rounds where the loops remain unworked, make 3 ch, 1 sl st, as you did with the blanket part, working from top to bottom.

β€” Back Feet :

Info :

With beige yarn

Round 1 :

6 sc in a magic ring (6)

Round 2 :

6 inc (12)

Round 3 :

1 sc, 1 inc (18)

Round 4 :

2 sc, 1 inc (24)

Round 5-9 :

24 sc (5 rounds) (24)

Round 10 :

change to color white 24 sc BLO

Round 11-12 :

24 sc (2 rounds) (24)

Round 13 :

2 sc, 1 dec (18) Start stuffing

Round 14 :

18 sc (18)

Round 15 :

1 sc, 1 dec (12)

Round 16 :

6 dec (6)

Info :

Close the opening with a tapestry needle.

Info :

On the rounds where the loops remain unworked, make 3 ch, 1 sl st, as you did with the blanket part, working from top to bottom.

β€” Tail :

Info :

With white yarn, BLO

Round 1 :

6 sc in a magic ring (6)

Round 2 :

6 inc (12)

Round 3-4 :

12 sc (2 rounds) (12)

Info :

On the rounds where the loops remain unworked, make 3 ch, 1 sl st, as you did with the blanket part, working from top to bottom.

β€” Assembly :

Info :

Sew the head and the 4 legs on the edges of the blanket, on the top side where you made the curls.

Info :

On the 6th round of the blanket, sew the tail.

β€” Little Bow :

Info :

With light cotton yellow yarn, hook size 1mm: Magic ring, ch 4, 3 tr, ch 4, 1 sl st inside the magic ring, ch 4, 3 tr, ch 4, 1 sl st inside the magic ring. Adjust the magic ring and leave a long tail to tie the center of the bow.

Info :

The sheep security blanket is finished! Congratulations!

Assembly Instructions

  • Sew the head and the 4 legs on the edges of the blanket, placing them on the top side where you made the curls so the head faces forward and legs sit at the corners.
  • On the 6th round of the blanket, sew the tail in the center of the edge, securing it firmly with several stitches so it does not detach.
  • Attach the ears to the head after joining the white and beige ear pieces; position them symmetrically on top sides of the head and sew securely.
  • Embroider the nose on rnd 6 and create the V-shaped nose edges on rnd 8, then embroider eyes on rnd 14 (3 stitches per eye, 3 stitches spacing) and add eyelashes as pictured.
  • Tie and sew the little yellow bow to one ear using the long tail left when adjusting the magic ring, stitching through to secure the bow in place.

Important Notes

  • πŸ’‘Use tight stitches for the amigurumi parts so the filling is not visible; consider using a hook 1-2 sizes smaller for head and legs.
  • πŸ’‘Stuff head and limbs firmly but gradually to keep smooth shaping and avoid lumps or bulging.
  • πŸ’‘Work the blanket and specified rounds on the back loop only (BLO) when instructed to get the curl texture.
  • πŸ’‘Count stitches after each round to ensure increases and decreases are placed correctly to keep shape consistent.
  • πŸ’‘Remember yarn thickness and hook size will significantly affect the final size; check gauge if you need a specific finished measurement.

This sheep security blanket pattern brings a soft, textured lovey and an adorable amigurumi sheep to life for baby snuggles. 🧢 Follow the step-by-step rounds and assembly instructions to create a durable, lovable keepsake that can be customized in color and details. πŸŽ€ Perfect for gifts, nursery decor, or handmade keepsakes that will be treasured for years to come. πŸ‘

You ask,

we answer.

FAQs

What size will the finished piece be?

The blanket is worked in rounds until approximately 22 cm in diameter for the central round section; finished overall size will vary slightly with yarn and tension.

Can I use different yarn weights for this pattern?

Yes, you can use different yarn weights but this will change the final size and texture; a bulkier yarn will make a larger, plusher lovey while thinner yarn yields a smaller, finer piece.

Do I need prior crochet experience for this pattern?

This pattern is rated intermediate because it combines surface texture (BLO technique), amigurumi shaping, and embroidery; basic knowledge of crochet stitches and amigurumi techniques is recommended.

How long does this project typically take to complete?

Most crocheters complete this project in 5-7 hours, depending on experience, customization, and stitching speed.

How do I make the textured curls on the blanket?

On rounds with unworked loops, work below the first free loop in the center to form curls: make 5 ch, 1 sl st in the next stitch, and repeat in all loops around; a linked video is provided in the pattern for visual guidance.