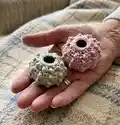
🧢 Beautiful ✨ Detailed πŸ’ Adorable

Sea Urchin Shells Pattern

Sea Urchin Shells Pattern
4.7β˜… Rating
2-3 Hours Time Needed
2.9K Made This
βœ‚οΈ

Intermediate Level

Ideal for those with basic crochet experience, featuring slightly more advanced stitches and techniques to expand your skills.

⏱️

Bite-Sized Project

Finishes in 2-4 hoursβ€”perfect for an afternoon of creative relaxation.

🏑

Cozy Accent

A warm touch for your space that transforms ordinary corners into inviting nooks filled with handmade charm.

About This Sea Urchin Shells Pattern

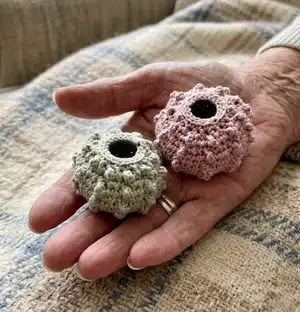
This pattern shows how to crochet sea urchin shells in three different sizes using 100% cotton yarn. Each shell is worked in rounds with treble stitch tubercles to create the textured effect and finished by shaping with a glue-and-water mixture. The instructions include exact round-by-round details and photos to guide your progress.

Sea Urchin Shells Pattern crochet pattern - detailed view of completed project

You will get full round instructions for small, medium and large shells plus step-by-step shaping tips. Suitable for display, small gifts, or to embellish home projects.

Why You'll Love This Sea Urchin Shells Pattern

I absolutely love this pattern because it turns simple crochet stitches into something sculptural and delicate. I enjoy how the treble bumps create organic texture that looks like real sea urchin skin. I especially love the shaping step β€” it transforms a flat piece into a three-dimensional shell and brings the project to life. The pattern is quick to work up so I can make several in different colors and experiment with finishes.

Sea Urchin Shells Pattern step 1 - construction progress Sea Urchin Shells Pattern step 2 - assembly progress Sea Urchin Shells Pattern step 3 - details and accessories Sea Urchin Shells Pattern step 4 - final assembly and finishing

Switch Things Up

I love customizing these shells by changing yarn color and thickness to create sets with different personalities.

I often use variegated cotton for a subtle, ocean-like color shift across the rounds.

For a vintage look I sometimes paint a light wash of diluted acrylic over the dried shell and seal it with varnish.

I make tiny holes before shaping and thread fishing line to hang them as ornaments or a garland.

I experiment with beads sewn into the center or around the rim before shaping for extra sparkle.

To create larger shells try bulky cotton with a larger hook, then shape gently with water rather than glue.

I sometimes embroider small radial lines from the center outward to increase surface detail before shaping.

If I want a softer shell I skip the glue step and simply wet and shape with water, then stuff lightly for a plush effect.

I add a small felt base glued into the opening to make them sit flat on a shelf or to make a pin-back brooch.

I enjoy creating color-themed displays β€” grouping shells in shades of blue, pink, or neutral sands for seasonal decor.

When gifting I wrap a small trio of different sizes in tissue and tie with twine for a pretty, handmade present.

Common Mistakes & How to Fix Them

βœ— Not making the treble stitch pop forward; push the treble stitch to the front of your work and make the following single crochet as tight as possible so the tubercle forms nicely. βœ— Using too large a hook resulting in loose stitches and poor shaping; use a smaller hook than the yarn label recommends to achieve tight, neat stitches suitable for shaping. βœ— Skipping stitch counts after rounds which will create uneven shaping; count stitches at the end of each round to confirm you have the correct total and correct any mistakes immediately. βœ— Trying to shape with a too-strong glue mix which can over-stiffen or distort thin yarn; follow the recommended 2 parts water to 1 part glue (or 1:1 for stiffer results) and test on a scrap first.

Sea Urchin Shells Pattern

Make charming crocheted sea urchin shells in three sizes with this clear, photographed pattern. You will learn simple rounds, treble bumps and a shaping technique using a glue-water mix to give the shells a firm, rounded shape. Perfect for home decor, gift tags, or small tabletop displays, these shells are quick to make and very satisfying to finish.

Intermediate 2-3 Hours

Materials Needed for Sea Urchin Shells Pattern

β€” Main Fabric

  • 01
    100% cotton yarn (general recommendation for crisp stitch definition)
  • 02
    Madame Tricote "Camilla" 100% cotton, 50 g = 125 m (used for smaller set)
  • 03
    Drops "Muskat" 100% cotton, 50 g = 100 m (used for larger set)
  • 04
    Finished shell sizes (approx): smaller set measured approx. 4 cm, 5 cm and 6 cm in diameter
  • 05
    Finished shell sizes (larger yarn/hook): measured approx. 5 cm, 6.5 cm and 8 cm in diameter

β€” Tools Required

  • 01
    Crochet hook size 1.5 mm (recommended for smaller set)
  • 02
    Crochet hook size 2.5 mm (recommended for larger set)
  • 03
    Scissors
  • 04
    Needle to weave in ends
  • 05
    Stitch markers (optional)
  • 06
    White glue (PVA) for shaping
  • 07
    Water and a cup for mixing glue solution
  • 08
    Something to stir (stick, spoon)
  • 09
    Rubber gloves (optional, for shaping with glue)
  • 10
    Chopstick or large crochet hook (for shaping and pushing out sides)

Progress Tracker

0% Complete

β€” Small sea urchin shell :

Round 1 :

ch 3 (= 1 dc) and 14 dc in magic ring; join with sl st into top of ch 3 (15)

Round 2 :

ch 1 (=1 sc), sc in same st, 2 sc in each st all around; join with sl st to ch 1 (30)

Round 3 :

ch 1 (=1 sc), sc in next st, tr in next; * sc in next 2 sts, tr in next; rep from * 8 more times; join with sl st to ch 1 (30)

Info :

Make sure you push treble crochet stitch forward to front of your work so it forms a little bump (look at the photos), it helps if you make a single crochet stitch which comes after treble as tight as possible!

Round 4 :

ch 1 (=1 sc), sc in each st; join with sl st to ch 1 (30)

Round 5, 7, 9 :

ch 1 (=1 sc), sc in next st, tr in next; * sc in next 2 sts, tr in next; rep from * 8 more times; join with sl st to ch 1 (30)

Round 6, 8, 10 :

ch 1 (=1 sc), sc in each st; join with sl st to ch 1 (30)

Round 11 :

ch 1 (=1 sc), sc in next, tr in next; * sc2tog, tr in next; rep from * 8 more times; skip ch1 and join with sl st to next sc (20)

Round 12 :

ch 1 (=1 sc), sc in each st (20)

Round 13 :

working in back loops only sl st in each st all around (20)

Info :

Fasten off and weave in all ends.

β€” Medium sea urchin shell :

Round 1 :

ch 3 (= 1 dc) and 14 dc in magic ring; join with sl st into top of ch 3 (15)

Round 2 :

ch 1 (=1 sc), sc in same st, 2 sc in each st all around; join with sl st to ch 1 (30)

Round 3 :

ch 1 (=1 sc), sc in next st, tr in next; * sc in next 2 sts, tr in next; rep from * 8 more times; join with sl st to ch 1 (30)

Round 4 :

ch 1 (=1 sc), sc in each st; join with sl st to ch 1 (30)

Round 5 :

ch 1 (=1 sc), sc in next, sc and tr in next; * sc in next 2 sts, sc and tr in next; rep from * 8 more times; join with sl st to ch 1 (40)

Round 6, 8, 10 :

ch 1 (=1 sc), sc in each st; join with sl st to ch 1 (40)

Round 7, 9, 11 :

ch 1 (=1 sc), sc in next 2 sts, tr in next; * sc in next 3 sts, tr in next; rep from * 8 more times; join with sl st to ch 1 (40)

Round 12 :

ch 1 (=1 sc), sc2tog; * sc in next 2 sts, sc2tog; rep from 8 more times; sc in last st and join with sl st to ch 1 (30)

Round 13 :

ch 1 (=1 sc), sc in next st, tr in next; * sc in next 2 sts, tr in next; rep from * 8 more times; join with sl st to ch 1 (30)

Round 14 :

ch 1 (=1 sc), sc in next 2 sts; * sc2tog, sc in next; rep from * 8 more times; skip ch 1 in beg of rnd and join with sl st to next sc (20)

Round 15 :

ch 1 (=1 sc), sc in each st; join with sl st to ch 1 (20)

Round 16 :

working in back loops only sl st in each st all around (20)

Info :

Fasten off and weave in all ends.

β€” Large sea urchin shell :

Round 1 :

ch 3 (= 1 dc) and 14 dc in magic ring; join with sl st into top of ch 3 (15)

Round 2 :

ch 1 (=1 sc), sc in same st, 2 sc in each st all around; join with sl st to ch 1 (30)

Round 3 :

ch 1 (=1 sc), sc in next st, tr in next; * sc in next 2 sts, tr in next; rep from * 8 more times; join with sl st to ch 1 (30)

Round 4 :

ch 1 (=1 sc), sc in each st; join with sl st to ch 1 (30)

Round 5 :

ch 1 (=1 sc), sc in next, sc and tr in next; * sc in next 2 sts, sc and tr in next; rep from * 8 more times; join with sl st to ch 1 (40)

Round 6 :

ch 1 (=1 sc), sc in each st; join with sl st to ch 1 (40)

Round 7 :

ch 1 (=1 sc), sc in next 2 sts, sc and tr in next; * sc in next 3 sts, sc and tr in next; rep from * 8 more times; join with sl st to ch 1 (50)

Round 8 :

ch 1 (=1 sc), sc in each st; join with sl st to ch 1 (50)

Round 9 :

ch 1 (=1 sc), sc in next 3 sts, tr in next; * sc in next 4 sts, tr in next; rep from * 8 more times; join with sl st to ch 1 (50)

Round 10, 12, 14 :

ch 1 (=1 sc), sc in each st; join with sl st to ch 1 (50)

Round 11, 13, 15 :

ch 1 (=1 sc), sc in next 3 sts, tr in next; * sc in next 4 sts, tr in next; rep from * 8 more times; join with sl st to ch 1 (50)

Round 16 :

ch 1 (=1 sc), sc in next, sc2tog; * sc in next 3 sts, sc2tog; rep from * 8 more times; sc in last; join with sl st to ch 1 (40)

Round 17 :

ch 1 (=1 sc), sc in next 2 sts, tr in next; * sc in next 3 sts, tr in next; rep from * 8 more times; join with sl st to ch 1 (40)

Round 18 :

ch 1 (=1 sc), sc2tog, * sc in next 2 sts, sc2tog; rep from * 8 more times; sc in last st; join with sl st to ch 1 (40)

Round 19 :

ch 1 (=1 sc), sc in next st, tr in next; * sc in next 2 sts, tr in next; rep from * 8 more times; join with sl st to ch 1 (30)

Round 20 :

ch 1 (=1 sc), sc in next 2 sts; * sc2tog, sc in next; rep from * 8 more times; skip the ch 1 in beg of rnd and join with sl st to next sc (20)

Round 21 :

ch 1 (=1 sc), sc in each st; join with sl st to ch 1 (20)

Round 22 :

working in back loops only sl st in each st all around (20)

Info :

Fasten off and weave in all ends.

β€” Shaping the shell :

Info :

In a cup mix 2 parts of water with 1 part of glue.

Info :

Immerse crocheted shell into the glue and water mixture (wear rubber gloves if necessary) until it’s fully wet.

Info :

Carefully squeeze out excess glue-water mix.

Info :

Start shaping the shell by gently pulling at the crochet fabric and giving it a desired shape. Use something (chopstick, large size crochet hook) to insert into the shell and push the sides of shell slightly outside to give it a nice rounded shape.

Info :

Pull at tubercles to shape them nicely.

Info :

Continue until you are satisfied with it.

Info :

Leave it to dry on a towel.

Assembly Instructions

  • Fasten off and weave in all ends after finishing the last round for each shell.
  • Prepare a glue mix (2 parts water : 1 part glue) and fully wet the crocheted shell before shaping.
  • Use a chopstick or large crochet hook inserted into the shell to push the sides slightly outward and create a rounded shell shape.
  • Gently pull and shape the treble tubercles to refine their appearance while the shell is wet and malleable.
  • Leave the shaped shell to dry on a towel completely before handling or adding embellishments.

Important Notes

  • πŸ’‘Use a smaller hook than the yarn label suggests to achieve tight stitches suitable for shaping with glue.
  • πŸ’‘Use stitch markers to mark the beginning of each round if you prefer, especially when rounds are repeated.
  • πŸ’‘Wear rubber gloves if you have sensitive skin while working with the glue mixture for shaping.
  • πŸ’‘Do not use glue mix for shaping when using thicker yarn; shape with water only for those yarns.

These delicate sea urchin shells add a handmade coastal touch to any space and make lovely little gifts. They work up quickly and beautifully in cotton yarn and come alive after the shaping step. Try them in soft pastels or natural shades to create a charming display. πŸ§ΆπŸ–οΈ

You ask,

we answer.

FAQs

What size will the finished piece be?

Finished shell sizes depend on yarn and hook: for the smaller set (1.5 mm hook) shells measure approximately 4 cm, 5 cm and 6 cm; for the larger set (2.5 mm hook) shells measure approximately 5 cm, 6.5 cm and 8 cm in diameter.

Can I use different yarn weights for this pattern?

Yes, you can use different yarn weights but that will affect the final size and the shaping process; thicker yarns usually should be shaped with water only rather than a glue mix.

Do I need prior crochet experience for this pattern?

This pattern is rated intermediate β€” basic knowledge of single crochet, treble crochet, and simple decreases is recommended to follow the rounds accurately.

How long does this project typically take to complete?

Most crocheters complete a single shell in 2-3 hours including drying time for shaping, though time can vary depending on yarn choice and shaping technique.