🧢 Beautiful ✨ Detailed πŸ’ Adorable

Santa Christmas Cat Amigurumi Pattern

Santa Christmas Cat Amigurumi Pattern
4.6β˜… Rating
5-7 Hours Time Needed
2.2K Made This
βœ‚οΈ

Intermediate Level

Ideal for those with basic crochet experience, featuring slightly more advanced stitches and techniques to expand your skills.

⏱️

Weekend Treat

Takes 5-7 hours, making it an enjoyable project to finish over a couple of days.

🧸

Cute Companion

An adorable friend to cherish, handcrafted with love to bring comfort and joy for years to come.

About This Santa Christmas Cat Amigurumi Pattern

This pattern makes a charming Santa Cat amigurumi complete with a hat, beard, sack, and detailed facial features. You will use sport/fine weight yarn and small hooks to create a compact, well-shaped toy. The design features color changes, sewn-on parts, and a scalloped beard for extra personality.

Santa Christmas Cat Amigurumi Pattern crochet pattern - detailed view of completed project

Clear row-by-row instructions and photo guides help you assemble each piece accurately. Perfect for gift making, holiday displays, or adding to your amigurumi collection.

Why You'll Love This Santa Christmas Cat Amigurumi Pattern

I absolutely love this pattern because it combines classic amigurumi shaping with festive details that make the character sing. I enjoy crocheting the layered beard – it adds so much texture and charm. I also appreciate that the pattern is modular: you can make or omit accessories like the sack or pompom as you like. Sharing this pattern lets me spread a little handmade holiday cheer to other makers.

Santa Christmas Cat Amigurumi Pattern step 1 - construction progress Santa Christmas Cat Amigurumi Pattern step 2 - assembly progress Santa Christmas Cat Amigurumi Pattern step 3 - details and accessories Santa Christmas Cat Amigurumi Pattern step 4 - final assembly and finishing

Switch Things Up

I love customizing this Santa Cat by changing yarn colors to match my holiday decor.

I often swap the red for green or teal for a modern holiday look that still uses the same rounds and construction.

If you want a larger version, I increase yarn weight and bump the hook size up one or two sizes; this yields a cuddly, larger toy.

To make a tiny keychain version, use fingering yarn and a 1.75–2.0mm hook for a pocket-sized pal.

I also experiment with different eye options: safety eyes, embroidered eyes, or French knots all change the character's expression.

Try adding wire in the tail or arms for posability if you want a poseable figureβ€”just be careful to secure ends inside the stuffing.

Add outfit variations like a tiny scarf, different hat styles, or removable accessories using simple chain stitches and slip stitches.

I sometimes embroider eyelashes or a little blush with pastel yarn to enhance the face and give personality.

Think about texture swaps: use boucle or faux fur yarn for the beard to make a fluffy, realistic effect.

For gifting, attach a small bell or tag to the sack and consider using metallic thread for a subtle festive shimmer.

Common Mistakes & How to Fix Them

βœ— Not using a stitch marker for round starts can cause slipped counts and misaligned rounds; place a marker at the first stitch of each round and move it as you go to maintain accurate counts. βœ— Stuffing too early or too much can distort shaping and make sewing difficult; stuff gradually as you complete shaping and only fill firmly but not overly tight for best results. βœ— Changing colors without securing tails neatly leaves gaps and loose ends; fasten off or carry yarn securely and weave in ends before continuing rounds to keep color changes tidy. βœ— Skipping stitch counts after increases/decreases often leads to incorrect shaping; count stitches after every increase/decrease round to catch mistakes early and correct them immediately.

Santa Christmas Cat Amigurumi Pattern

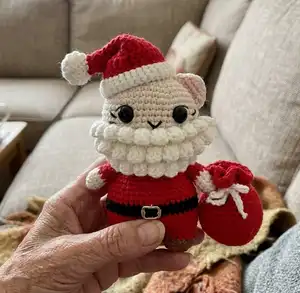
Create an adorable Santa-themed cat amigurumi perfect for holiday decorations or handmade gifts. This pattern includes full step-by-step rounds, photo references, and assembly notes so you can crochet with confidence. You'll learn shaping techniques, color changes, and finishing details to bring this festive character to life. Suitable for crafters who enjoy a rewarding, detailed amigurumi project.

Intermediate 5-7 Hours

Materials Needed for Santa Christmas Cat Amigurumi Pattern

β€” Main Fabric

  • 01
    Sport weight yarn (Fine 2) - primary yarn weight used
  • 02
    White yarn - for beard, hat trim, pompom, details
  • 03
    Brown yarn - for feet and accents
  • 04
    Red yarn - main body, hat, and sack
  • 05
    Beige yarn - head, tail, ears, and skin parts
  • 06
    Pink yarn - inner ear detail
  • 07
    Black yarn - belt and facial accents
  • 08
    Eyes 12-15mm - 2 pieces for safety eyes (or embroider if preferred)

β€” Tools Required

  • 01
    Crochet hook size 2.5mm (C)
  • 02
    Safety eyes 12-15mm (2 pieces)
  • 03
    Stitch marker
  • 04
    Sewing needle for assembly and weaving ends
  • 05
    Scissors
  • 06
    Hot glue gun (optional for small parts)
  • 07
    Polyester stuffing (fiberfill)
  • 08
    Pom-pom maker or tool for 10-15mm pompom (optional)

Progress Tracker

0% Complete

β€” Materials :

Info :

Yarn Weight: Sport | Fine (2). Color: white, brown, red, beige, pink, black. 2.5mm (C) Hook. Eyes 12-15mm. Stitch maker. Sewing needle. Scissors. Hot gun glue. Fiberfill.

β€” Abbreviations :

Infos :

MR: Magic Ring. st(s): stitch(es). slst: slip stitch. ch: Chain. SC: Single crochet. INC: INCrease. DEC: Decrease. FLO: Front loop only. DC-INC: 2 double crochet in one stitch. Picot: slst in 1st chain. HDC: Half double crochet. DC: Double crochet.

β€” Arms :

Info :

Join the rounds with a slip stitch. Begin with white yarn.

Round 1 :

6SC in an MR (6)

Round 2 :

(SC, INC) 3 times (9)

Round 3-4 :

9SC (9)

Info :

Change to red yarn

Round 5-9 :

9SC (9)

Info :

Fasten off and cut the yarn and leave a long tail for sewing. Sew the two edges together.

β€” Legs :

Info :

Join the rounds with a slip stitch. Begin with brown yarn.

Round 1 :

6SC in an MR (6)

Round 2 :

6INC (12)

Round 3 :

(2SC, INC) 4 times (16)

Round 4 :

16SC (16)

Info :

Change to red yarn

Round 5-6 :

16SC (16)

Info :

Cut the yarn. Make one more leg until round 6 but DO NOT cut the yarn.

β€” Body :

Info :

Begin with RED yarn. Make chain 2: Seamless leg Joint.

Round 1 :

16SC of the first leg, 2SC of the chain, 16SC of the second leg, 2SC on a back bump of the chains between 2 legs (36)

Round 2 :

(5SC, INC) 6 times (42)

Round 3 :

(6SC, INC) 6 times (48)

Round 4-5 :

48SC (48)

Info :

Change to black yarn

Round 6-7 :

48SC (48)

Info :

Change to red yarn

Round 8-9 :

48SC (48)

Round 10 :

(4SC, DEC) 8 times (40)

Round 11-12 :

40SC (40)

Round 13 :

(3SC, DEC) 8 times (32)

Round 14 :

32SC (32)

Round 15 :

(2SC, DEC) 8 times (24)

Round 16 :

24SC (24)

Info :

*Stuffing* Fasten off and cut the yarn.

β€” Tail :

Info :

Use beige yarn

Round 1 :

6SC in an MR (6)

Round 2-15 :

6SC (6)

Info :

Fasten off and cut the yarn. Sew the tail in the body at R6-7.

β€” Head :

Info :

Use Beige yarn

Round 1 :

8 SC in an MR (8)

Round 2 :

8 INC (16)

Round 3 :

(SC, INC) 8 times (24)

Round 4 :

(2 SC, INC) 8 times (32)

Round 5 :

32 SC (32)

Round 6 :

(7 SC, INC) 4 times (36)

Round 7 :

(5 SC, INC) 6 times (42)

Round 8 :

(6 SC, INC) 6 times (48)

Round 9-17 :

48 SC (48)

Round 18 :

(4 SC, DEC) 8 times (40)

Round 19 :

(3 SC, DEC) 8 times (32)

Round 20 :

(2 SC, DEC) 8 times (24)

Info :

*Stuffing* Fasten off and cut the yarn and leave a long tail for sewing

β€” Ears :

Info :

Begin with Beige yarn

Round 1 :

6 SC in an MR (6)

Round 2 :

(SC, INC) 3 times (9)

Round 3 :

2 SC, INC, 2 SC, INC, 2 SC, INC (12)

Round 4 :

3 SC, INC, 3 SC, INC, 3 SC, INC (15)

Round 5 :

4 SC, INC, 4 SC, INC, 4 SC, INC (18)

Info :

Fasten off and cut the yarn. Sew the two edges together and attach the ears to the head at R4-9. Sew the arms to the head at R19. Attach the eyes at R11-12, 7st apart.

β€” Beard :

Info :

Use white yarn

Round 1 :

Make 23 chains, Start in the 3rd stitch from the hook: 21DC

Round 2 :

2CH, and turn, 21DC

Round 3 :

2CH, and turn, skip 1 stitch, SLST, (2CH, skip 1 stitch, SLST) 9 times

Round 4 :

(CH, and turn SC, 3DC, SC) in one st, (SC, 3DC, SC) 9 times, 2CH, SLST in row 2

Round 5 :

2CH, and turn, skip 1 stitch, SLST, (2CH, skip 1 stitch, SLST) 8 times

Round 6 :

(CH, and turn SC, 3DC, SC) in one st, (SC, 3DC, SC) 9 times, 2CH, SLST in row 1

Round 7 :

2CH, and turn, skip 1 stitch, SLST, (2CH, skip 1 stitch, SLST) 9 times

Round 8 :

(CH, and turn SC, 3DC, SC) in one st, (SC, 3DC, SC) 9 times, SLST

Info :

Fasten off and leave a long tail for sewing at R11

β€” Santa's Sack :

Info :

Use with red yarn. Join the rounds with a slip stitch.

Round 1 :

6SC in an MR (6)

Round 2 :

6 INC (12)

Round 3 :

(SC, INC) 6 times (18)

Round 4 :

(2SC, INC) 6 times (24)

Round 5 :

(3SC, INC) 6 times (30)

Round 6 :

30SC (30)

Round 7 :

(4SC, INC) 6 times (36)

Round 8 :

(5SC, INC) 6 times (42)

Round 9-11 :

42 SC (42)

Round 12 :

(5SC, DEC) 6 times (36)

Round 13-14 :

36SC (36)

Round 15 :

(4SC, DEC) 6 times (30)

Round 16-17 :

30SC (30)

Round 18 :

15DEC (15)

Round 19 :

(SC, CH, Skip 1 stitch) Repeat it at the end (15)

Round 20 :

2CH, (15HDC-INC) 6 times (30)

Round 21 :

2CH, 30HDC (30)

Info :

*Stuffing* Fasten off and cut the yarn. Make 20 chains with white yarn and cut it. Sew the Chains to the pocket in CH of R19.

β€” Santa's Hat :

Info :

Begin with RED yarn. Join the rounds with a slip stitch.

Round 1 :

6DC in an MR (6)

Round 2 :

2CH, 6DC (6)

Round 3 :

2CH, (2DC, INC) 2 times (8)

Round 4 :

2CH, (DC, INC) 4 times (12)

Round 5 :

2CH, (2DC, INC) 4 times (16)

Round 6 :

2CH, (DC, INC) 8 times (24)

Round 7 :

2CH, (2DC, INC) 8 times (32)

Round 8 :

2CH, (7DC, INC) 4 times (36)

Info :

Cut the RED yarn and change it to WHITE yarn.

Round 9-12 :

CH, 36SC (36)

Info :

Fasten off and leave a long tail for sewing. Attach pompom ball: 10-15mm (white) to the hat. Sew the hat to the head at R16-19. Sew the face as a photo.

Assembly Instructions

  • Attach ears to the head by sewing them to rows 4-9 of the head so they sit symmetrically; sew the two ear edges together first for a neat shape.
  • Sew the two legs into the body by connecting the legs to each other with the chain join (seamless leg joint) and continue into round 1 of the body as instructed.
  • Attach the arms to the head at round 19 using the long tails left from fastening off; position them slightly forward and sew securely with whipstitch or ladder stitch.
  • Sew the tail into the body at rounds 6-7, hiding the end and securing with several passes to prevent loosening.
  • Attach the beard by sewing the long tail to the head at round 11, positioning the scalloped edge under the eyes for the correct facial placement.
  • Sew the hat to the head at rounds 16-19 and secure the pompom to the hat center; finish facial embroidery and attach eyes at rounds 11-12, 7 stitches apart.

Important Notes

  • πŸ’‘Use a stitch marker at the start of each round to keep track of the beginning of rounds and avoid losing count.
  • πŸ’‘Stuff pieces gradually and evenly while shaping to avoid lumps and maintain correct proportions.
  • πŸ’‘Pin and position all parts before sewing to check alignment and symmetry, especially ears, arms, and beard placement.
  • πŸ’‘Weave in yarn ends as you go to keep the work tidy and avoid a long finishing session at the end.

This Santa Cat amigurumi brings festive charm to your handmade collection with a fluffy beard and tiny sack. It's perfect as a holiday gift or a seasonal decoration that shows off your crochet skills. Enjoy making this little companion and spread some handmade joy this season! πŸŽ„πŸ§Ά

You ask,

we answer.

FAQs

What size will the finished piece be?

The finished amigurumi measures approximately 12-15 cm tall when using sport weight yarn and a 2.5mm hook; exact size may vary with tension and yarn.

Can I use different yarn weights for this pattern?

Yes, you can use different yarn weights but that will change the finished size; if using thicker yarn, use a larger hook and expect a chunkier result.

Do I need prior crochet experience for this pattern?

This pattern is rated intermediate; basic knowledge of amigurumi techniques, increases, decreases, and sewing pieces together is recommended.

How long does this project typically take to complete?

Most crafters complete this project in about 5-7 hours, depending on experience level and how many accessories (sack, hat, pompom) are included.

How should I attach safety eyes safely?

Insert safety eyes at the specified rounds (R11-12, 7 stitches apart) before closing the head, and secure the washers tightly on the inside; alternatively embroider eyes for child-safe toys.