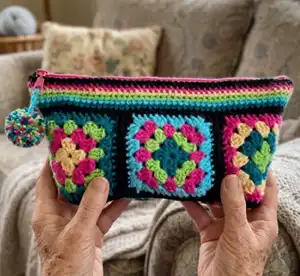
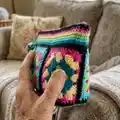
This charming zippered project bag is made from eight colorful granny squares and finished with a lined interior and a zipper. Youll use scrap worsted-weight yarn to create vibrant squares, then assemble and line the pouch for a durable, polished finish. The pattern guides you through granny construction, seaming, adding a zipper, and making a pompom so youll have a useful project bag at the end.
Progress Tracker
0% Complete
— Sizes :
— Finished Measurements :
Info :
Approximately 7" [18 cm] tall x 15" [38.5 cm] wide (measured at top edge) x 5" [13 cm] deep (measured across bottom, from front to back of pouch)
— Materials :
Infos :
6 different colors of scrap worsted weight acrylic yarn - approximately 50-60 yards [45-55 m] each color. US H [5.0 mm] crochet hook or size needed to obtain gauge. Yarn Needle. Removeable stitch markers. Piece of fabric approx 22" [56 cm] long x 18" [46 cm] wide (heavier woven fabric such as twill, denim, canvas). Pencil for marking light fabrics, chalk or silver sharpie for dark fabrics. One 16" [41 cm] zipper (may be shortened to 15" [38.5 cm]). Sewing needle and matching thread.
— Yarn Used for Bag Shown :
Info :
Red Heart Super Saver (worsted weight, 100% Acrylic; 364 yards [198 grams]) Shocking Pink #0718 (A), Cornmeal #0320 (B), Spring Green #0672 (C), Turqua #0512 (D), Real Teal #0656 (E), Black #0312 (F) (partial skeins each color)
— Gauge :
Info :
1 Granny square measures 5" [13 cm] x 5" [13 cm]
— Abbreviations :
Info :
Ch = chain. DC = double crochet. Lp(s) = loop(s). Rnd = rnd. SC = single crochet. Sl st = slip stitch. Sp = space. St(s) = stitch(es). WS = wrong side. YO = yarn over.
— Notes :
Info :
Eight granny squares, each constructed separately, are stitched together to form the bottom of the bag. Side/bottom seams are left open until after crocheted bag is complete to make drafting the lining easier. Joined rounds of single crochet are added to the top edge of bag to complete the crocheted portion. The fabric lining is drafted using the crocheted bag as a template and is seamed by machine or by hand. Turning chains in the granny squares count as a stitch. Beginning chains in the top (single crochet) section of the bag do not count as a stitch.
— Instructions :
Granny Square (Make 8) :
Colors used in sample for each square are listed below in order beginning with Round 1 and ending with the SC round: Square 1: B, A, C, E, F. Square 2: E, C, A, D, F. Square 3: C, E, B, A, F. Square 4: A, B, E, D, F. Square 5: D, A, C, E, F. Square 6: E, D, A, B, F. Square 7 (bottom): A, C, E, D, F. Square 8 (bottom): D, A, B, E, F.
Info :
Using first color, Ch 4, sl st to join into a ring.
Round 1 :
Ch 3 (counts as first DC of rnd), work the following sts into the ring: 2 dc, [ch 2, 3 dc] 3 times, ch 2, sl st into top of beg ch-3, fasten off.
Round 2 :
Change to second color. Make slip knot and place on hook, insert hook into any corner ch-2 sp from Rnd 1, yo and pull up loop, pull loop through loop on hook to anchor new color, ch 3 (beginning ch-3 counts as 1st DC now and throughout), 2 DC in same ch-2 sp, [3 DC, ch 2, 3 DC] into each of next 3 ch-2 sps, 3 DC in same ch-2 sp as first 3 DC of rnd were made, ch 2, sl st to top of ch-3, fasten off.
Round 3 :
Change to third color. Make slip knot and place on hook, insert hook into any corner ch-2 sp from Rnd 2, yo and pull up loop, pull loop through loop on hook to anchor new color, ch 3, 2 DC in same ch-2 sp, [3 DC into the next sp between DC clusters, (3 DC, ch 2, 3 DC) into the following ch-2 sp] 3 times, 3 DC into the next sp between clusters, 3 DC in same ch-2 sp as first 3 DC of rnd were made, ch 2, sl st to top of ch-3, fasten off.
Round 4 :
Change to fourth color. Make slip knot and place on hook, insert hook into any corner ch-2 sp from Rnd 3, yo and pull up loop, pull loop through loop on hook to anchor new color, ch 3, 2 DC in same ch-2 sp, [3 DC into each of the next 2 sps between DC clusters, (3 DC, ch 2, 3 DC) into the following ch-2 sp] 3 times, 3 DC into each of the next 2 sps between DC clusters, 3 DC in same ch-2 sp as 1st 3 DC of rnd were made, ch 2, sl st to top of ch-3, fasten off.
Round 5 :
Change to fifth color. Make slip knot and place on hook, insert hook into any corner ch-2 sp from Rnd 3, yo and pull up loop, pull loop through loop on hook to anchor new color, ch 1 (this counts as the 1st SC of rnd), SC in same ch-2 sp, [SC in each of the next 12 sts, 4 SC in next ch-2 sp] 3 times, SC in each of the next 12 sts, 2 SC in first ch-2 sp of rnd, slip st to first st of rnd, fasten off leaving 18" [46 cm] yarn tail to be used later for seaming.
Info :
Weave in all ends except the color F tail for seaming. Steam block all 8 pieces.
— Seaming the Bag :
Seaming the Bag :
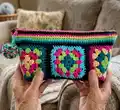
Line up granny squares 1-6 in a row, arranging them according to color preference. In the sample they were arranged from left to right: square #1-square #6.
Seaming the Bag :
Using yarn tails sew the sides of the squares together using a whip-stitch to make one long straight line of squares. Sew remaining seam to connect the first square to the sixth square, creating a tube. Whip-stitch the remaining two squares to each other using yarn tails. These 2 squares create the bottom surface of the bag. Place the bottom of the bag directly below the granny square tube, lining up the center seam of the bottom with the center of one of the tube-squares.
Seaming the Bag :
Pin, then whip-stitch bottom of bag to tube of granny squares. Fold bottom of bag lengthwise so that the opposite edge of bottom matches up with the opposite side of tube. Pin, then whipstitch in place.
Info :
Do not finish seaming bottom-sides of bag until after lining has been made!
— Crocheting Top Edging of Bag :
Round 1 :
Fold bag flat as shown in photo above. Pull up loop of color F at right-hand top corner (or left-hand corner if crocheting left-handed). Ch 1 (beginning ch does not count as a stitch), SC in each st around, sl st to join. 96 sts.
Round 2 :
YO with Color E and pull up loop to change color, pull on Color F tail to tighten last color F loop until it disappears, ch 1 (does not count as a stitch), SC around, sl st to join.
Round 3 :
Repeat Rnd 2, changing to color D at beginning of rnd.
Round 4 :
Repeat Rnd 2, changing to color C at beginning of rnd.
Round 5 :
Repeat Rnd 2, changing to color B at beginning of rnd.
Round 6 :
Repeat Rnd 2, changing to color A at beginning of rnd.
Round 7 :
Repeat Rnd 2, changing to color F at beginning of rnd. Fasten off. Weave in ends. Steam block if necessary.
— Prep Lining :
Prep Lining :
Fold lining fabric in half – it should measure about 18" [46 cm] wide by 11" [28 cm] tall when folded. Place folded bag on top of folded fabric, matching up the folded bottom edges. Using marking tool, trace around top and sides of bag including the bottom side notches. Be careful not to mark the crocheted piece by accident. Cut lining fabric out leaving a ¼" seam allowance beyond drawn lines.
Prep Lining :
Pin, then sew side seams, ending at notch near bottom of bag. Reposition bottom openings of bag so that short seams can be made at notches, to shape the bottom of the bag. Press top edge of lining to WS by ½".
— Seam Bottom of Crocheted Bag :
Seam Bottom of Crocheted Bag :
Whip stitch remaining 2 seams on bottom of bag.
— Zipper :
Zipper :
Check measurement of zipper against the measurement of opening. If zipper is longer than opening it can be shortened from the bottom by stitching the zipper teeth several times with a needle and thread and trimming away the excess below the stitching line. Pin zipper into opening in top of bag. Place zipper tape to inside of crocheted fabric and make sure teeth are far enough away from crocheted fabric so that it will not get snagged by zipper teeth. Using sewing needle and thread, stitch zipper in place.
— Add Lining to Bag :
Add Lining to Bag :
Slip lining inside bag matching side seams. Pin folded lining edge over zipper tape so that it just covers the stitching line. Using sewing needle and thread, slip stitch the folded edge of lining to the zipper tape.
— Pompom :
Pompom :
Pompom on sample was made with Colors A, B, C, D and E. Cut 2 pieces of color D yarn 10" [25.5 cm] long, set aside. Cut one piece of color D yarn at 20" [51 cm]. Fold the longer piece of yarn in half. Tie a knot about 1.5" [4 cm] away from the folded end to create a loop of yarn that measures about 3" [8 cm] in circumference. This loop will later be used to attach the pompom to the zipper. Set aside. Holding 5 strands of yarn together as one, wrap yarn around piece of 2" [5 cm] cardboard about 15 times. Before removing lps from cardboard, tie each 10" [25.5 cm] piece of yarn tightly around lps near center of cardboard (one on each side of the cardboard). Carefully slide lps off cardboard and tie longer piece of yarn (near the knotted end) around the center of lps, this time around both sides - make sure you tie a very tight knot. Use scissors to cut all of the lps of pompom, being careful not to cut the loop that was created to attach the pompom to the zipper. Fluff pompom and trim ends into a 1.75" [4.5 cm] ball.
Pompom :
Push folded end of pompom loop through hole in zipper tab, pulling it through as far as you can. Slip pompom through loop to secure pompom to zipper.
— Chart :
Info :
Bonita Granny Square Chart is provided for reference showing ch, sl st, DC and SC symbols for rounds 1-5.
This colorful Bonita Project Bag uses your leftover worsted yarn to create a playful, practical pouch perfect for projects and gifts. The lined interior and sewn-in zipper give it a finished, durable feel while the pompom adds a cheerful accent. Make one for yourself or stitch a few as thoughtful, handmade presents. 🧶🎁