🧢 Beautiful ✨ Detailed πŸ’ Adorable

Rustic Lamp Pattern

Rustic Lamp Pattern
4.5β˜… Rating
8-10 Hours Time Needed
2.1K Made This
βœ‚οΈ

Intermediate Level

Ideal for those with basic crochet experience, featuring slightly more advanced stitches and techniques to expand your skills.

⏱️

All-Day Adventure

Requires 8-10 hours, ideal for a full day of immersive crocheting.

🏑

Cozy Accent

A warm touch for your space that transforms ordinary corners into inviting nooks filled with handmade charm.

About This Rustic Lamp Pattern

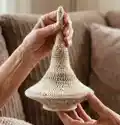
This pattern teaches you how to crochet a large rustic hanging lamp using rope stitch and two metal rings for structure. It produces a textured, airy lampshade that lets light filter beautifully through the stitches. The pattern includes step-by-step rounds, tips for finishing, and instructions for attaching electrical parts. It is perfect for makers who want a statement piece that blends natural tones and soft geometry.

Rustic Lamp Pattern crochet pattern - detailed view of completed project

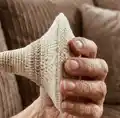
The lamp is crocheted in the round using Katia Capri rope yarn and worked over two metal rings (Ø 30 cm and Ø 15 cm). Detailed guidance for the rope stitch, finishing, and electrical assembly is included to help you complete a safe and polished lamp.

Why You'll Love This Rustic Lamp Pattern

I absolutely love this pattern because it transforms simple rope yarn into a dramatic, sculptural lamp that elevates any room. I enjoy the rhythmic, meditative repetition of the rope stitch as the piece grows, and how the metal rings help form a crisp silhouette. The finished lamp casts a gorgeous soft glow thanks to the open, textured stitchwork. It's a satisfying project that blends crochet with a touch of utilitarian craft for a truly rewarding make.

Rustic Lamp Pattern step 1 - construction progress Rustic Lamp Pattern step 2 - assembly progress Rustic Lamp Pattern step 3 - details and accessories Rustic Lamp Pattern step 4 - final assembly and finishing

Switch Things Up

I love experimenting with color when I make this lamp; try a soft gradient of neutrals or a bold contrast band near the rim to give it personality.

I sometimes change the yarn weight and hook to make a miniature version for a pendant cluster or a chunky version for a statement piece.

I like adding a decorative trim at the lower edge β€” try a few rounds of single crochet in a contrasting color for a clean border.

To soften the light, I occasionally line the inside with a thin fabric diffuser; this creates a warm glow and hides the bulb if desired.

I often swap the 30 cm ring for a different diameter to change the overall silhouette β€” larger ring gives a flatter, wider shade, smaller makes it taller and narrower.

You can also embellish with small crocheted motifs or tassels hung from the lower ring for a boho look.

If you want more structure, try adding lightweight interfacing or a stiffer coating like fabric stiffener sprayed on the finished lamp.

I recommend testing different bulbs and lumen levels; a lower-lumen bulb creates a softer atmosphere while a brighter bulb highlights the stitch texture.

For a modern finish, use metallic thread for a few rounds near the rings to catch the light and add subtle shimmer.

I sometimes make matching smaller lamps at staggered heights and group them over a table for dynamic lighting and visual interest.

Common Mistakes & How to Fix Them

βœ— Skipping the test swatch and hook size check can make the lamp too large or too small; always try the hook size first and adjust if needed. βœ— Not weaving in ends immediately makes them hard to reach later; weave ends with a wool needle as you go to avoid unreachable tails. βœ— Forgetting to secure the electrical cord and strain relief properly creates an unsafe fixture; follow the electrical parts instructions carefully and use the correct fittings. βœ— Working with inconsistent tension causes uneven shaping and sagging; maintain consistent, moderate tension and check the shape often during rounds. βœ— Failing to attach the metal rings correctly will distort the lampshade shape; follow the ring instructions and join the yarn over the ring as described.

Rustic Lamp Pattern

Create a calm, natural look for your living or outdoor space with this Rustic Lamp pattern. You will crochet a beautiful hanging lamp using the rope stitch and metal rings for structure. The design blends cozy texture with clean lines to fit modern and rustic interiors alike. Follow step-by-step instructions and useful assembly tips to finish a safe, stylish lamp for your home.

Intermediate 8-10 Hours

Materials Needed for Rustic Lamp Pattern

β€” Main Fabric

  • 01
    Katia Capri yarn: 3 balls of Sand (82134)
  • 02
    Neutral sand color for the body of the lamp, approximately 3 balls (per pattern recommendation)

β€” Tools Required

  • 01
    Crochet hook size 3 mm
  • 02
    Metal ring Ø 30 cm
  • 03
    Metal ring Ø 15 cm
  • 04
    Wool needle with large eye
  • 05
    Scissors
  • 06
    Safety screwdriver
  • 07
    Wire stripper (or a sharp knife)
  • 08
    Black electrical cord, length of your choice
  • 09
    Flat plug, black
  • 10
    Lamp fitting, black
  • 11
    Strain relief, black
  • 12
    E27 lamp, 600 lumens

Progress Tracker

0% Complete

β€” Lamp :

Info :

Try out the size of the crochet hook first and use a different size if necessary. You crochet with the rope stitch, like this: make 1 dc, 1 ch, 1 dc around 1 ch = base stitch. End each round with 1 sl st in the 1st stitch of the round.

Round 1 :

crochet 40 ch, join with 1 sl st in 1st ch.

Round 2 :

1 ch, 40 sc, join with 1 sl st in 1st sc.

Round 3 :

3 ch, 1 dc in 1st sc, 1 ch, 1 dc in 1st sc, rep (1 dc, 1 ch, 1 dc in 4th sc), join.

Round 4 :

rep Rnd 3, but work around the ch of the previous round and join.

Round 5-12 :

as Rnd 4.

Round 13 :

as Rnd 4, but crochet 2 ch instead of 1.

Round 14 :

as Rnd 13.

Round 15 :

3 ch, rep (1 dc, 3 ch, 1 dc around the 2 ch), join with 1 sl st.

Round 16 :

3 ch, rep (1 dc, 1 ch, 1 dc, 1 ch, 1 dc around the 3 ch), join with 1 sl st.

Round 17 :

3 ch, 1 dc, 1 ch, 1 dc around each ch, join.

Round 18-20 :

as Rnd 17.

Round 21 :

as Rnd 13.

Round 22-24 :

as Rnd 21.

Round 25 :

as Rnd 21, but crochet 3 ch instead of 2 ch between the dc now.

Round 26 :

as Rnd 16.

Round 27-33 :

as Rnd 17.

Round 34 :

3 ch, rep (1 dc, 1 ch, 1 dc around 1 ch, work around 2nd ch: 1 dc, 1 ch, 1 dc), end with 1 sl st.

Round 35-37 :

as Rnd 17.

Round 38-41 :

as Rnds 34-36.

Round 42 :

Take the metal ring of 30 cm Ø and crochet in 1 ch: 1 sc on each stitch of the previous round (= 1 sc in 1 dc, 1 sc around the ch, 1 sc in 1 dc). Insert the hook into the stitch of the previous round, the yarn goes over the ring. Pull the yarn through the loop (like an sc) with the hook. Join with 1 sl st in the 1st ch.

Round 43 :

as Rnd 3.

Round 44-50 :

as Rnd 17. Dec from here.

Round 51 :

3 ch, rep (1 dc, 1 ch, 1 dc, crochet in the next ch: 1 dc, 1 ch, 1 dc, make 1 dc in the next ch). Join with 1 sl st.

Round 52 :

3 ch, rep (1 dc, 1 ch, 1 dc in 1 ch, crochet in the next ch: 1 dc, 1 ch, 1 dc, skip 1 dc). Join with 1 sl st.

Round 53-55 :

as Rnd 17.

Round 56 :

take the 15 cm Ø metal ring and work as Rnd 42.

Round 57 :

1 ch, 1 sc on 1 sc, join with 1 sl st. Fasten off the last thread and use the wool needle to carefully weave it through a few stitches on the inside. Break the yarn.

Info :

TIP! Immediately weave in all the ends with the wool needle. You can barely reach them later.

Info :

End each round with 1 sl st in the 1st stitch of the round.

Assembly Instructions

  • Reinforce the work with fabric stiffener spray if desired; this step is optional but can help the lampshade keep its shape.
  • Attach the plug to one end of the cord and fit the strain relief to the other end. Insert the plug from the inside through the narrow part of the lamp cover and pull the cord through to determine bulb height.
  • Cut a long strand of yarn and tightly pull the narrow part upward; use the yarn to tightly tie and wrap the lamp about 28 cm from the fitting to secure it.
  • Wind the cord around a stick or hang several lamps together at different heights to achieve the desired look, then screw in the light bulb.
  • Insert the metal rings (Ø 30 cm and Ø 15 cm) as instructed (Rnd 42 and Rnd 56) and join the yarn over the rings to secure them in place before continuing with rounds.

Important Notes

  • πŸ’‘Use stitch markers or join carefully to keep track of the beginning of each round; each round is joined with 1 sl st in the first stitch.
  • πŸ’‘Weave in ends immediately with a wool needle because they will be difficult to reach after assembly.
  • πŸ’‘Test your hook size and tension before starting; changing hook size affects final size and drape of the lamp.
  • πŸ’‘When attaching electrical parts, follow safety guidelines and ensure the strain relief and plug are fitted securely for safe operation.

This Rustic Lamp Pattern brings a natural, handcrafted vibe to any room with soft, neutral tones and textured rope stitch. It uses simple crochet techniques combined with metal rings to create a stunning hanging lamp you will be proud to display. Perfect as a unique gift or a personal statement piece for your home. 🧢✨

You ask,

we answer.

FAQs

What size will the finished lamp be?

The finished lamp uses a 30 cm metal ring for the wide section and a 15 cm ring for the lower ring; final overall size depends slightly on tension but matches the photo proportions.

Can I use a different yarn or hook size?

Yes, you can change yarn weight and hook size, but this will alter the final size and drape. Test a small swatch and adjust the hook to achieve the desired look.

Is this pattern safe to use with an electrical fitting?

Yes, the pattern includes instructions for attaching electrical parts, but you must follow safety precautions, use appropriate strain relief, and ensure secure connections when wiring the plug and fitting.

How long does this project typically take to complete?

Most crafters finish this lamp in about 8-10 hours, though time may vary depending on experience and the amount of detail in finishing and assembly.