🧢 Beautiful ✨ Detailed πŸ’ Adorable

Rustic Lamp Pattern

Rustic Lamp Pattern
4.6β˜… Rating
5-7 Hours Time Needed
3.6K Made This
βœ‚οΈ

Intermediate Level

Ideal for those with basic crochet experience, featuring slightly more advanced stitches and techniques to expand your skills.

⏱️

Weekend Treat

Takes 5-7 hours, making it an enjoyable project to finish over a couple of days.

🏑

Cozy Accent

A warm touch for your space that transforms ordinary corners into inviting nooks filled with handmade charm.

About This Rustic Lamp Pattern

This pattern guides you to crochet a rustic hanging lamp shade using Katia Capri yarn and two metal rings to create the structure. The design uses a rope stitch for an open, textured fabric that looks elegant and natural. Full step-by-step rounds are included along with finishing and electrical assembly instructions for a safe, professional result.

Rustic Lamp Pattern crochet pattern - detailed view of completed project

The pattern includes materials, tools, and a clear stitch diagram for the rope stitch used throughout. You'll also find tips for reinforcing the work and positioning the cord and bulb for the perfect hanging height.

Why You'll Love This Rustic Lamp Pattern

I absolutely love this pattern because it turns simple materials into a beautiful, sculptural lamp that transforms a room. I enjoy the rope stitch texture β€” it gives a handmade, airy feel that still looks refined. I love that the pattern includes clear finishing and electrical assembly steps so the final piece is both pretty and practical. I also appreciate how versatile the design is: you can make variations in size and color to match any interior.

Rustic Lamp Pattern step 1 - construction progress Rustic Lamp Pattern step 2 - assembly progress Rustic Lamp Pattern step 3 - details and accessories Rustic Lamp Pattern step 4 - final assembly and finishing

Switch Things Up

I love playing with color palettes on this lamp β€” try soft neutrals for a calm look or deep jewel tones for a bolder statement.

I sometimes change yarn weight and hook size to create a smaller or larger lamp; using thicker yarn and a bigger hook makes a chunkier, more solid shade.

I add a second decorative band near the top by inserting a contrasting-color round before attaching the outer ring for a subtle stripe effect.

I experiment with different ring sizes and spacing to alter the profile of the shade, making it shallower or more elongated depending on the room.

I often swap the black cord for a fabric-covered or colored cord to coordinate with my interior and make the lamp feel more custom.

I recommend trying a metallic or natural-fiber yarn for a different surface sheen and texture that catches the light differently.

I sometimes tighten the final rounds before attaching the ring to reduce sag and preserve shape when hanging.

I like to hang two or three lamps at uneven heights for visual interest β€” mix sizes and colors for a designer cluster light.

I also add small crocheted or felt embellishments near the top hole for a playful, personalized touch that is easy to change later.

I always test the electrical assembly separately before finalizing the cover, and I suggest consulting an electrician if you have any doubts about wiring or strain relief installation.

Common Mistakes & How to Fix Them

βœ— Using the wrong hook size for your tension can make the lamp too stiff or too loose; test your gauge and try a different hook size before starting the full project. βœ— Skipping the recommendation to weave ends immediately will make them nearly impossible to reach later; weave in ends with a wool needle as you go to avoid frustration. βœ— Not reinforcing the finished piece when desired may cause sagging over time; use a fabric stiffener spray sparingly for a firmer shape if needed. βœ— Ignoring electrical safety when attaching the plug or strain relief can be dangerous; follow the electrical parts instructions carefully and, if unsure, consult a qualified electrician.

Rustic Lamp Pattern

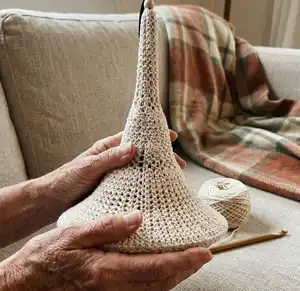
Create a soft-toned rustic hanging lamp to give your living room or outdoor space a natural, calming look. This pattern uses a rope stitch to build a beautiful, airy lamp shade and includes full assembly and electrical guidance. You will enjoy the textured crochet fabric and the satisfaction of turning yarn and rings into a statement light fixture. Perfect for gifting or refreshing your home decor with handmade charm.

Intermediate 5-7 Hours

Materials Needed for Rustic Lamp Pattern

β€” Main Fabric

  • 01
    Katia Capri yarn (Sand 82134)  3 balls (as specified in the pattern)
  • 02
    Optional: fabric stiffener spray (for finishing, if desired)

β€” Tools Required

  • 01
    3 mm crochet hook
  • 02
    Metal rings: 30 cm diameter (1) and 15 cm diameter (1)
  • 03
    Wool needle with large eye
  • 04
    Scissors
  • 05
    Safety screwdriver
  • 06
    Wire stripper or sharp knife
  • 07
    Black electrical cord, length of your choice
  • 08
    Flat plug, black
  • 09
    Lamp fitting, black
  • 10
    Strain relief, black
  • 11
    E27 lamp (approx. 600 lumens)
  • 12
    Stitch markers (optional)

Progress Tracker

0% Complete

β€” Lamp :

Info :

Try out the size of the crochet hook first and use a different size if necessary. You crochet with the rope stitch, like this: make 1 dc, 1 ch, 1 dc around 1 ch = base stitch. See also the pattern on the next page.

Info :

End each round with 1 sl st in the 1st stitch of the round.

Round 1 :

crochet 40 ch, join with 1 sl st in 1st ch.

Round 2 :

1 ch, 40 sc, join with 1 sl st in 1st sc.

Round 3 :

3 ch, 1 dc in 1st sc, 1 ch, 1 dc in 1st sc, rep (1 dc, 1 ch, 1 dc in 4th sc), join.

Round 4 :

Rep Rnd 3, but work around the ch of the previous round and join.

Rounds 5-12 :

as Rnd 4.

Round 13 :

as Rnd 4, but crochet 2 ch instead of 1.

Round 14 :

as Rnd 13.

Round 15 :

3 ch, rep (1 dc, 3 ch, 1 dc around the 2 ch), join with 1 sl st.

Round 16 :

3 ch, rep (1 dc, 1 ch, 1 dc, 1 ch, 1 dc around the 3 ch), join with 1 sl st.

Round 17 :

3 ch, 1 dc, 1 ch, 1 dc around each ch, join.

Rounds 18-20 :

as Rnd 17.

Round 21 :

as Rnd 13.

Rounds 22-24 :

as Rnd 21.

Round 25 :

as Rnd 21, but crochet 3 ch instead of 2 ch between the dc now.

Round 26 :

as Rnd 16.

Rounds 27-33 :

as Rnd 17.

Round 34 :

3 ch, rep (1 dc, 1 ch, 1 dc around 1 ch, work around 2nd ch: 1 dc, 1 ch, 1 dc), end with 1 sl st.

Rounds 35-37 :

as Rnd 17.

Rounds 38-41 :

as Rnds 34-36.

Round 42 :

Take the metal ring of 30 cm Ø and crochet in 1 ch: 1 sc on each stitch of the previous round (= 1 sc in 1 dc, 1 sc around the ch, 1 sc in 1 dc). Insert the hook into the stitch of the previous round, the yarn goes over the ring. Pull the yarn through the loop (like an sc) with the hook. Join with 1 sl st in the 1st ch.

Round 43 :

as Rnd 3.

Rounds 44-50 :

as Rnd 17. Dec from here.

Round 51 :

3 ch, rep (1 dc, 1 ch, 1 dc, crochet in the next ch: 1 dc, 1 ch, 1 dc, make 1 dc in the next ch). Join with 1 sl st.

Round 52 :

3 ch, rep (1 dc, 1 ch, 1 dc in 1 ch, crochet in the next ch: 1 dc, 1 ch, 1 dc, skip 1 dc). Join with 1 sl st.

Rounds 53-55 :

as Rnd 17.

Round 56 :

Take the 15 cm Ø metal ring and work as Rnd 42.

Round 57 :

1 ch, 1 sc on 1 sc, join with 1 sl st. Fasten off the last thread and use the wool needle to carefully weave it through a few stitches on the inside. Break the yarn.

Infos :

TIP! Immediately weave in all the ends with the wool needle. You can barely reach them later.

Infos :

Pattern note: Crochet several lamps, in different colors if desired, and hang them together at uneven heights.

Infos :

Finishing: Reinforce the work with fabric stiffener spray, this step is optional.

Infos :

Electrical parts: Attach the plug to one end of the cord and the strain relief with fitting to the other end. Insert the plug from the inside through the narrow part of the lamp cover. Pull the cord as far as you like and determine the height of the bulb in the lamp. Cut a long strand of the yarn and tightly pull the narrow part upward. Use the yarn to tightly tie and wrap the lamp you made to secure it at about 28 cm from the fitting. Keep in mind that the work will slightly sag when it hangs. Wind the cord around a stick or hang several lamps from the ceiling at different heights. Finally, screw in the light bulb.

Assembly Instructions

  • Attach the plug to one end of the cord and the strain relief with fitting to the other end, then insert the plug from the inside through the narrow part of the lamp cover.
  • Pull the cord to determine the bulb height, then cut a long strand of yarn and tightly pull the narrow part upward and tie the yarn to secure the lamp about 28 cm from the fitting.
  • Take the 30 cm metal ring and crochet the ring round (Rnd 42) to secure the outer edge, then attach the 15 cm metal ring later (Rnd 56) for the inner lower section.
  • Wind the cord around a stick or hang multiple lamps at uneven heights to create an attractive cluster; finally screw in the E27 bulb and test the lamp.
  • Fasten off the final threads and use the wool needle to carefully weave the ends through a few stitches on the inside before breaking the yarn.

Important Notes

  • πŸ’‘Immediately weave in ends with a wool needle as you go because later they are hard to reach.
  • πŸ’‘End each round with 1 sl st in the first stitch for a neat finish and consistent round joins.
  • πŸ’‘Test the crochet hook size first and adjust if necessary to get the desired drape and stitch definition.
  • πŸ’‘When attaching electrical parts, ensure strain relief and plug are fitted securely and follow safety guidelines or consult an electrician if unsure.

This rustic lamp pattern creates a soft, natural focal point that warms any room with handmade texture. It combines simple rope-stitch crochet with an internal metal frame for a professional finish. Make one for yourself or make several in different sizes and colors to hang as a cluster. 🧢🏑

You ask,

we answer.

FAQs

What size will the finished piece be?

The finished lamp size depends on tension and ring placement; using the specified rings (30 cm and 15 cm) and recommended yarn produces a pendant roughly matching the photos when using a 3 mm hook.

Can I use different yarn weights for this pattern?

Yes, you can use different yarn weights but your final lamp will change in size and drape; adjust the hook size and ring placement accordingly and test with a swatch first.

Do I need prior crochet experience for this pattern?

This pattern is rated intermediate due to working in rounds, the rope stitch, and assembly with metal rings and electrical parts; basic knowledge of dc, sc, ch, and working in rounds is required.

How long does this project typically take to complete?

Most crafters complete a single lamp in approximately 5-7 hours, though time may vary depending on experience, size chosen, and finishing steps.

Is the electrical assembly difficult or dangerous?

The pattern includes electrical assembly steps like attaching a plug and strain relief; while the steps are straightforward, follow safety precautions and consult a qualified electrician if you are unsure about wiring.