🧢 Beautiful ✨ Detailed πŸ’ Adorable

Bucket Hat Crochet Pattern

Bucket Hat Crochet Pattern
4.7β˜… Rating
5-7 Hours Time Needed
3.7K Made This
βœ‚οΈ

Intermediate Level

Ideal for those with basic crochet experience, featuring slightly more advanced stitches and techniques to expand your skills.

⏱️

Weekend Treat

Takes 5-7 hours, making it an enjoyable project to finish over a couple of days.

🧣

Snug Essential

Everyday comfort with practical charm, designed for both functionality and style through changing seasons.

About This Bucket Hat Crochet Pattern

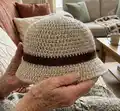
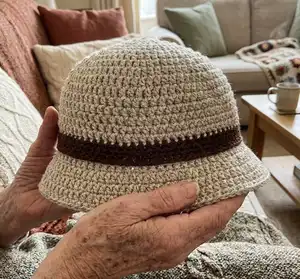
This pattern creates a classic bucket hat worked in the round with two strands of worsted yarn held together for body and structure. It features a single round of front post single crochet to start the brim so it stands out immediately. The hat includes instructions for a removable decorative band so you can change the look quickly.

Bucket Hat Crochet Pattern crochet pattern - detailed view of completed project

Available in three sizes (small, medium, large) with clear round-by-round instructions. The pattern is written in spiral rounds and uses simple shaping for a professional finish.

Why You'll Love This Bucket Hat Crochet Pattern

I absolutely love this pattern because it transforms basic stitches into a stylish, wearable hat that is practical and customizable. I enjoy how the front post round gives an instant brim that stands out without complex shaping. I also love that the band is removable β€” it makes the hat versatile for many outfits. The technique of holding two strands together gives great structure while remaining soft and comfortable to wear.

Bucket Hat Crochet Pattern step 1 - construction progress Bucket Hat Crochet Pattern step 2 - assembly progress Bucket Hat Crochet Pattern step 3 - details and accessories Bucket Hat Crochet Pattern step 4 - final assembly and finishing

Switch Things Up

I love customizing this hat by swapping yarn colors for different seasons; try bright summer shades or muted fall tones.

I often make the hat using a single strand of bulky yarn and a larger hook for a quick, chunky version.

You can change the band color or make multiple bands to match different outfits, slipping them on and off as desired.

To make the hat larger or smaller, add or remove increase rounds at the crown following the pattern's increase progression.

I like to add small crocheted flowers or a bow to the band for a feminine touch and personal flair.

Try holding different yarn fibers together, like cotton with acrylic, to alter drape and stiffness for varied brim behavior.

For extra shape, consider lightly stiffening the brim with a fabric stiffener or a spray-on stiffener after finishing.

I sometimes embroider simple lines or initials on the band for personalization and a unique handmade gift.

Want a packable hat? Use softer yarn and fewer plies so the hat compresses easily without losing its shape.

I also experiment with different chain counts for the band to create wider or narrower decorative bands that suit my look.

Try combining textures, such as a boucle band with a smooth main color, for an eye-catching contrast.

Common Mistakes & How to Fix Them

βœ— Not holding both strands together consistently; always keep the two yarn strands held together throughout to maintain the correct gauge and structure. βœ— Skipping the stitch marker at the end of the round; place a marker after the last sc and move it up each round to avoid losing track of increases. βœ— Joining or twisting the rounds (working joined rounds instead of spiral); work in a spiral with no joins to keep the hat shape and stitch alignment correct. βœ— Incorrect band length because chains were not checked for fit; try the ch 66 chain around the hat before joining and adjust the number of chains to ensure proper fit.

Bucket Hat Crochet Pattern

Make a stylish, hand-crocheted bucket hat using worsted-weight yarn and a 6.0mm hook. This pattern guides you through creating a structured brim and a removable decorative band. Perfect for customizing colors and sizes to fit small, medium, or large heads.

Intermediate 5-7 Hours

Materials Needed for Bucket Hat Crochet Pattern

β€” Main Fabric

  • 01
    Worsted weight yarn (#4), 4 oz each of two colors (main color and contrasting band color)
  • 02
    Two strands of worsted yarn held together for the hat body (use recommended amounts above)
  • 03
    One strand of worsted weight yarn for the hat band (color of your choice)

β€” Tools Required

  • 01
    Crochet hook size J / 6.00mm
  • 02
    Scissors
  • 03
    Yarn needle for weaving and sewing
  • 04
    Stitch marker
  • 05
    Measuring tape

Progress Tracker

0% Complete

β€” Hat :

Info :

Materials: 4oz each of two colors of worsted weight yarn, size J or 6.00mm crochet hook.

Info :

Gauge: 3 sts + 4 rows = 1 inch with two strands held together

Info :

Sizes: small-18", medium- 20", large-22"

Info :

Abbreviations: ch - chain sc – single crochet fpsc – front post single crochet (single crochet around the post of the single crochets in the previous round, not the top) Rnd - round

Info :

Notes: This hat is made in the round with no joins (spiral) with both strands of yarn held together throughout. To start you can use the magic ring or if you'd like you can just chain 2 and crochet the first 6 single crochets in the second chain from hook. There is one round of front post single crochets to start the brim, this gives it a brim that instantly stands out and doesn't gradually increase. Each increase round adds 2 inches to this hat, for in between sizes (19", 21", 23" etc) you can add a round and only increase by 3 stitches skipping every other increase stitch.

Info :

Starting with both strands of yarn held together and magic loop: Single crochet 6 inside ring. Place a marker after this last sc and move it up with every round.

Round 1 :

2 sc in each sc around.

Round 2 :

(sc 1, 2 sc in next sc) around.

Round 3 :

(sc 2, 2 sc in next sc) around.

Round 4 :

(sc 3, 2 sc in next sc) around.

Round 5 :

(sc 4, 2 sc in next sc) around.

Round 6 :

(sc 5, 2 sc in next sc) around.

Round 7 :

(sc 6, 2 sc in next sc) around.

Round 8 :

(sc 7, 2 sc in next sc) around. For small sizes end increase here and skip down to Rnd 11.

Round 9 :

(sc 8, 2 sc in next sc) around. For medium size end increase here and skip down to Rnd 11.

Round 10 :

(sc 9, 2 sc in next sc) around.

Round 11-24 :

sc around.

Round 12 :

(fpsc 10, 2 fpsc in next st) around.

Round 13 :

(sc 11, 2 sc in next st) around.

Round 14 :

sc 6, 2 sc in next st, (sc 12, 2 sc in next st) 5 times, sc to end.

Round 15 :

sc 3, 2 sc in next st, (sc 13, 2 sc in next st) 5 times, sc to end.

Round 16 :

(sc 14, 2 sc in next st) around.

Round 17 :

sc 7, 2 sc in next st, (sc 15, 2 sc in next st) 5 times, sc to end. Break yarn, hide end.

β€” Hat Band :

Info :

For the hat band - With one strand of your choice color of worsted weight yarn and size j or 6.00mm crochet hook -

Round 1 :

ch 66, join with a slip stitch to the first chain. (Try this chain out around your hat to make sure it fits before joining, if it's to long pull out some chains, if it's to short add some. The number of chains is not important here, fit is!)

Round 2 :

ch 1, sc in each ch around, join with a slip stitch to the first SINGLE CROCHET, skipping the ch 1.

Round 3 :

ch 1, sc around, join in the same way.

Round 4 :

Reverse single crochet around.

Round 5 :

You can cut the yarn and rejoin it to the bottom of the band on the chain round or you can slip stitch down the inside of the band and turn it around so that the bottom is the top and continue.

Info :

Reverse single crochet around along the bottom of the band. Cut and hide yarn.

Info :

Slip this band down around the hat and you can use a strand of the same color of yarn and sew it in place or just let it be there and make a bunch of different colors of bands and change them to match whatever accessories your wearing that day. : D

Assembly Instructions

  • Place the completed hat band around the hat and adjust for fit before securing; try the ch 66 chain around the hat to ensure it fits before joining.
  • To attach the band permanently, use a strand of the same color yarn and sew the band to the hat with small whipstitches hidden under the band edge.
  • Alternatively slip stitch down the inside of the band and turn it so the bottom becomes the top, then work reverse single crochet along the bottom and hide ends.
  • Keep a stitch marker at the last sc of the crown and move it up each round while assembling to keep stitch alignment accurate.
  • Weave and hide all yarn ends inside the hat after finishing brim and band to secure the work and create a clean interior finish.

Important Notes

  • πŸ’‘Work the hat in continuous spiral rounds with no joins to maintain a smooth, seamless crown.
  • πŸ’‘Hold both strands of yarn together throughout for correct gauge and a firm but soft structure.
  • πŸ’‘Place a marker after the last single crochet of the round and move it up with each new round to track round start.
  • πŸ’‘Try the band loop around the hat before joining chains to ensure the correct band circumference and adjust chain count as needed.
  • πŸ’‘One round of front post single crochet starts the brim so it stands out immediately; this creates the desired brim behaviour.

This Bucket Hat pattern gives you a classic, wearable accessory that you can make your own with color and band choices. Change bands to match outfits or make several in different shades for variety. The two-strand body provides structure while staying soft and comfortable to wear. πŸ§ΆπŸ‘’

You ask,

we answer.

FAQs

What sizes are included in this pattern?

The pattern includes sizes: small - 18", medium - 20", and large - 22". Adjust by adding or skipping increase rounds as instructed.

What hook and yarn should I use?

Use worsted weight yarn held in two strands and a size J (6.00mm) crochet hook for the hat body. Use one strand of worsted yarn for the hat band.

Do I need to join rounds or work in spiral?

Work the hat in the round with no joins (spiral). Place a marker after the last single crochet and move it up each round to keep track of the start.

Can I change the band or make it removable?

Yes, the band is designed to slip on and off. You can sew it in place or leave it removable to swap colors and styles.

Is front post single crochet required?

Yes, one round of front post single crochet is used to start the brim and create a brim that stands out immediately.