🧢 Beautiful ✨ Detailed πŸ’ Adorable

Round bag with t-shirt yarn Pattern

Round bag with t-shirt yarn Pattern
4.8β˜… Rating
5-7 Hours Time Needed
2.7K Made This
βœ‚οΈ

Beginner Friendly Level

Perfect for those just starting their crochet journey, with clear instructions and simple techniques

⏱️

Weekend Treat

Takes 5-7 hours, making it an enjoyable project to finish over a couple of days.

✨

Stylish Touch

An elegant detail to elevate any look, combining traditional techniques with contemporary design sensibilities.

About This Round bag with t-shirt yarn Pattern

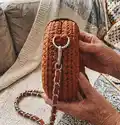
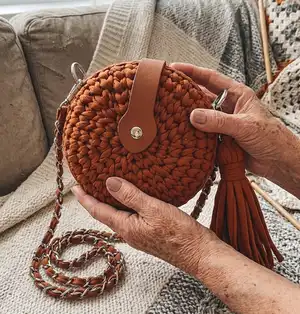
This pattern teaches you how to crochet a compact round bag using t-shirt yarn, with complete step-by-step instructions. You will make two circular halves, join them neatly, add hardware, and create a matching tassel. The finished bag has a sturdy canvas-like texture and a stylish leather valve and chain strap.

Round bag with t-shirt yarn Pattern crochet pattern - detailed view of completed project

Clear photos and a linked video tutorial are included to guide you through tricky steps. The pattern is beginner friendly and focuses on single crochet shaping and finishing techniques.

Why You'll Love This Round bag with t-shirt yarn Pattern

I absolutely love this pattern because it turns basic stitches into a chic, wearable accessory that feels luxurious and sturdy. I enjoy how quickly the round base grows using simple increases, so you see progress fast. The combination of t-shirt yarn and steaming for a finished canvas look always impresses me. Sewing on hardware and adding the tassel makes each bag feel uniquely handmade and special.

Round bag with t-shirt yarn Pattern step 1 - construction progress Round bag with t-shirt yarn Pattern step 2 - assembly progress Round bag with t-shirt yarn Pattern step 3 - details and accessories Round bag with t-shirt yarn Pattern step 4 - final assembly and finishing

Switch Things Up

I love to experiment with color when I make this pattern; try two contrasting colors for the base and the edge for a bold look.

To make the bag larger or smaller, I change the yarn weight and hook size β€” using thicker t-shirt yarn or two strands together creates a chunkier bag, while thinner yarn makes a more delicate version.

I often add a fabric lining to my bags for extra structure and to hide hardware seams; choose a lightweight cotton lining and hand-sew it in place after assembly.

For a more formal finish, I swap the chain strap for a leather strap or use metal hardware with brass or antique finishes to change the bag's aesthetic.

If I want a more boho style, I make a longer tassel and add multiple tassels around the snap hook-rings for extra movement.

I sometimes embroider initials or small motifs on one half before joining to personalize each bag as a gift.

Try different edge trims β€” a small picot or an extra round of reverse single crochet can change the silhouette and make the bag look more finished.

To create a convertible strap, I add snap hooks at several positions so I can switch between a short shoulder strap and a longer crossbody strap.

I also like to experiment with closures: magnetic snaps are quick and invisible, while a decorative button and loop give a handmade charm.

For an eco-friendly version, I use upcycled t-shirt material cut into strips from old shirts and braid them for a rustic strap to match the crocheted body.

Common Mistakes & How to Fix Them

βœ— Pulling yarn from the middle of the bobbin; always pull the thread from the outside to prevent twisting and make crocheting easier. βœ— Crocheting into the wrong loop or orientation; insert the hook between the legs of each stitch to create a split single stitch for a neater fabric. βœ— Forgetting to tighten and hide the starting tail after the 2nd row; pull the end through the first row stitches from the wrong side, tighten and hide the tail to close the hole. βœ— Cutting the thread too early before finishing the trim; do not cut the thread until you have crocheted the base trim SlSt and hidden the end securely. βœ— Overstuffing or under-steaming the circle; steam the circle through a damp cloth at high setting to get a smooth canvas look, then allow to cool and set before joining.

Round bag with t-shirt yarn Pattern

Create a stylish round crossbody bag using t-shirt yarn and a 6 mm hook. This pattern walks you through crocheting a firm circular base, joining two halves, and finishing with hardware and a tassel. You will learn simple single crochet increases and a neat edge finish to make a compact, wearable accessory. Perfect for gifting or adding a handmade touch to your wardrobe.

Beginner Friendly 5-7 Hours

Materials Needed for Round bag with t-shirt yarn Pattern

β€” Main Fabric

  • 01
    T-shirt yarn (t-shirt ribbon), width 7-9 mm, approximately 131 yards (120 meters) - main color for bag body and tassel

β€” Tools Required

  • 01
    Crochet hook N6 - 6 mm
  • 02
    Set of furniture: chain - 47 inches (120 cm); valve with button; 2 snap hook-rings; 3 snap hooks
  • 03
    Sewing thread (color to match yarn)
  • 04
    Sewing needle
  • 05
    Needle with large eyelet for threading yarn through chain links
  • 06
    Scissors
  • 07
    Iron and damp cloth for steaming and setting the canvas
  • 08
    Measuring tape (for cutting yarn lengths)

Progress Tracker

0% Complete

β€” Materials and tools :

Info :

T-shirt yarn, width 7-9 mm, 131 yard (120 meters). Hook N6 - 6 mm. Set of furniture (chain - 47 inches (120 cm); valve with button; 2 snap hook-rings; 3 snap hooks). Sewing thread. Sewing needle. Needle with large eyelet. Scissors. Iron and damp cloth. Finished bag from the specified materials: diameter - 7-8 inches (18-20 cm), width - 4 3/8 inches (11 cm). Gauge: 9 stitches and 8 row = 4*4 inches (10*10cm).

β€” Abbreviation :

Infos :

CH - chain stitch. SlSt - slip stitch. SC - single crochet. Inc - increase (2 SC in 1).

β€” Base (circle) :

Info :

Crochet 2 CH.

Round 1 :

1 row. Crochet 6 SC in the 2nd loop from the hook. In the 1st SC crochet CH like on the video.

Info :

Next, crochet the split single stitch. For that, we need to insert the hook between the legs of each stitch, to split the stitch from the face and from the wrong side.

Round 2 :

2 row. 1 Inc*6= 12, CH.

Info :

After crocheting 2nd row, the hole will be formed in the middle. The end needs to be hidden and thus the hole will be removed. Pull the end through all the stitches of the 1st row from the wrong side. Tighten, strengthen, hide and cut the end of the thread.

Round 3 :

3 row. (1 SC, 1 Inc)*6 = 18, CH.

Round 4 :

4 row. (2 SC, 1 Inc)*6 = 24, CH.

Round 5 :

5 row. (3 SC, 1 Inc)*6 = 30, CH.

Round 6 :

6 row. (4 SC, 1 Inc)*6 = 36, CH. Don't cut the thread. Steam the circle with an iron through a damp cloth at high setting. T-shirt yarn can withstand high temperatures. But, need to iron through a damp cloth so that the canvas does not shine.

Round 7 :

7 row. 36 SC, CH.

Round 8 :

8 row. 36 SC. Don't cut the thread.

Info :

Pull the loop under 1st SC, pull out on the wrong side under last SC. Crochet the base trim SlSt in the each loops. Cut the end. Pull the end under 1st SlSt, pull back on the wrong side. Strengthen and hide the end.

Info :

Steam the edge with an iron through a damp cloth.

Info :

Similarly, crochet the second part of the bag.

β€” Assembly :

Info :

Join the 2 parts of the bag with the edges. Insert the hook in the loops of the previous row of both parts of the bag. Pull out the loop. Again, insert the hook in the loops of the previous row of both parts of the bag. Pull out the next loop, crochet SlSt. Each time, insert the hook, first in one part, then in the other. Crochet SlSt, leave unconnected 7-8 inches (18-20 cm). Strengthen and hide both ends of the thread on the wrong side.

Info :

Insert the snap hook-rings in the places where the connecting seam ends.

Info :

Sew on the valve. Sew on the top part of the valve. Then, position the lower part of the valve to where it is supposed to be and sew on it.

Info :

Cut off the piece of the yarn 48 inches (122 cm) long. Pass the piece of the yarn through each link of the chain with the needle with large eyelet. Sew in the ends with the sewing needle and the sewing thread with the color of the yarn.

Info :

Fasten the shoulder strap to the snap hook-rings.

β€” Make the tassel :

Info :

Cut off 20-25 pieces of the yarn 13-14 inches (33-35 cm) long. Intercept with a longer piece in the middle. Put a snap hook on the piece of the yarn.

Info :

Wrap the bundle with a long piece several times.

Info :

Tie the ends, hide them under the turns. Spread the tassel with hands, cut off the ends exactly. Hang the tassel on any snap hook-ring.

Info :

Congratulations! Your cute bag is readyπŸ‘

Assembly Instructions

  • Join the two circular halves by inserting the hook through the loops of the previous row of both parts, pull up a loop and SlSt through both loops; continue inserting first in one part then the other to create a neat seam, leaving a gap 7-8 inches (18-20 cm) unconnected for the top opening, then fasten off and hide ends on the wrong side.
  • Insert snap hook-rings into the seam ends where you want the strap to attach and secure them by stitching firmly through a couple of stitches around the ring area to prevent shifting.
  • Sew the valve (leather flap with button) onto the top half of the bag: sew the top part first, position the lower part to align with the button, then sew the lower part in place.
  • Prepare the chain strap by cutting a 48 inch (122 cm) piece of yarn, threading it through each chain link with a needle with a large eyelet, and sewing the yarn ends securely with matching sewing thread.
  • Fasten the completed shoulder strap to the snap hook-rings, checking alignment and security before trimming any excess thread.
  • Attach the tassel to any snap hook-ring after finishing and trimming it neatly; secure any wraps and hide ends under the wraps to complete the decorative finish.

Important Notes

  • πŸ’‘Take the thread from the outside of the bobbin, not the middle, to avoid twisting and make crocheting easier.
  • πŸ’‘Steam the finished circle through a damp cloth at high heat to set the canvas texture, but do not iron directly on the yarn to avoid shine.
  • πŸ’‘When crocheting with t-shirt yarn, pull the working thread just above the level of the column and hold the hook at a slight angle for a neat fabric.
  • πŸ’‘Hide and strengthen all starting and finishing tails on the wrong side to secure the piece before joining and attaching hardware.

This round t-shirt yarn bag pattern is a fun, modern accessory you can make by weekend. The pattern includes step-by-step photos, a linked video tutorial, and clear finishing instructions to add hardware and a tassel. Make one for yourself or gift it to a friend β€” it dresses up any outfit with handmade flair. 🧢✨

You ask,

we answer.

FAQs

What size will the finished piece be?

The finished bag measures approximately 7-8 inches (18-20 cm) in diameter and about 4 3/8 inches (11 cm) wide using the specified t-shirt yarn and a 6 mm hook.

Can I use different yarn weights for this pattern?

Yes, you can use different yarn types but the final size and texture will change; if using thinner yarn, use a smaller hook and consider making two or more strands together to get a similar canvas thickness.

Do I need prior crochet experience for this pattern?

This pattern is rated beginner friendly, so basic knowledge of single crochet, increases, and slip stitch will be helpful for best results.

How long does this project typically take to complete?

Most crocheters complete this project in 5-7 hours, though time may vary based on experience level, finishing steps, and whether you make the tassel and attach hardware by hand.