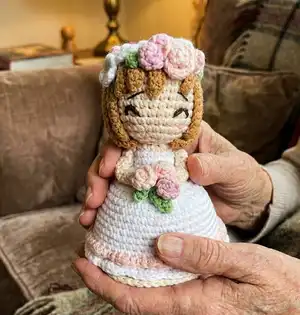
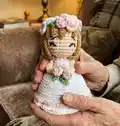
Create a charming reversible flower bouquet that opens to reveal a tiny bride amigurumi — a delightful gift or keepsake. This pattern walks you through crocheting the bride, skirt, bouquet wrapper, ribbon and tiny flowers with clear rounds and helpful assembly tips. Youll enjoy making the small detailed pieces and learning finishing techniques like invisible finish for a neat result. Perfect for thoughtful handmade presents and special occasions.
Progress Tracker
0% Complete
— Bride's Head and Body :
Info :
Start with skin color yarn
Round 3 :
[sc, inc]x6 (18)
Round 4 :
[sc, inc, sc]x6 (24)
Round 5 :
[5sc, inc]x4 (28)
Round 13 :
[5sc, dec]x4 (24)
Round 14 :
[sc, dec, sc]x6 (18)
Info :
Start stuffing with fiberfill.
Round 15 :
[sc, dec]x6 (12)
Round 16 :
FLO [sc, inc]x6 (18)
Info :
Change to white yarn.
Info :
Fasten off, leave a long tail for sewing. Do an invisible finish.
— Bride's Arms :
Item Name (P1) :
BRIDE'S ARMS (make 2). Start with skin color yarn. Make 12ch. Start from the second loop from the hook, make 11sc. Fasten off, leave a long tail for sewing.
— Bride's Hair :
Info :
Start with light brown yarn
Info :
sl st to the first st of R2. Then continue to make the hair strands.
Strand 1 :
14ch. Start from the second loop from the hook: sl st, 12sc. Sl st to the next st
Strand 2-5 :
8ch. Start from the second loop from the hook: sl st, 6sc. Sl st to the next st
Strand 6 :
do the same as strand 1
Strand 7-16 :
16ch. Start from the second loop from the hook: sl st, sc, 13hdc. Sl st to the next st
Info :
Fasten off, leave a long tail for sewing.
Info :
Attach the hair to the head with the wrong side facing outwards.
Infos :
Notes: You can sew the hair or use glue. If you use glue, be aware that the area where the glue is applied will become stiffer. This can make it difficult to sew the flowers on her head later. If you are going to sew all the strands together, don’t sew them all the way to the hair tip. It is recommended to sew it about 5st above the sl st, in order to give a nice curl and the hair can stay closer to the head.
— Bride's Skirt :
Info :
Start with white yarn. Leave a long starting yarn tail, approximately 10 cm (4”). This tail will be used to join both bouquet and bride at the end of this pattern.
Round 3 :
[sc, inc]x6 (18)
Round 4 :
[sc, inc, sc]x6 (24)
Round 5 :
[3sc, inc]x6 (30)
Round 6 :
[2sc, inc, 2sc]x6 (36)
Round 7 :
[5sc, inc]x6 (42)
Round 9 :
[3sc, inc, 3sc]x6 (48)
Round 14 :
[7sc, inc]x6 (54)
Info :
Stop for a while but do not cut the yarn*, because it will be use for the step on page 9.
Info :
Use the dark brown yarn to embroider the eyes at R10. Look at the pictures. With dark brown yarn (use only 1 ply), embroider the eyebrows at R8. Embroider the blush on the cheeks using pink yarn, between R11-12.
Info :
Hold the skirt with its bottom facing you. Attach the light peach yarn at the FL of R16 (you worked R17 BLO). Work: [sl st, sc, hdc inc, sc]x13, 2sl st. Fasten off, secure and hide the tail.
— Bouquet Wrapper :
Info :
Start with cream yarn. Leave a long starting yarn tail, approximately 10 cm (4”). This tail will be used to join both bouquet and bride at the end of this pattern.
Round 3 :
[sc, inc]x6 (18)
Round 4 :
BLO [sc, inc, sc]x6 (24)
Round 5 :
[3sc, inc]x6 (30)
Round 6 :
[2sc, inc, 2sc]x6 (36)
Round 7 :
[5sc, inc]x6 (42)
Round 9 :
[3sc, inc, 3sc]x6 (48)
Round 14 :
[7sc, inc]x6 (54)
Info :
Fasten off. Leave a long tail for sewing, about 50 cm long.
— Ribbon :
Info :
Work in rows. Start with peach yarn. Make 25ch. Then, start from the second loop from the hook:
Row 1 :
[2sc, 2hdc, 4dc, 2hdc, 2sc]x2 (24), 1ch
Row 2 :
turn, BLO [2sc, 2hdc, 4dc, 2hdc, 2sc]x2 (24)
Info :
Fasten off, leave a long tail. Fold the bow so that both ends meet in the middle. Make a knot using both yarn tails to fix the position of the folded ribbon.
Info :
Then, make a bow’s tail using the same color yarn. Make a MR, Then work: [10ch, start from the third loop from the hook: 5dc, 2hdc, sc. Sl st to the MR]x2. Pull tight the MR and fasten off. Using the yarn tail, attach the bow’s tail to the center back of the bow. Let its wrong/ugly side faces outside.
Info :
And then, sew the ribbon to the bouquet, near to its bottom.
— Flower 1 (make 6) :
Info :
Make 1 in pink and white. Make 2 in light pink and light peach. Make 6ch. Start from the second loop from the hook: hdc, hdc inc, hdc, 2ch, hdc inc in the same st, 2ch, hdc inc in the next st, 2ch, hdc in the same st, hdc, 2ch, hdc inc in the same st. Fasten off, leave a long tail for sewing. Roll up the flower and sew it together so that it won’t roll open.
— Flower 2 (make 10) :
Info :
Make 6 in light peach, 3 in light pink, and 1 in pink. Make 6ch. Start from the second loop from the hook: sc, inc, 3inc3. Fasten off, leave a long tail for sewing. Roll up the flower and sew it together so that it won’t roll open.
— Flower 3 (make 3) :
Info :
Use the white yarn. In a MR, make: [4ch, sl st to the MR]x5. Tighten the MR. Fasten off, leave a long tail for sewing.
— Leaves 1 (make 3) :
Info :
Start with green yarn. Make 5ch, start from the second loop from the hook, make sl st, sc, hdc, sl st. Don’t cut the yarn and make again 4ch, start from the second loop from the hook, make sl st, sc, sl st. Fasten off. Leave a long tail for sewing.
— Leaves 2 (make 3) :
Info :
Start with green yarn. Make 4ch, start from the second loop from the hook, make sl st, sc, sl st. Fasten off. Leave a long tail for sewing.
— Assembly & Joining :
Info :
Attach the bride's body to the skirt between R3-4. No need to stuff the body with fiberfill, or just stuff it slightly.
Info :
Then, attach the ends of the arms, the leaves 1 and 3 pieces of flower 2 (in light pink and light peach) at the skirt.
Info :
Turn the bouquet wrapper and the bride’s skirt inside out with the wrong/ugly sides facing you. Tie a knot with the yarn tails from the magic rings of both bouquet wrapper and the bride’s skirt, leaving a space between them.
Info :
Turn the bouquet wrapper back with the right/good side facing you, and leave the skirt intact at the wrong/ugly side. No need to stuff with fiberfill. Push the skirt inside the bouquet wrapper.
Info :
Join the last rounds of the bouquet wrapper and the bride. Sew them together with light pink tail through the BL of each piece. To finish, make a knot and hide the tail.
Info :
After joining the bouquet and the bride’s skirt, continue working the bouquet side. Hold the bouquet with its flowers facing you. Attach the cream yarn at the FL of R18. And work: [sl st, sc, hdc inc, sc]x13, 2sl st. Fasten off, secure and hide the tails.
Info :
Now, turn the bouquet inside out so the bride is facing outside, because now we are going to work the bride’s side. Hold the bride with her skirt facing you. With the white yarn tail left from the last round of the bride's skirt (page 4), work at the FL R18: ch1, sc at the same st, [sl st, sc, hdc inc, sc]x13, sl st. Fasten off, do an invisible finish, secure and hide the tail.
Info :
Congratulation! Your reversible flower bouquet and bride amigurumi is ready.
This reversible flower bouquet and bride amigurumi makes a special, heartfelt gift that captures love and charm in a tiny package. Whether you craft it for a wedding keepsake or a thoughtful present, the delicate flowers and clever reversible design will delight anyone who receives it. Happy crocheting and enjoy every tiny stitch! 🧶💖