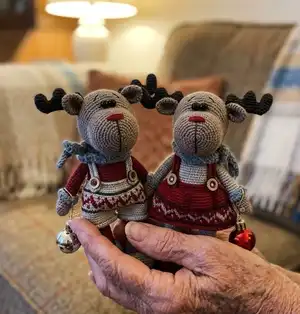
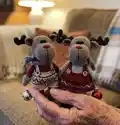
Make a charming handmade reindeer amigurumi to brighten your holidays. This pattern guides you step-by-step through crocheting the head, body, arms, legs, horns, ears, clothing and accessories. You will enjoy colorwork details and simple shaping to create a delightful toy that stands about 21 cm tall. Perfect as a festive gift or a cozy decoration for the season.
Progress Tracker
0% Complete
— Recommended Materials and Tools :
Info :
Size 1,75mm crochet hook; YarnArt JEANS color 66 (maroon) - 1ball; YarnArt JEANS color 46 (gray) - 1ball; YarnArt JEANS color 28 (graphite) - 1/4of a ball; ALIZE Cotton Gold color 688 (coffee) - 1/4of a ball; ALIZE Baby Softy 119 (gray) - 1/4of a ball; Toy stuffing; Sewing needle; Scissors; Hard plastic material or a cardboard; Black round beads d.6-8mm to make the eyes; 4 wooden buttons d.10mm.
— Abbreviations :
Info :
mr-magic ring; ch-chain stitch; sc- single crochet; BLO- back loops only; FLO- front loops only; HDC- half double crochet; DC- double crochet; inc- increase; dec- decrease; ( ) *- repeat N times; SL ST- slip stitch; Puff stitch- crochet 5unfinished DC and close them together.
— Arms :
Info :
ARMS (make 2): Stuff 2/3 of bottom part of the arm as you go. Use coffee yarn color for both toys.
Round 1 :
Start 6sc in a mr (6)
Round 3 :
(inc, 3sc) *3 (15)
Round 4-5 :
15sc- 2 rounds (15)
Round 6 :
4sc, inc, 2sc, puff stitch, 2sc, inc, 4sc (17)
Round 7-8 :
17sc- 2 rounds (17)
Round 9 :
8sc, dec, 7sc (16)
Info :
Maroon color- for the boy, grey color – for the girl.
Round 11 :
BLO: (dec, 6sc)* 2 (14)
Round 12-28 :
14sc- 17 rounds (14). 3sc to shift stitch marker to the middle of back part of the arm. Crochet 7 more sc for right arm.
Round 29 :
Put together and crochet 6sc through the loops of both sides (6)
Section :
Cuff: Maroon color- for the boy, grey color- for the girl: Go back to the 11th round and work into FLO.
Round 1 :
16sc. Fasten off and cut the yarn.
Info :
Use softy grey color:
Round 2-3 :
16sc- 2 rounds (16). Fasten off and cut the yarn.
Info :
The 1st arm is completed. Crochet the 2nd one the same way.
— Legs :
Info :
LEGS (make 2): Stuff as you go. Graphite yarn color for both toys. Cut a plastic or a cardboard insole and place an insole inside when instructed.
Round 1 :
Ch8, from the 2nd stitch from hook crochet: inc, 5sc, 4sc into 1 stitch, 5sc, inc (18)
Round 2 :
inc, 6sc, 4inc, 6sc, inc (24)
Round 3 :
1sc, inc, 6sc, (inc, 1sc)*4, 7sc, inc (30)
Round 4 :
2sc, inc, 6sc, (hdc inc, 2hdc)*4, 8sc, inc (36)
Info :
Change the yarn to grey color if you make the boy, maroon color if you make the girl.
Round 7-9 :
36sc-3 rounds (36)
Round 10 :
6sc, (dec, 2sc)*6, 6sc (30)
Round 12 :
6sc, (dec, 1sc)*6, 6sc (24)
Info :
Place an insole inside.
Info :
Maroon color for the boy, grey color for the girl:
Round 14 :
BLO: (dec, 2sc)*6 (18)
Round 15-32 :
18sc- 18rounds (18). 1sc to shift stitch marker to the middle of back part of the leg.
Round 33 For left :
12sc, sl st
Round 34 :
4sc, sl st. Make ch10 and attach the chain into sl st of left leg, where you finished working.
— Boot :
Info :
Grey yarn color for the boy, maroon yarn color for the girl: Go back to the 14th round, where you worked into BLO.
Round 1 :
FLO: 24sc (24). Fasten off and cut the yarn.
Info :
Use grey softy yarn for both toys:
Round 2-3 :
24sc -2rounds (24). Fasten off, cut the yarn and hide inside the work.
— Body :
Info :
BODY: Stuff as you go. Maroon yarn color for the boy, grey yarn color for the girl.
Round 1 :
18sc on left leg, 10sc on chain, 18sc on right leg, 10sc on chain (56) - place stitch marker. New round starts here.
Round 2 :
inc, 16sc, inc, 10sc, inc, 16sc, inc, 10sc (60)
Round 3-8 :
60sc- 6 rounds (60)
Round 9 :
55sc. Do not use last 5 stitches – shift stitch marker. New round starts here.
Round 10 :
4sc, dec, (8sc, dec)*5, 4sc (54)
Round 11-12 :
54sc- 2 rounds (54)
Info :
Change yarn color: maroon for the girl, grey for the boy.
Round 14 :
BLO: (dec, 7sc)*6 (48)
Info :
Now you will crochet pants for the boy and a skirt for the girl.
— Shorts :
Round 1 :
FLO 14 rounds: (inc, 2sc)* 18 (72)
Round 4 :
(1sc- M, 2sc- G)* 24 (72)
Round 5 :
2sc-M, 3sc- G, (3sc- M, 3sc- G)* 11, 1sc-M (72)
Round 6 :
(1sc- G, 2sc- M)* 24 (72)
Round 7 :
2sc- G, 3sc- M, (3sc- G, 3sc- M)* 11, 1sc- G (72)
Round 8 :
(1sc- M, 2sc- G)* 24 (72)
Info :
Chart: follow the provided motif image for the design.
— Shorts continued :
Round 11-13 :
72sc- 3rounds (72)
Info :
From last sc in the 13th round count 35sc and sew the 72nd sc of the 13th round and the 36th sc.
Info :
Now you will crochet each leg separately. There are 35sc in each leg. Attach the yarn and work in the round.
Round 1-7 (Grey) :
35sc- 7rounds. Fasten off yarn, leaving a tail to sew. Bend 2 rounds and sew them as pictured. Crochet the 2nd leg the same way.
— Skirt :
Round 1 :
FLO of the 14th round: (inc, 1sc)* 27 (81)
Round 2-5 :
81sc- 4 rounds (81)
Round 6 :
(inc, 26sc)* 3 (84)
Round 9 :
(1sc- G, 2sc- M)* 28 (84)
Round 10 :
2sc- G, 3sc- M, (3sc- G, 3sc- M)*13, 1sc- G (84)
Round 11 :
(1sc- M, 2sc- G)* 28 (84)
Round 12 :
2sc- M, 3sc- G, (3sc- M, 3sc- G)*13, 1sc- M (84)
Round 13 :
(1sc- G, 2sc- M)* 28 (84)
Round 16 :
84sc (84). Fasten off and cut the yarn.
— Body continued :
Info :
Go back to the 16th round and work into FLO, crochet the belt of the skirt: maroon for the skirt, for the pants - grey: 48sc. Fasten off and cut the yarn.
Round 18 :
3sc, dec, (6sc, dec)*5, 3sc (42)
Round 19-23 :
42sc- 5 rounds (42)
Round 24 :
(dec, 5sc)*6 (36)
Round 25-26 :
36sc- 2 rounds (36)
Round 27 :
2sc, dec, (4sc, dec)*5, 2sc (30), 1sc to shift.
Round 28 :
Connect the arms and the body in next round: 6sc for each arm, 9sc for the back and 9sc for front part. 4sc on the back; 6sc, grabbing loops of left arm and the body simultaneously; 9sc on front part; 6sc, grabbing loops of right arm and the body simultaneously; 5sc on the back (30)
Round 29 :
30sc (30). Fasten off the yarn, leaving a tail to sew.
Section :
Straps for the shorts and for the skirt: Ch36 and from the 2nd stitch crochet 34sc, 3sc into 1 stitch, continue working into the unused loops on the opposite side of the chain: 34sc. Fasten off and cut the yarn, leaving a tail to sew. Sew a button to the strap (step a little from the edge, where you made 3sc into 1 stitch). Now sew the straps to the shorts/skirt and crisscross them as pictured.
— Head :
Info :
HEAD- size 1,75mm crochet hook: Stuff as you go. Use coffee yarn color for both toys.
Round 1 :
Start 6sc in a mr (6)
Round 3 :
(inc, 1sc)* 6 (18)
Round 4 :
1sc, inc, (2sc, inc)* 5, 1sc (24)
Round 5 :
(inc, 3sc)* 6 (30)
Round 6 :
2sc, inc, (4sc, inc)* 5, 2sc (36)
Round 7 :
(inc, 5sc)* 6 (42)
Round 8 :
3sc, inc, (6sc, inc)* 5, 3sc (48)
Round 9-16 :
48sc- 8 rounds (48)
Round 17 :
18sc, 12 hdc inc, 18sc (60)
Round 18 :
9sc, (inc, 2sc)* 3, 24sc, (2sc, inc)* 3, 9sc (66)
Round 19-28 :
66sc- 10 rounds (66)
Round 29 :
(dec, 9sc)* 6 (60)
Round 30 :
4sc, dec, (8sc, dec)* 5, 4sc (54)
Round 31 :
(dec, 7sc)* 6 (48)
Round 32 :
3sc, dec, (6sc, dec)* 5, 3sc (42)
Round 33 :
(dec, 5sc)* 6 (36)
Round 34 :
2sc, dec, (4sc, dec)* 5, 2sc (30)
Round 35 :
(dec, 3sc)* 6 (24)
Round 36 :
1sc, dec, (2sc, dec)* 5, 1sc (18)
Round 37 :
(dec, 1sc)* 6 (12)
Round 38 :
6dec (6). Close the opening. Fasten off and cut the yarn.
— Head Decoration :
Info :
Use black threads to decorate the muzzle. Step 6 rounds up and down from a mr (beginning of the head). Sew the eyes between the 16th and the 17th rounds, with the distance 3hdc (focus on the 17th round, where you made hdc inc). Between the 5th and the 6th inc- blue pin and the 7th and the 8th inc – white pin. Embroider the eyebrows. Embroider maroon colored nose, it takes 6-8sc and 1 round tall.
— Head sculpting :
Info :
Work in the 16th round. Insert the needle into the foundation of the head and pull out of the 16th round under left eye (where blue pin is placed). Step 3sc, insert the needle under right eye (where white pin is placed) and pull out of foundation of the head into the same opening. Stretch threads and make a knot to fasten off. Hide inside the head.
Info :
Sew the head to the body, using remained yarn tail.
— Horns :
Info :
HORNS (make 2) - use size 1,75mm crochet hook: Graphite yarn color for both toys.
Part 1 Round 1 :
Start 5sc in a mr (5)
Part 1 Round 2 :
5inc (10)
Part 1 Round 3-5 :
10sc- 3 rounds (10). Fasten off and cut the yarn.
Part 2 Round 1 :
Start 5sc in a mr (5)
Part 2 Round 2 :
5inc (10)
Part 2 Round 3-4 :
10sc- 2 rounds (10). Fasten off and cut the yarn.
Part 3 Round 1 :
Start 5sc in a mr (5)
Part 3 Round 2 :
5inc (10)
Part 3 Round 3 :
10sc (10)
Info :
Do not cut the yarn; continue making basic part of the horn: Make ch2 from the 3rd part and connect part 2; 5sc part2, ch2 and connect part1; 5sc on part1.
Round 2 :
5sc on part 1, 2sc on chain, 5sc on part 2, 2sc on chain, 10sc on part 3, 2sc on chain, 5sc on part 2, 2sc on chain, 5sc on part 1 (38)
Round 3 :
dec, 34sc, dec (36)
Round 4 :
dec, 32sc, dec (34)
Round 5 :
dec, 30sc, dec (32)
Info :
Stuff the horns. Do not stuff basic part of the horn. Put together and sew into FLO. Leave a yarn tail to sew.
Info :
Sew the horns on the 13th round (from the place where you have finished making the head). With the distance 18sc.
— Ears :
Info :
EARS- size 1,75mm crochet hook: Do not stuff. Coffee yarn color.
Round 1 :
Start 6sc in a mr (6)
Round 4 :
(inc, 1sc)* 6 (18)
Round 6 :
1sc, inc, (2sc, inc)* 5, 1sc (24)
Round 8 :
1sc, dec, (2sc, dec)*5, 1sc (18)
Round 9 :
(dec, 1sc)* 6 (12)
Round 10 :
Put together and crochet 5sc through the loops of both sides. Sew the edges (1sc and 5sc). Leave a yarn tail to sew.
Info :
Sew the ears in front of the horns on the 12th round from the end of the head. With the distance 20sc.
— Scarf :
Info :
SCARF- size 1,75mm crochet hook: Grey yarn color.
Round 1 :
ch111, from the 2nd stitch from hook: 110sc (110)
Round 2 :
110sc -1round (110). Fasten off and cut the yarn.
Thank you for choosing this Reindeer amigurumi pattern! 🧶
This little reindeer is full of festive charm and handmade details to brighten your home. 🎄
Follow the steps carefully, enjoy the colorwork and assembly, and share your finished toy with pride! ✨