🧢 Beautiful ✨ Detailed πŸ’ Adorable

Crochet Hook Holder Pattern

Crochet Hook Holder Pattern
4.8β˜… Rating
2-4 Hours Time Needed
1.3K Made This
βœ‚οΈ

Beginner Friendly Level

Perfect for those just starting their crochet journey, with clear instructions and simple techniques

⏱️

Bite-Sized Project

Finishes in 2-4 hoursβ€”perfect for an afternoon of creative relaxation.

✨

Stylish Touch

An elegant detail to elevate any look, combining traditional techniques with contemporary design sensibilities.

About This Crochet Hook Holder Pattern

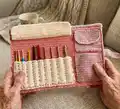
This pattern teaches you how to crochet a compact hook holder with multiple pockets, a hook protector flap, and a secure closure loop. Youll work simple single crochet rows in separate pieces, then sew them together for a tidy finished organizer. The design is perfect for using variegated or solid Cotton Cakes yarn to create a pretty, functional accessory.

Crochet Hook Holder Pattern crochet pattern - detailed view of completed project

Pieces are crocheted flat and joined at the end, making the construction easy to follow. The pattern includes pocket placement guidance and finishing tips to customize pocket widths for your hooks.

Why You'll Love This Crochet Hook Holder Pattern

I absolutely love this pattern because it turns a handful of basic crochet skills into a very useful, everyday accessory. I enjoy how quickly each rectangular piece works up with single crochet, giving visible progress and satisfaction. Sewing the pockets together and adjusting pocket widths to fit different hook brands is a rewarding finishing step I always enjoy. The pattern invites creativity with color choices, and I find it delightful to mix and match shades for a cheerful organizing solution.

Crochet Hook Holder Pattern step 1 - construction progress Crochet Hook Holder Pattern step 2 - assembly progress Crochet Hook Holder Pattern step 3 - details and accessories Crochet Hook Holder Pattern step 4 - final assembly and finishing

Switch Things Up

I love experimenting with colors, so I often switch the main inner layer to a solid color and pick a variegated shade for the outer pocket for contrast.

I sometimes change the size by adjusting the foundation chain; add or subtract chains in multiples of one to widen or narrow pockets for larger or smaller hooks.

I make mini versions by using lighter-weight yarn and a smaller hook to create a keychain-sized hook case perfect for travel.

I add a fabric lining for extra durability and a clean inside finish; cut lining pieces to the same dimensions and sew them before attaching the outer layer.

I replace the snap fasteners with a small button and loop for a different look β€” choose a decorative button to make it a focal point.

I like to embroider initials or small motifs on the outer layer to personalize each holder as a gift or workshop sample.

For a more professional finish, try topstitching the outer edge after assembly using matching thread and a sewing machine or careful hand-stitching.

I sometimes add elastic loops inside pockets for thinner hooks so they stay snug and dont slide down when the holder is closed.

If you prefer a zip closure, you can sew a zipper to the outer layer edge instead of using a flap and snap; this creates a secure pouch for loose items.

I recommend testing pocket spacing with a variety of hook brands; I keep a few prototype pieces to measure spacing before final sewing so I can make precise separator lines for each hook type.

Common Mistakes & How to Fix Them

βœ— Not counting chains accurately when starting a piece can change pocket widths; recount your foundation chain before working the first row and mark the correct number to avoid mismatched pieces. βœ— Sewing pockets in the wrong position will make the holder uneven; place and pin each pocket on the inner layer and check spacing with your hooks before permanently sewing. βœ— Skipping the test fitting step for hooks may lead to pockets that are too tight or too loose; insert your tallest and thinnest hooks to check spacing before sewing the separator lines. βœ— Working with inconsistent tension can cause uneven pocket rows and misaligned edges; maintain steady tension and check your row lengths frequently to ensure uniform pieces.

Crochet Hook Holder Pattern

Create a stylish and practical crochet hook holder to keep your hooks neat, accessible, and protected. This pattern guides you through making layered pockets, a hook protector flap, and a secure closure with clear row-by-row instructions. Youll enjoy customizing colors with Cotton Cakes yarn and sewing the pieces together for a polished finish. Perfect as a thoughtful handmade gift or a tidy addition to your craft bag.

Beginner Friendly 2-4 Hours

Materials Needed for Crochet Hook Holder Pattern

β€” Main Fabric

  • 01
    Yarnspirations Cotton Cakes Yarn (530yd/250g) - Lilac (less than 1 skein)
  • 02
    Yarnspirations Cotton Cakes Yarn (530yd/250g) - Watermelon (less than 1 skein)
  • 03
    Yarnspirations Cotton Cakes Yarn (530yd/250g) - Cream (less than 1 skein)

β€” Tools Required

  • 01
    Crochet hook size 4.0 mm
  • 02
    Scissors
  • 03
    Tapestry needle
  • 04
    Stitch markers (optional)
  • 05
    Sew-on snap fasteners (optional, used ones made by Singer)

Progress Tracker

0% Complete

β€” Instructions :

Info :

You can crochet each part separate from each other and then sew them all together at the end.

β€” Outer large pocket/layer :

Info :

Using the color Lilac, Ch 84

Round 1 :

starting from the 2nd ch from the hook: 1 sc in each ch, turn (83sts)

Round 2 - 52 :

1 sc in each st, turn

Info :

Fasten off.

β€” Inner layer :

Info :

Using the color Watermelon, Ch 84

Round 1 :

starting from the 2nd ch from the hook: 1 sc in each ch, turn (83sts)

Round 2 - 49 :

1 sc in each st, turn

Info :

Fasten off.

β€” Right bottom pocket :

Info :

Using the color Lilac, Ch 21

Round 1 :

starting from the 2nd ch from the hook: 1 sc in each ch, turn (20sts)

Round 2 - 25 :

1 sc in each st, turn

Info :

Fasten off.

β€” Right top pocket :

Info :

Using the color Lilac, Ch 21

Round 1 :

starting from the 2nd ch from the hook: 1 sc in each ch, turn (20sts)

Round 2 - 16 :

1 sc in each st, turn

Info :

Fasten off.

β€” Right top pocket closure :

Info :

Using the color Lilac, Ch 21

Round 1 :

starting from the 2nd ch from the hook: 1 sc in each ch, turn (20sts)

Round 2 - 8 :

1 sc in each st, turn

Round 9 - 12 :

1 sc dec, sc in each st, until the last 2 sts, 1 sc dec turn

Info :

Fasten off.

β€” Hook pocket :

Info :

Using the color Cream, Ch 47

Round 1 :

starting from the 2nd ch from the hook: 1 sc in each ch, turn (46sts)

Round 2 - 25 :

1 sc in each st, turn

Info :

Fasten off.

β€” Hook protector flap :

Info :

Using the color Cream, Ch 47

Round 1 :

starting from the 2nd ch from the hook: 1 sc in each ch, turn (46sts)

Round 2 - 14 :

1 sc in each st, turn

Info :

Fasten off.

β€” Outside closure loop :

Info :

Using the color Lilac, Ch 9

Round 1 :

starting from the 2nd ch from the hook: 1 sc in each ch, turn (8sts)

Round 2 :

1 sc in each st

Info :

Fasten off.

β€” Outside closure :

Info :

Using the color Lilac, Ch 36

Round 1 :

starting from the 2nd ch from the hook: 1 sc in each ch, turn (35sts)

Round 2 - 4 :

1 sc in each st, turn

Info :

Fasten off.

β€” Finishing the Crochet Hook Holder :

Info :

Sew the right bottom pocket to the inner layer. Then sew the top right pocket with flap to the inner layer as well. Next sew the hook pocket to the bottom left corner of the inner layer. Insert your tallest hook so you can see where to sew the protector flap to the inner layer. Finally, sew hook separator lines using a running stitch to the hook pocket in the distance you need for your hooks. Each brand has different hook measurements. So make sure to test it out. I made some smaller hook pockets for thinner hooks (Tunisian hooks) and some larger ones (Furls Hooks). Next, sew the outer layer to the inner layer and the closure loop and closure flap also to the outer layer. Finally I added (sewn with cotton thread) snap fasteners to the closure snap and top right pocket. You can also add snap fasteners for the back pocket (between outer and inner layer) to prevent your patterns/papers/magazines to fall out. Weave in any left-over ends.

Assembly Instructions

  • Sew the right bottom pocket to the inner layer, aligning the bottom edge and sewing with whip or mattress stitch for a neat seam.
  • Sew the top right pocket with its flap to the inner layer, positioning the flap so it folds over the pocket opening and securing the sides evenly.
  • Sew the hook pocket to the bottom left corner of the inner layer, then insert your tallest hook to mark where the protector flap should be attached and sew it accordingly.
  • Sew hook separator lines to the hook pocket using a running stitch at distances that fit your hooks, testing with several hook brands for correct spacing.
  • Sew the outer large layer to the inner layer around the edges, then attach the closure loop and closure flap to the outer layer and add snap fasteners where desired.

Important Notes

  • πŸ’‘Pin all pockets and closure pieces in place before sewing to ensure correct alignment and symmetry.
  • πŸ’‘Test pocket widths with your actual hooks before sewing separator lines, as different brands and styles have different measurements.
  • πŸ’‘Weave in all leftover ends after assembly to keep the inside neat and prevent snagging on hooks.

This Crochet Hook Holder Pattern helps you organize and protect your hooks with pretty pockets and a secure closure. It uses simple single crochet rows to create functional, stackable pieces you can sew together for a polished finish. Make one as a gift or keep it for your own craft bagβ€”small, pretty, and so useful! 🧢✨

You ask,

we answer.

FAQs

What size will the finished piece be?

The finished holder measures approximately 10.75 x 15 inches when open and about 10.75 x 8 inches when closed, using the recommended yarn and hook size.

Can I use different yarn weights for this pattern?

Yes, you can use different yarn weights, but this will change the final size and pocket spacing; adjust your hook size accordingly and test-fit hooks before finishing.

Do I need prior crochet experience for this pattern?

This pattern is rated Beginner Friendly, so basic knowledge of single crochet and chaining is sufficient, along with simple sewing techniques for assembly.

How long does this project typically take to complete?

Most crocheters complete this project in 2-4 hours, though time may vary depending on experience level and how many custom adjustments you make.