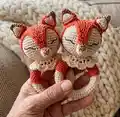
🧢 Beautiful ✨ Detailed πŸ’ Adorable

Rattle Fox Amigurumi Pattern

Rattle Fox Amigurumi Pattern
4.5β˜… Rating
2-4 Hours Time Needed
4.1K Made This
βœ‚οΈ

Intermediate Level

Ideal for those with basic crochet experience, featuring slightly more advanced stitches and techniques to expand your skills.

⏱️

Bite-Sized Project

Finishes in 2-4 hoursβ€”perfect for an afternoon of creative relaxation.

🎁

Tiny Treasure

Small, sweet, and gift-worthy creations that fit perfectly in the palm of your hand with detailed charm.

About This Rattle Fox Amigurumi Pattern

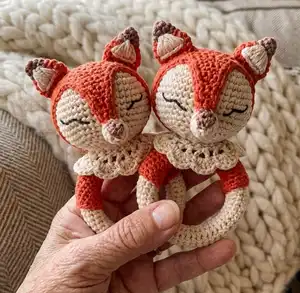
This pattern teaches you how to crochet a tiny fox rattle mounted on a wooden ring, worked mostly in continuous spirals and small flat sections. You will make the head, upper head cap, nose, ears, and a decorative collar, then assemble and embroider sleepy eyes for character. Photo instructions accompany the text to help with tricky steps like working around a wooden ring.

Rattle Fox Amigurumi Pattern crochet pattern - detailed view of completed project

Perfect for creating a soft, tactile baby rattle or a small keepsake toy, this design uses fingering weight cotton yarn and small hooks for a neat finish. The pattern includes two options for covering the wooden ring and clear assembly photos.

Why You'll Love This Rattle Fox Amigurumi Pattern

I absolutely love this pattern because it transforms simple stitches into an irresistibly cute fox rattle that is perfect for gifting. I enjoy the delicate shaping of the head and the clever upper head cap which gives the fox its expressive face. The project is small and satisfying β€” you can finish it quickly but still practice increases, decreases and sewing. I also love how customizable it is: change colors, make mini sets, or add embroidered details to personalize each toy.

Rattle Fox Amigurumi Pattern step 1 - construction progress Rattle Fox Amigurumi Pattern step 2 - assembly progress Rattle Fox Amigurumi Pattern step 3 - details and accessories Rattle Fox Amigurumi Pattern step 4 - final assembly and finishing

Switch Things Up

I love experimenting with colorways for this small rattle; try pastel beige and mint for a neutral baby look or bright coral and cream for a playful version.

You can change the yarn weight and hook to adjust size: I often use sport or DK yarn with a larger hook for a chunkier rattle, or thinner thread for a mini keychain version.

I sometimes replace the wooden ring with a larger smooth teething ring or a resin ring for different textures; just check safety for babies before gifting.

Embroider different eye expressions to change personality β€” short curved sleepy lines or small open eyes create very different faces.

Add a tiny bow, felt scarf, or a crocheted hat to turn the fox into a seasonal character or themed set for nursery decor.

To make a keychain, omit the rattle insert, use thinner yarn and a smaller ring, and sew a small loop at the top for a keyring.

I often experiment by making a matching mini bunny or bear using the same head pattern and swapping ears to create a full set of woodland friends.

Try using wool-blend yarn for a softer, more plush finish β€” note this will change the feel and care instructions of the finished toy.

If you want posable ears, sew a small piece of craft wire into the ear seam before stuffing and closing to hold gentle shapes.

For gifting, make a matching set of two rattles in complementary colors and place them in a simple cloth bag for a lovely handmade present.

Common Mistakes & How to Fix Them

βœ— Skipping the use of stitch markers when working in a continuous spiral can make you lose track of round starts; place a marker at the beginning of each round and move it up as you work to maintain accurate counts. βœ— Working around the wooden ring with too-large a hook produces loose fabric that gaps; use the smaller hook recommended and crochet tightly around the ring, ripping back and reducing one stitch if the fabric is moving loosely. βœ— Not stuffing the head before closing causes lumps or floppy shape; stuff gradually while shaping, using tweezers for small areas and ensuring the rattle is positioned inside before finishing. βœ— Forgetting to leave long tails for sewing means you will struggle to attach parts; always leave the specified long tail (for example 18-20in/45-50cm for head sewing) to comfortably sew around the ring and attach pieces.

Rattle Fox Amigurumi Pattern

Make a sweet handmade fox rattle that is perfect for baby gifts and keepsakes. This detailed pattern guides you through crocheting a small rattle head, ears, nose and collar, plus how to attach it to a wooden ring. With clear round-by-round instructions and photo-guided techniques, you will create a charming, safe toy for little hands.

Intermediate 2-4 Hours

Materials Needed for Rattle Fox Amigurumi Pattern

β€” Main Fabric

  • 01
    Vita Cotton Lily 100% cotton, 1.75 oz/50g approx 137 yds/125 m - main yarn (beige) - 2 hanks suggested
  • 02
    Contrast Color (CC) yarn orange - approx 87 yds/80 m total for pieces
  • 03
    Brown yarn (CC1) - 10-15 g for ear tips and nose detail
  • 04
    Suggested substitutes: 'Scheepjes Catona', 'Alpina Anabel' - choose similar fingering/cotton weight to match gauge

β€” Tools Required

  • 01
    Crochet hook size 2.5 mm
  • 02
    Crochet hook size 2.0 mm (use when working around the wooden ring)
  • 03
    Wooden ring approx 2-3 in / 60-70 mm in diameter (beech recommended)
  • 04
    Rattle approx 1 in / 24-30 mm in diameter
  • 05
    Polyester stuffing
  • 06
    Scissors
  • 07
    Black embroidery floss or fingering weight yarn for eyes
  • 08
    Tapestry needle
  • 09
    Stitch markers
  • 10
    Tweezers (optional, for stuffing small areas)

Progress Tracker

0% Complete

β€” Notes :

Info :

All pieces worked in a continuous spiral. Do not join to work in the rnd, just work sc in the next st. Place marker or use contrasting color yarn to mark beg of rnd. Use hook 2.5 mm or size matching your yarn and obtaining gauge. When work around the wooden ring, use smaller size hook, it will be easier to work.

β€” Working around the ring. Option 1 :

Info :

Work around the ring in a continuous spiral. The total number of sts depends on the size of your wooden ring and yarn. For my size ch10 using hook 2.5mm, then work around the ring using hook 2mm.

Info :

Join chain with sl st around the ring. Then sc in each st around. The first rnd is the most difficult.Then start to work in a continuous spiral, sc in each st. if it's still uncomfortable to work, try to use smaller size hook. Pay attention to your tension, crochet around the ring tightly. If the fabric is moving loosely, rip it out and start over again with one st less.

Info :

Cont to work until the half or a bit less than half of the ring is covered. End with sl st. The beginning and the end of work should be inside of the ring. Weave in ends. Pull the end through the last rnd to tighten the fabric around the ring, and then pull it through the fabric inside the ring.

β€” Working around the ring. Option 2 :

Info :

If option 1 is too complicated for you, you can crochet a rectangle, working sc. For my ring size, ch20 and work for 9 rows. When the rectangle is finished, fold it over the ring and sew it, the fabric should be tight around the ring. The seam should be inside the ring. Weave in ends using tapestry needle

β€” Head :

Info :

With MC work the head, hook - 2,5 mm

Round 1 :

6sc in magic ring = 6 sts

Round 2 :

(inc) * 6 times = 12 sts

Round 3 :

(inc, sc in next st) * 6 times = 18 sts

Round 4 :

(inc, sc in next 2 sts) * 6 times = 24 sts

Round 5 :

(inc, sc in next 3 sts) * 6 times = 30 sts

Round 6 :

(inc, sc in next 4 sts) * 6 times = 36 sts

Round 7 :

(inc, sc in next 5 sts) * 6 times = 42 sts

Round 8 :

(inc, sc in next 6 sts) * 6 times = 48 sts

Round 9-15 :

48sc (work even for 7 rnds)

Round 16 :

(dec, sc in next 6 sts) * 6 times = 42 sts

Round 17 :

(dec, sc in next 5 sts) * 6 times = 36 sts

Round 18 :

(dec, sc in next 4 sts) * 6 times = 30 sts

Round 19 :

(dec, sc in next 3 sts) * 6 times = 24 sts

Info :

Stuff the head and put rattle inside.

Round 20 :

(dec, sc in next 2 sts) * 6 times = 18 sts

Info :

Stuff the head tightly, for your convenience you can use tweezers.

Round 21 :

(dec, sc in next st) * 6 times = 12 sts

Round 22 :

(dec) * 6 times = 6 sts

Info :

Bind off rem 6 sts using a needle. Leave a long tail to sewing around a ring (approx 18-20in/45-50cm). The head is done.

β€” Upper head piece :

Info :

With CC work the upper head piece, hook - 2,5 mm

Round 1 :

6sc into magic ring = 6 sts

Round 2 :

(inc) * 6 times =12 sts

Round 3 :

(inc, sc in next st) * 6 times = 18 sts

Round 4 :

(inc, sc in next 2 sts) * 6 times = 24 sts

Round 5 :

(inc, sc in next 3 sts) * 6 times = 30 sts

Round 6 :

(inc, sc in next 4 sts) * 6 times = 36 sts

Round 7 :

(inc, sc in next 5 sts) * 6 times = 42 sts

Round 8 :

(inc, sc in next 6 sts) * 6 times = 48 sts

Round 9-13 :

sc in every st (work even for 5 rnds) = 48 sts

Round 14 :

(dec, sc in next 6 sts) * 6 times = 42 sts

Round 15 :

sc in every st (work 1 rnd even) = 42 sts

Info :

Turn the piece and start to work flat.

Row 16 :

ch1, sc in next 6 sts, turn.

Row 17 :

ch1, sc in next 6 sts, turn.

Row 18 :

sc in next 5 sts starting from the 2nd st from the hook, turn.

Row 19 :

sc in next 4 sts starting from the 2nd st from the hook, turn.

Row 20 :

ch1, sc in next 4 sts, turn.

Row 21 :

sc in next 3 sts starting from the 2nd st from the hook, turn.

Row 22 :

sc in next 2 sts starting from the 2nd st from the hook, turn.

Row 23-25 :

ch1, sc in next 2 sts.

Info :

Sc in every st to end of upper head piece.

Info :

Sl st in next st, fasten off leaving a long tail approx 25-27 in(65-70 cm) for sewing to the head.

β€” Nose :

Info :

Work with MC yarn (beige). Hook - 2,5 mm

Round 1 :

5sc into magic ring = 5 sts

Round 2 :

(inc)* 5 times = 10 sts

Round 3-5 :

sc in next 10 (work even for 3 rnds)= 10 sts

Info :

Sl st in next st, fasten off leaving a tail for sewing.

Info :

With CC1 yarn or black work 6sc into magic ring for the nose tip, fasten off and sew it to the nose or embroider the tip of the nose using brown or black yarn. Stuff the nose firmly.

β€” Ears (Make 2) :

Info :

With brown yarn and hook size 2.5mm work as foll:

Round 1 :

6 sc into magic ring = 6 sts

Round 2 :

sc in every st (work even around) = 6 sts

Round 3 :

(inc, sc in next 2 sts) * 2 times = 8 sts= 8

Info :

Cont to work with CC yarn:

Round 4 :

(inc, sc in next st) * 4 times = 12 sts

Round 5 :

(inc, sc in next 5 sts) * 2 times = 14 sts

Round 6 :

(inc, sc in next 6 sts) * 2 times = 16 sts

Round 7 :

sc in every st (work even around) = 16 sts

Info :

Sl st in next st, fasten off leaving a long tail for sewing to the head.

Info :

With MC yarn embroider triangle on the ear.

Info :

Rep the same for the 2nd ear.

β€” Assembling :

Info :

Sew the nose to the head at level of row 6 from the last inc, attaching the upper head piece to the head, checking the right place for embroidering the nose. See photo-instructions for sewing the upper head piece and the nose.

Info :

Then outline the eyes and remove the upper head piece. With black embroidery floss or fingering weight yarn embroider sleepy eyes. You can bring the needle from the back side of the head. The upper head piece will hide all the knots, when attaching it. Embroider the eyes as it`s shown on the photo, mirror the 2nd eye. Pay attention to the symmetrical position of the eyes regarding to the nose. For your convenience attach the upper head piece. When eyes are finished, secure the thread on the back of the head and cut it.

Info :

Now sew the upper head piece. Attach it as it`s shown on the photo and sew it to the head around the edge.

Info :

Sew the ears at level of 2-3 rows from the edge of the upper head piece with 5 sts in between. The head is done.

Info :

With MC yarn tail sew the head to the wooden ring. When you sew the head to the ring, push it slightly, the neck shouldn`t be too thin. The head should be tightly attached to the ring, I recommend to sew it around twice.

β€” Collar :

Info :

Now make a collar. With MC yarn ch22. Then work flat as foll:

Row 1 :

sc in 2nd st from the hook, sc in next 20 sts, turn.

Row 2 :

ch4, dc in 1st st, [sk1, dc in next st, ch1, dc in the same st] 10 times, turn.

Row 3 :

ch2, 2 dc in next ch space, sc in next st, [5 dc in next ch space, sc in next st] 10 times, 3 dc in last post. The collar is ready. Sew it as it`s shown on the photo.

Assembly Instructions

  • Sew the nose to the head at the level of row 6 from the last increase, then attach the upper head piece to the head and check placement for embroidering the nose.
  • Outline and embroider sleepy eyes with black embroidery floss, bringing the needle from the back of the head so the upper head piece hides knots; mirror the second eye for symmetry.
  • Sew the ears 2-3 rows in from the edge of the upper head piece with 5 stitches between them, then secure the ears and weave in tails.
  • With MC yarn tail sew the head securely to the wooden ring, pushing slightly so the neck is not too thin; sew around twice for a tight attachment.
  • Sew the finished collar to the neck edge as shown in photos, ensuring it sits evenly around the joining seam.

Important Notes

  • πŸ’‘All pieces are worked in a continuous spiral; do not join roundsβ€”use a stitch marker to mark the beginning of each round.
  • πŸ’‘When crocheting around the wooden ring use a smaller hook (2.0 mm) for a tighter fabric and to avoid gaps.
  • πŸ’‘Stuff the head firmly but gradually, using tweezers to push stuffing into small areas so the rattle sits centered and the shape remains smooth.
  • πŸ’‘Leave long tails for sewing parts to the ring and for attaching the upper head piece; specified lengths are approx 18-20in (45-50cm) for the head and 25-27in (65-70cm) for the upper head piece.

This adorable Rattle Fox makes a perfect handmade baby gift or keepsake, small enough for little hands and beautiful enough to treasure. The pattern includes clear step-by-step rounds and helpful photos to guide you through each assembly stage. Make one in natural cotton for a soft, modern look or mix colors for playful character variations. 🧢🧡

You ask,

we answer.

FAQs

What size will the finished piece be?

Finished size depends on your wooden ring; using a 60-70mm ring and the recommended yarn, the rattle measures roughly 10-12 cm from top of head to bottom of ring.

Can I use different yarn weights for this pattern?

Yes, you can substitute yarns, but size will change. Choose an appropriate hook to match gauge and consider a sturdier rattle insert if using non-cotton yarns.

Do I need prior crochet experience for this pattern?

This pattern is rated intermediate, so basic knowledge of single crochet, increases, decreases, and working in spirals is recommended for best results.

How long does this project typically take to complete?

Most crocheters complete this project in 2-4 hours depending on experience and whether you follow photo assembly steps carefully.