🧢 Beautiful ✨ Detailed πŸ’ Adorable

Rattle Bunny Amigurumi Pattern

Rattle Bunny Amigurumi Pattern
4.9β˜… Rating
2-4 Hours Time Needed
1.8K Made This
βœ‚οΈ

Intermediate Level

Ideal for those with basic crochet experience, featuring slightly more advanced stitches and techniques to expand your skills.

⏱️

Bite-Sized Project

Finishes in 2-4 hoursβ€”perfect for an afternoon of creative relaxation.

🧸

Cute Companion

An adorable friend to cherish, handcrafted with love to bring comfort and joy for years to come.

About This Rattle Bunny Amigurumi Pattern

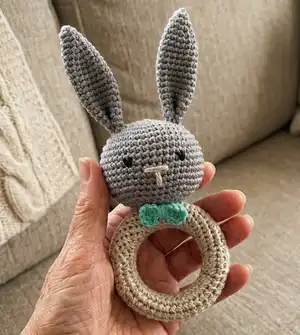
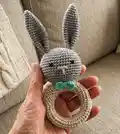
This pattern creates a small bunny rattle mounted on a wooden ring, worked mainly in single crochet in the round. You will crochet the head, ears, and a tiny bow and secure the head around a wooden ring with a rattle inside. Clear step-by-step photos and tips are included to help you work around rings and assemble parts neatly.

Rattle Bunny Amigurumi Pattern crochet pattern - detailed view of completed project

Designed for crocheters with basic experience, it teaches increases, decreases, and sewing techniques. The finished toy is compact, baby-friendly, and perfect as a handmade gift.

Why You'll Love This Rattle Bunny Amigurumi Pattern

I absolutely love this pattern because it turns simple stitches into a charming, functional toy that babies and parents adore. I enjoy how the wooden ring and soft cotton yarn combine for natural texture and great tactile contrast. The pattern is compact yet satisfying to make, giving a finished giftable item in just a few hours. I also love that you can personalize colors and small details to make each rattle unique. Sewing the head securely to the ring and stitching on the tiny bow always feels so rewarding when the toy comes together.

Rattle Bunny Amigurumi Pattern step 1 - construction progress Rattle Bunny Amigurumi Pattern step 2 - assembly progress Rattle Bunny Amigurumi Pattern step 3 - details and accessories Rattle Bunny Amigurumi Pattern step 4 - final assembly and finishing

Switch Things Up

I love how easy it is to customize this rattle by changing yarn colors; try soft pastels for a baby shower gift or bright brights for a playful toy.

To make a larger rattle, use a heavier weight cotton yarn and a larger wooden ring, and increase hook size accordingly to keep stitch density similar.

For a tiny keychain version, use fingering weight yarn with a 1.75–2.0 mm hook and a small wooden or plastic ring for a mini amigurumi look.

I often swap the embroidered face for safety eyes when making for older children, but always consider safety and age-appropriateness for your recipient.

Try embroidering different expressions or adding blush with a tiny bit of fabric paint to create unique personalities for each bunny.

Make a whole set by crocheting different colored bows or scarves that can be tied on and changed, giving each bunny a wardrobe.

If you want extra posability, consider inserting a short piece of craft wire in the ears to pose them slightly for a whimsical look.

You can replace the wooden ring with a plastic teething-safe ring, but ensure materials are non-toxic and suitable for babies.

I often embellish with tiny crocheted flowers or initial tags for personalized baby gifts that feel extra special and handmade.

For a textured finish, experiment with alternating rows of HDC or front loop only single crochet to create subtle ridges on the ring cover.

Common Mistakes & How to Fix Them

βœ— Skipping stitch markers when working in continuous spiral often causes misplaced beginnings; use a marker or contrasting yarn at the start of each round to maintain correct counts. βœ— Working too loosely around the wooden ring makes the fabric slip and look sloppy; tighten your tension and switch to the smaller hook when crocheting around the ring. βœ— Forgetting to insert the rattle before closing the head results in having to reopen stitches; place the rattle and stuff gradually before finishing the final decreases. βœ— Overstuffing the head can distort its shape and make sewing difficult; stuff firmly but in small increments and check the shape as you go to maintain even fullness. βœ— Not counting decreases accurately will change stitch totals and shape; count stitches after every decrease round to ensure you reach the expected stitch counts.

Rattle Bunny Amigurumi Pattern

Make a sweet hand-held rattle bunny using this step-by-step crochet pattern. You will learn how to work in continuous spirals, crochet around a wooden ring, and assemble small amigurumi pieces. The pattern includes clear photos, materials list, and full round-by-round instructions so you can create a safe baby rattle toy. Perfect for handmade gifts and nursery keepsakes.

Intermediate 2-4 Hours

Materials Needed for Rattle Bunny Amigurumi Pattern

β€” Main Fabric

  • 01
    Vita Cotton Lily 100% cotton, 1.75 oz/50g (approx 137 yds / 125 m) - main color, 1 hank
  • 02
    Suggested substitute yarn: Scheepjes Catona or Alpina Anabel - approx 87 yds / 80 m (adjust quantity to match gauge)
  • 03
    Small amount of contrast yarn or embroidery floss for nose and eyes (black and white as needed)

β€” Tools Required

  • 01
    Crochet hook size 2.5mm
  • 02
    Crochet hook size 2.0mm (recommended for working around wooden ring)
  • 03
    Wooden ring approx 2-3 in / 60-70 mm in diameter (beech recommended)
  • 04
    Rattle approx 1 in / 24-30 mm in diameter
  • 05
    Polyester stuffing
  • 06
    Scissors
  • 07
    Tapestry needle for sewing
  • 08
    Black embroidery floss or yarn for eyes and nose
  • 09
    Stitch marker or contrasting scrap yarn
  • 10
    Tweezers (optional, for stuffing the rattle inside the head)

Progress Tracker

0% Complete

β€” Required Skills :

Info :

Sc, magic ring, increases, decreases, sewing parts together.

β€” Materials :

Info :

1 hanks of Vita Cotton Lily 100% cotton, 1.75 oz/50g approx 137yds/125m. You can substitute yarn just make sure that it matches original proportions. Gauge: 26 sc x 25 rows = 4in(10cm). Suggested substitute yarn "Scheepjes Catona", "Alpina Anabel" Yardage approx 87yds/80m. Crochet hook 2mm and 2.5mm. Wooden ring approx 2-3in/60-70mm in diameter (I recommend beech wooden ring for you). Rattle approx 1in/24-30mm in diameter. Stuffing. Scissors. Black embroidery floss or yarn. Tapestry needle.

β€” Abbreviations (US terminology) :

Infos :

beg of rnd - beginning of round. ch - chain. cont - continue. dc - double crochet. dec - decrease (sc2tog)(I recommend to make invisible decreases). inc - increase (2sc in one st). foll - follow(ing)(s). tr - treble crochet. rep - repeat. rnd - round. sc - single crochet. sl st - slip stitch. st(s) - stitch(es). rem - remain(ing). ( ) * n - rep the content of the parenthesis as many times as the number after parenthesis says. The number in the end is the total number of stitches in the rnd.

β€” Notes :

Info :

All pieces worked in a continuous spiral. Do not join in the rnd, just work sc in the next st. Place marker or use contrasting color yarn to mark beg of rnd. Use hook 2.5 mm or size matching your yarn and obtaining gauge. When work around the wooden ring, use smaller size hook, it will be easier to work.

β€” Working around the ring. Option 1 :

Info :

Work around the ring in a continuous spiral. The total number of sts depends on the size of your wooden ring and yarn. For my size ch10 using hook 2.5mm, then work around the ring using hook 2mm.

Info :

Join chain with sl st around the ring. Then sc in every st around. The first rnd is the most difficult. Then start to work in a continuous spiral, sc in each st. If it’s still uncomfortable to work, try to use smaller size hook. Pay attention to your tension, crochet around the ring tightly. If the fabric is moving loosely, rip it out and start over again with one st less.

Info :

Cont to work until half or a less than half of the ring is covered. End with sl st. The beginning and the end of work should be inside of the ring. Weave in ends. Pull the end through the last rnd to tighten the fabric around the ring, and then pull it through the fabric inside the ring.

β€” Working around the ring. Option 2 :

Info :

If option 1 is too complicated for you, you can crochet a rectangle, working sc. For my ring size, ch20 and work for 9 rows. When the rectangle is finished, fold it over the ring and sew it, the fabric should be tight around the ring. The seam should be inside the ring. Weave in ends using tapestry needle.

β€” Head :

Round 1 :

6 sc in magic ring = 6 sts

Round 2 :

(inc) * 6 times = 12 sts

Round 3 :

(inc, sc in next st) * 6 times = 18 sts

Round 4 :

(inc, sc in next 2 sts) * 6 times = 24 sts

Round 5 :

(inc, sc in next 3 sts) * 6 times = 30 sts

Round 6 :

(inc, sc in next 4 sts) * 6 times = 36 sts

Round 7 :

(inc, sc in next 5 sts) * 6 times = 42 sts

Round 8 :

(inc, sc in next 6 sts) * 6 times = 48 sts

Round 9-15 :

48 sc (work even for 7 rnds)

Round 16 :

(dec, sc in next 6 sts) * 6 times = 42 sts

Round 17 :

(dec, sc in next 5 sts) * 6 times = 36 sts

Round 18 :

(dec, sc in next 4 sts) * 6 times = 30 sts

Round 19 :

(dec, sc in next 3 sts) * 6 times = 24 sts

Info :

Embroider the eyes at level of row 3 or 4 after the last inc with 7 sts between the eyes. Embroider the nose one row below the eyes.

Info :

Embroider eyes and nose, stuff the head in half and put the rattle inside.

Round 20 :

(dec, sc in next 2 sts) * 6 times = 18 sts

Info :

Stuff the head tightly, for your convenience you can use tweezers.

Round 21 :

(dec, sc in next st) * 6 times = 12 sts

Round 22 :

(dec) * 6 times = 6 sts

Info :

Bind off rem 6 sts using a needle. Leave a long tail to sewing around a ring (approx 18-20in/45-50cm). The head is done.

β€” Ears (Make 2) :

Round 1 :

4 sc into magic ring = 4 sts

Round 2 :

(inc, sc in next st) * 2 times = 6 sts

Round 3 :

(inc, sc in next 2 sts) * 2 times = 8 sts

Round 4 :

(inc, sc in next 3 sts) * 2 times = 10 sts

Round 5 :

(inc, sc in next 4 sts) * 2 times = 12 sts

Round 6 :

(inc, sc in next 5 sts) * 2 times = 14 sts

Round 7 :

(inc, sc in next 6 sts) * 2 times = 16 sts

Round 8-20 :

sc in next 16 sts (work even for 13 rnds)

Info :

Sl st in next st, finish off leaving a long tail for sewing to the head. Fold the ear in half as it’s shown on the pic and sew it.

β€” Bow :

Info :

In magic ring ch4, tr4, ch4, sl st into magic ring, ch4, tr4, ch4, sl st. Finish off leaving a long tail for sewing. Fasten off, tighten the magic ring and wrap it using a tail.

β€” Assembling :

Info :

Sew the ears to the head. Sew bunny ears to the head at level of row 4 from the top of the head. I recommend sewing it around twice.

Info :

Sew the head to the ring. Place the head directly in the middle and press it a bit as it’s shown on the pic. Sew the head to the ring, I recommend to sew it around twice. Pay attention to the position of the head, it should be in the middle. If it shifted a bit, start over.

Info :

Sew the bow to neck.

Assembly Instructions

  • Sew the ears to the head at the level of round 4 from the top and secure by sewing around twice for stability.
  • Place the head directly in the middle of the wooden ring, press slightly to position, then sew the head to the ring around twice to secure.
  • Insert the rattle into the head before finishing stuffing, then complete the final decreases and bind off leaving a long tail to sew around the ring (approx 18-20in/45-50cm).
  • Fold each ear in half and sew along the folded edge to create the ear shape before attaching to the head as shown in photos.
  • Sew the small crocheted bow to the neck area between head and ring, fastening securely with a tapestry needle and tail.

Important Notes

  • πŸ’‘Use stitch markers or contrasting yarn to mark the beginning of each round when working in a continuous spiral to avoid losing your place.
  • πŸ’‘When crocheting around the wooden ring use a smaller hook and tight tension so the fabric sits snugly and does not slip off.
  • πŸ’‘Weave in ends securely and leave a long tail after binding off the head to sew evenly around the ring; this helps create a neat finish.
  • πŸ’‘Stuff the head gradually and firmly but not overly tight to preserve shape and avoid the stuffing bulging through stitches.

This charming Rattle Bunny pattern makes a sweet, handmade gift that babies will love to hold and parents will cherish. The wooden ring and soft cotton yarn give a natural, tactile feel that is both attractive and practical. Make one as a quick gift or a set for a baby shower β€” happy crocheting! 🧢🐰

You ask,

we answer.

FAQs

What size will the finished piece be?

The finished rattle measures approximately 4-5 inches tall including ears, with the wooden ring about 2-3 inches in diameter depending on ring size used.

Can I use different yarn weights for this pattern?

Yes, you can substitute yarn but it will change the final size; adjust hook sizes to match gauge, and ensure the fabric fits snugly around the wooden ring.

Do I need prior crochet experience for this pattern?

This pattern is rated intermediate, so basic knowledge of single crochet, increases, decreases, and working in continuous spiral is recommended.

How long does this project typically take to complete?

Most crocheters finish this rattle in 2-4 hours, depending on experience and assembly time.

Is the rattle safe for babies?

Use a secured, baby-safe rattle and well-sewn parts; avoid small detachable parts for very young infants and follow safety guidelines for handmade baby toys.