🧢 Beautiful ✨ Detailed πŸ’ Adorable

Rainbow Bunny Amigurumi Pattern

Rainbow Bunny Amigurumi Pattern
4.4β˜… Rating
5-7 Hours Time Needed
1.2K Made This
βœ‚οΈ

Intermediate Level

Ideal for those with basic crochet experience, featuring slightly more advanced stitches and techniques to expand your skills.

⏱️

Weekend Treat

Takes 5-7 hours, making it an enjoyable project to finish over a couple of days.

🧸

Cute Companion

An adorable friend to cherish, handcrafted with love to bring comfort and joy for years to come.

About This Rainbow Bunny Amigurumi Pattern

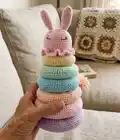
This pattern teaches you how to crochet a pastel Rainbow Bunny stacking toy made from six soft rings and a cone body topped with a bunny detail. You will work each ring in the round, sew pieces together, and stuff as you go for even shape and balance. The project is ideal for gifting, nursery decor, or a fun handmade toy to keep or share.

Rainbow Bunny Amigurumi Pattern crochet pattern - detailed view of completed project

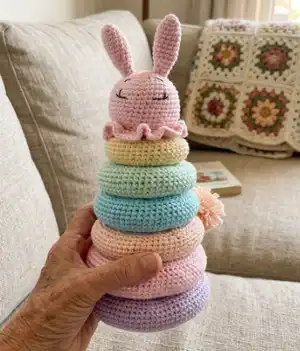
Round-by-round instructions and clear abbreviations are included for each color ring and the cone. Photos illustrate assembly so you can sew the cone into the top ring and stack the rings neatly.

Why You'll Love This Rainbow Bunny Amigurumi Pattern

I absolutely love this pattern because it combines simple amigurumi techniques with bright pastel colorwork that feels fresh and modern. I enjoy how each ring is a quick, satisfying mini-project, letting you see progress fast. Sewing the cone into the top ring and stacking the pieces brings a playful, tactile result that kids adore. The pattern also encourages creativity β€” you can change colors, sizes, or make a mini set for keychains.

Rainbow Bunny Amigurumi Pattern step 1 - construction progress Rainbow Bunny Amigurumi Pattern step 2 - assembly progress Rainbow Bunny Amigurumi Pattern step 3 - details and accessories Rainbow Bunny Amigurumi Pattern step 4 - final assembly and finishing

Switch Things Up

I love how easy it is to customize this pattern by changing colorsβ€”try bright primary colors for a bold nursery toy or soft pastels for a gentle baby gift.

To make the toy bigger or smaller, change your yarn weight and hook size: bulky yarn with a larger hook gives a chunky version, while thin yarn makes a sweet mini set.

I often add embroidery or tiny felt accessories to personalize each bunny; a little bow, a tiny pompom tail, or embroidered cheeks can change the mood completely.

Consider swapping the cone for a wooden dowel or ring if you want a sturdier stacker for very active toddlers; it will make the set more durable.

For a travel-friendly version, make smaller rings and add a loop to the top so the set can be hung on a stroller or diaper bag.

I also enjoy making matching sets: make two complete sets in complementary colors for siblings or twins to play together.

If you prefer sewn seams to crocheted joins, leave longer tails and stitch the pieces inside-out for an invisible finish on the outside.

Try varying the stuffing level in each ring for different tactile experiencesβ€”firmer rings are easier to stack while softer rings are cuddly and squeezable.

To add a learning element, embroider numbers or letters on the rings so children can practice counting and color recognition as they stack.

I recommend testing stitch counts on a small swatch before starting a ring so you can adjust tension and ensure rings sit evenly when stacked.

Common Mistakes & How to Fix Them

βœ— Skipping stitch markers when closing rounds makes counting very difficult; place a marker at the end of every round and move it each row to keep track. βœ— Not stuffing gradually causes lumps or an uneven shape; stuff a small amount often, shaping as you go so rings stay even and round. βœ— Cutting yarn tails too short prevents secure sewing of parts; leave a long tail (about 10-15 cm) when finishing pieces for neat sewing. βœ— Crocheting with inconsistent tension produces irregular ring sizes and poor stacking; use the same tension throughout and check circumference as you go to match sizes. βœ— Forgetting to count increases and decreases leads to wrong stitch counts; count after each increase/decrease round and mark pattern repeats to stay accurate.

Rainbow Bunny Amigurumi Pattern

Create a soft, pastel Rainbow Bunny stacking toy with this friendly amigurumi pattern. You will crochet six colorful rings, a cone body, and a sweet bunny head detail to stack into a playful tower. The pattern uses simple single crochet shaping and clear round-by-round instructions so you can follow along easily. Make a delightful handmade gift or nursery toy with cozy yarn and a bit of stuffing.

Intermediate 5-7 Hours

Materials Needed for Rainbow Bunny Amigurumi Pattern

β€” Main Fabric

  • 01
    Yarn "YARN-ART JEANS" Pink color N 74 - 55 g
  • 02
    Yarn "YARN-ART JEANS" Purple color N 89 - 26 g
  • 03
    Yarn "YARN-ART JEANS" Peach color N 73 - 15 g
  • 04
    Yarn "YARN-ART JEANS" Blue color N 76 - 10 g
  • 05
    Yarn "YARN-ART JEANS" Green color N 79 - 9 g
  • 06
    Yarn "YARN-ART JEANS" Yellow color N 67 - 8 g
  • 07
    Small amount of black yarn to embroider the eyes
  • 08
    You can use any similar weight yarn and colors you like

β€” Tools Required

  • 01
    Crochet hook size 2.5 mm
  • 02
    Toy filling (polyester stuffing)
  • 03
    Stitch marker or a little piece of a different color yarn
  • 04
    Needles for sewing up
  • 05
    Scissors
  • 06
    Pins for assembly

Progress Tracker

0% Complete

β€” Notes :

Info :

Use a stitch marker to mark the ending of the round. Move the stitch marker after finish each round. When finishing any of the body parts except the head leave a long yarn tail (around 10-15cm) which you can use for sewing. Fill the stuffing into the body parts while crocheting them. Be sure that you fill the rings with the same amount of fiberfill, so rings will have the same shape.

β€” Finished Size :

Info :

Approximately: 27 cm (10.62 inch). Please note that this size may vary depending on the yarn and crochet hook size used.

β€” Abbreviations :

Infos :

MR - magic ring. sc - single crochet. dc - double crochet. inc - increase. dec - decrease. sl st - slip stitch. ch - chain.

β€” Cone : PINK COLOR :

Round 1 :

5 sc in MR (5)

Round 2 :

5 inc (10)

Round 3 :

(sc, inc) x 5 (15)

Round 4-8 :

sc in each st (15)

Round 9 :

(2 sc, inc) x 5 (20)

Round 10-18 :

sc in each st (20)

Round 19 :

(3 sc, inc) x 5 (25)

Round 20-28 :

sc in each st (25). Start to stuff the detail gradually and evenly.

Round 29 :

(4 sc, inc) x 5 (30)

Round 30-36 :

sc in each st (30)

Round 37 :

(5 sc, inc) x 5 (35)

Round 38-43 :

sc in each st (35)

Round 44 :

(6 sc, inc) x 5 (40)

Round 45-47 :

sc in each st (40)

Round 48 :

(7 sc, inc) x 5 (45)

Round 49 :

(8 sc, inc) x 5 (50)

Info :

Finish with a slip stitch. Cut the yarn leaving a long tail for sewing. The length of cone should not exceed 17-18 cm.

β€” The bottom of the cone : PINK COLOR :

Round 1 :

7 sc in MR (7)

Round 2 :

7 inc (14)

Round 3 :

(sc, inc) x 7 (21)

Round 4 :

(2 sc, inc) x 7 (28)

Round 5 :

(3 sc, inc) x 7 (35)

Round 6 :

(4 sc, inc) x 7 (42)

Round 7 :

(5 sc, inc) x 6, 4 sc, 2 inc (50)

Round 8 :

sc in each st (50)

Info :

Sew the bottom and the cone together.

β€” Ring 1 : PURPLE COLOR :

Info :

ch 60. sl st the end to the first ch to make a ring.

Round 1 :

sc into the same ch that you just did a sl st into, sc around (60)

Round 2 :

(sc, inc) x 30 (90)

Round 3-16 :

sc in each st (90)

Round 17 :

(sc, dec) x 30 (60)

Round 18 :

sc in each st (60)

Info :

Leave a long enough end to sew it together (see pictures). Start to stuff the detail gradually and evenly. Preferably, the circumference of ring 1 and ring 2 should be 10 cm.

β€” Ring 2 : PINK COLOR :

Info :

ch 54. sl st the end to the first ch to make a ring.

Round 1 :

sc into the same ch that you just did a sl st into, sc around (54)

Round 2 :

(sc, inc) x 27 (81)

Round 3-16 :

sc in each st (81)

Round 17 :

(sc, dec) x 27 (54)

Round 18 :

sc in each st (54)

Info :

Leave a long enough end to sew it together. Start to stuff the detail gradually and evenly.

β€” Ring 3 : PEACH COLOR :

Info :

ch 50. sl st the end to the first ch to make a ring.

Round 1 :

sc into the same ch that you just did a sl st into, sc around (50)

Round 2 :

(sc, inc) x 25 (75)

Round 3-15 :

sc in each st (75)

Round 16 :

(sc, dec) x 25 (50)

Round 17 :

sc in each st (50)

Info :

Leave a long enough end to sew it together. Start to stuff the detail gradually and evenly. Preferably, the circumference of this ring should be 9 cm.

β€” Ring 4 : BLUE COLOR :

Info :

ch 44. sl st the end to the first ch to make a ring.

Round 1 :

sc into the same ch that you just did a sl st into, sc around (44)

Round 2 :

(sc, inc) x 22 (66)

Round 3-15 :

sc in each st (66)

Round 16 :

(sc, dec) x 22 (44)

Round 17 :

sc in each st (44)

Info :

Leave a long enough end to sew it together. Start to stuff the detail gradually and evenly.

β€” Ring 5 : GREEN COLOR :

Info :

ch 38. sl st the end to the first ch to make a ring.

Round 1 :

sc into the same ch that you just did a sl st into, sc around (38)

Round 2 :

(sc, inc) x 19 (57)

Round 3-14 :

sc in each st (57)

Round 15 :

(sc, dec) x 19 (38)

Round 16 :

sc in each st (38)

Info :

Leave a long enough end to sew it together. Start to stuff the detail gradually and evenly. Preferably, the circumference of this ring should be 9 cm.

β€” Ring 6 : YELLOW COLOR :

Info :

ch 34. sl st the end to the first ch to make a ring.

Round 1 :

sc into the same ch that you just did a sl st into, sc around (34)

Round 2 :

(sc, inc) x 17 (51)

Round 3-13 :

sc in each st (51)

Round 14 :

(sc, dec) x 17 (34)

Round 15 :

sc in each st (34)

Info :

Leave a long enough end to sew it together. Start to stuff the detail gradually and evenly.

β€” Assembly :

Item :

Sew the bottom to the cone as instructed earlier and finish the cone seam securely with the long tail.

Item :

Sew the obtained cone to the first (largest) ring with a needle, aligning the cone base evenly with the ring opening so the cone stands centered.

Item :

Stack the rings from largest (ring 1) to smallest (ring 6) over the cone, checking that each ring is stuffed for even shape and the set balances upright.

Info :

Weave in all ends and secure seams. If desired, embroider the eyes with the small amount of black yarn and sew any additional bunny head details last.

Assembly Instructions

  • Sew the bottom disc to the cone opening using the long tail left from the bottom; ensure edges align and stitch evenly around for a smooth join.
  • Attach the cone to the first (largest) ring by placing the cone base into the ring opening and sewing with a blunt needle, securing with even stitches all the way around.
  • Stack ring 1 (purple) first, then ring 2 (pink), ring 3 (peach), ring 4 (blue), ring 5 (green), and ring 6 (yellow) over the cone, checking fit and stuffing for even height.
  • Weave in all loose ends and tuck them inside the rings; embroider the bunny's facial features with black yarn and sew on any decorative details after stacking.

Important Notes

  • πŸ’‘Use a stitch marker to mark the end of each round and move it after finishing every round to avoid losing your place.
  • πŸ’‘Leave a long tail (about 10-15 cm) when finishing each ring or body part (except the head) to make sewing parts together easier and neater.
  • πŸ’‘Stuff rings and the cone gradually and evenly while crocheting to avoid lumps and to keep all pieces the same shape.
  • πŸ’‘Preferably check the circumference of ring 1 and ring 2 to be about 10 cm and smaller rings around 9 cm for consistent stacking.
  • πŸ’‘Do not over-stuff the cone; the length of the cone should not exceed 17-18 cm as noted in the pattern.

This Rainbow Bunny is a sweet, stackable amigurumi perfect for nurseries and gift-giving. The pastel rings and cuddly cone create a playful, tactile toy you can customize easily. Enjoy crocheting each colorful ringβ€”stack them high and share the joy of handmade playtime. 🧢✨

You ask,

we answer.

FAQs

What size will the finished piece be?

The finished stacking toy measures approximately 27 cm tall using the recommended yarn and 2.5 mm hook; final size may vary with yarn and tension.

Can I use different yarn weights for this pattern?

Yes, you can use different yarn weights but the final size and ring circumferences will change; adjust hook size accordingly and check the ring measurements as you go.

Do I need prior crochet experience for this pattern?

This pattern is rated intermediate and assumes you know single crochet, increases and decreases, working in rounds, and basic sewing techniques.

How long does this project typically take to complete?

Most crocheters complete the set in 5-7 hours, depending on experience, speed, and how many accessories or embroidery details you add.