🧢 Beautiful ✨ Detailed πŸ’ Adorable

Rainbow Bunny Amigurumi Pattern

Rainbow Bunny Amigurumi Pattern
4.7β˜… Rating
5-7 Hours Time Needed
2.9K Made This
βœ‚οΈ

Intermediate Level

Ideal for those with basic crochet experience, featuring slightly more advanced stitches and techniques to expand your skills.

⏱️

Weekend Treat

Takes 5-7 hours, making it an enjoyable project to finish over a couple of days.

🧸

Cute Companion

An adorable friend to cherish, handcrafted with love to bring comfort and joy for years to come.

About This Rainbow Bunny Amigurumi Pattern

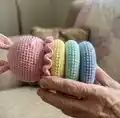
This pattern makes a pastel Rainbow Bunny stacking toy composed of six crocheted rings, a cone top, and a bunny head detail. The design uses simple rounds, increases and decreases to shape rings and a cone, with guidance for sewing pieces together. You will learn how to stuff evenly and assemble the toy securely for play or display.

Rainbow Bunny Amigurumi Pattern crochet pattern - detailed view of completed project

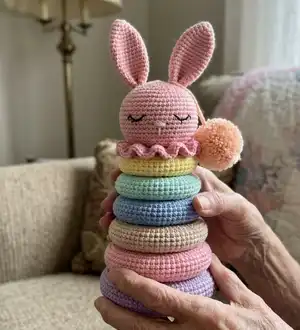
Techniques used include working in the round, joining chains into rings, and basic shaping through increases and decreases. The pattern is color-coded by ring for easy following and includes helpful photos to guide assembly.

Why You'll Love This Rainbow Bunny Amigurumi Pattern

I absolutely love this pattern because it combines simple amigurumi techniques into a beautiful, practical toy that appeals to all ages. I enjoy the way the stackable rings allow for creative color combinations and personalization. The cone top and bunny head bring personality and charm without complicated shaping. Making each ring feels quick and satisfying, and the final assembly is a rewarding moment when it all comes together.

Rainbow Bunny Amigurumi Pattern step 1 - construction progress Rainbow Bunny Amigurumi Pattern step 2 - assembly progress Rainbow Bunny Amigurumi Pattern step 3 - details and accessories Rainbow Bunny Amigurumi Pattern step 4 - final assembly and finishing

Switch Things Up

I love how easy it is to customize this pattern by changing yarn colors; I often swap the pastel palette for bright primaries to make playful versions.

I sometimes use a bulkier yarn and larger hook to create a chunky, cuddly version that works well as a soft toddler toy.

I also make a mini version using thin yarn and a smaller hook to turn the rings into a keychain or travel toy.

I like to add embroidery details on each ring or stitch small motifs to match nursery themes or gift occasions.

I often replace the cone top with a small crocheted star or heart for a different silhouette and extra whimsy.

I recommend using safety eyes for older kids or embroidering features for baby-safe toys; I personally prefer embroidered eyes for safety.

I sometimes add a small weighted pouch in the base ring for better balance if the stack topples easily in my trial runs.

I also experiment with textured stitches on the rings (e.g., half double crochet or front loop only) to create tactile interest for babies.

I like to finish the last seam with invisible ladder stitch so the rings look neat and professional when assembled.

I encourage you to try mixing yarn brands and fibers β€” cotton blends give a firmer ring while acrylic keeps it softer and squishier.

Common Mistakes & How to Fix Them

βœ— Skipping stitch markers during rounds leads to losing track of the start; place a marker at the end of each round and move it after you finish a round. βœ— Not stuffing gradually causes uneven shapes and lumps; stuff each ring and the cone little by little while crocheting and check shape frequently. βœ— Forgetting to leave a long yarn tail when finishing pieces makes sewing them together difficult; leave an end of about 10-15 cm for sewing each ring and the cone. βœ— Not counting stitches after increases or decreases results in incorrect ring circumference; count stitches at the end of rounds where increases or decreases occur. βœ— Pulling the yarn too tightly when joining chains can distort the ring size; join chains with a relaxed tension to keep a neat, even ring circumference.

Rainbow Bunny Amigurumi Pattern

Create a soft pastel Rainbow Bunny amigurumi stacking toy with clear, photo-led instructions. This pattern walks you through crocheting stackable rings, a cone top, and a sweet bunny head so you can build a playful, handmade toy. Perfect for gifting or nursery decor, choose your favorite yarn colors to personalize your creation.

Intermediate 5-7 Hours

Materials Needed for Rainbow Bunny Amigurumi Pattern

β€” Main Fabric

  • 01
    YARN-ART JEANS Pink color N 74 - 55 g (for main details)
  • 02
    YARN-ART JEANS Purple color N 89 - 26 g
  • 03
    YARN-ART JEANS Peach color N 73 - 15 g
  • 04
    YARN-ART JEANS Blue color N 76 - 10 g
  • 05
    YARN-ART JEANS Green color N 79 - 9 g
  • 06
    YARN-ART JEANS Yellow color N 67 - 8 g
  • 07
    Small amount of black yarn for embroidering the eyes

β€” Tools Required

  • 01
    Crochet hook size 2.5 mm
  • 02
    Toy filling (polyester fiberfill)
  • 03
    Stitch marker or a small piece of contrasting yarn
  • 04
    Needles for sewing up (yarn needle/tapestry needle)
  • 05
    Scissors
  • 06
    Pins for assembly (optional)
  • 07
    Measuring tape to check circumference and length

Progress Tracker

0% Complete

β€” Cone :

Round 1 :

5 sc in MR (5)

Round 2 :

5 inc (10)

Round 3 :

(sc, inc) x 5 (15)

Round 4-8 :

sc in each st (15)

Round 9 :

(2 sc, inc) x 5 (20)

Round 10-18 :

sc in each st (20)

Round 19 :

(3 sc, inc) x 5 (25)

Round 20-28 :

sc in each st (25). Start to stuff the detail gradually and evenly.

Round 29 :

(4 sc, inc) x 5 (30)

Round 30-36 :

sc in each st (30)

Round 37 :

(5 sc, inc) x 5 (35)

Round 38-43 :

sc in each st (35)

Round 44 :

(6 sc, inc) x 5 (40)

Round 45-47 :

sc in each st (40)

Round 48 :

(7 sc, inc) x 5 (45)

Round 49 :

(8 sc, inc) x 5 (50)

Info :

Finish with a slip stitch. Cut the yarn leaving a long tail for sewing. The length of cone should not exceed 17-18 cm.

β€” The bottom of the cone :

Round 1 :

7 sc in MR (7)

Round 2 :

7 inc (14)

Round 3 :

(sc, inc) x 7 (21)

Round 4 :

(2 sc, inc) x 7 (28)

Round 5 :

(3 sc, inc) x 7 (35)

Round 6 :

(4 sc, inc) x 7 (42)

Round 7 :

(5 sc, inc) x 6, 4 sc, 2 inc (50)

Round 8 :

sc in each st (50)

Info :

Sew the bottom and the cone together.

β€” Ring 1 : PURPLE COLOR :

Info :

ch 60. sl st the end to the first ch to make a ring

Round 1 :

sc into the same ch that you just did a sl st into, sc around (60)

Round 2 :

(sc, inc) x 30 (90)

Round 3-16 :

sc in each st (90)

Round 17 :

(sc, dec) x 30 (60)

Round 18 :

sc in each st (60)

Info :

Leave a long enough end to sew it together. Start to stuff the detail gradually and evenly. Preferably, the circumference of ring 1 and ring 2 should be 10 cm.

β€” Ring 2 : PINK COLOR :

Info :

ch 54. sl st the end to the first ch to make a ring

Round 1 :

sc into the same ch that you just did a sl st into, sc around (54)

Round 2 :

(sc, inc) x 27 (81)

Round 3-16 :

sc in each st (81)

Round 17 :

(sc, dec) x 27 (54)

Round 18 :

sc in each st (54)

Info :

Leave a long enough end to sew it together. Start to stuff the detail gradually and evenly. Preferably, the circumference of ring 1 and 2 should be 10 cm.

β€” Ring 3 : PEACH COLOR :

Info :

ch 50. sl st the end to the first ch to make a ring

Round 1 :

sc into the same ch that you just did a sl st into, sc around (50)

Round 2 :

(sc, inc) x 25 (75)

Round 3-15 :

sc in each st (75)

Round 16 :

(sc, dec) x 25 (50)

Round 17 :

sc in each st (50)

Info :

Leave a long enough end to sew it together. Start to stuff the detail gradually and evenly. Preferably, the circumference of ring 3 should be 9 cm.

β€” Ring 4 : BLUE COLOR :

Info :

ch 44. sl st the end to the first ch to make a ring

Round 1 :

sc into the same ch that you just did a sl st into, sc around (44)

Round 2 :

(sc, inc) x 22 (66)

Round 3-15 :

sc in each st (66)

Round 16 :

(sc, dec) x 22 (44)

Round 17 :

sc in each st (44)

Info :

Leave a long enough end to sew it together. Start to stuff the detail gradually and evenly. Preferably, the circumference of rings 3-6 should be 9 cm.

β€” Ring 5 : GREEN COLOR :

Info :

ch 38. sl st the end to the first ch to make a ring

Round 1 :

sc into the same ch that you just did a sl st into, sc around (38)

Round 2 :

(sc, inc) x 19 (57)

Round 3-14 :

sc in each st (57)

Round 15 :

(sc, dec) x 19 (38)

Round 16 :

sc in each st (38)

Info :

Leave a long enough end to sew it together. Start to stuff the detail gradually and evenly.

β€” Ring 6 : YELLOW COLOR :

Info :

ch 34. sl st the end to the first ch to make a ring

Round 1 :

sc into the same ch that you just did a sl st into, sc around (34)

Round 2 :

(sc, inc) x 17 (51)

Round 3-13 :

sc in each st (51)

Round 14 :

(sc, dec) x 17 (34)

Round 15 :

sc in each st (34)

Info :

Leave a long enough end to sew it together. Start to stuff the detail gradually and evenly. Preferably, the circumference of ring should be 9 cm.

β€” Assembly :

Item Name (P1) :

Sew the bottom and cone together using the long yarn tail, then sew the obtained cone to the first (purple) ring with a needle.

Info :

Stack rings from largest (purple base) to smallest (yellow top) and adjust stuffing so each ring sits evenly. Sew rings together through inner edges if a permanent stack is desired.

Info :

Weave in all ends securely and embroider the bunny eyes with black yarn. Pin parts before final sewing to check placement.

Assembly Instructions

  • Sew the cone to the first (largest) ring by inserting the cone base into the ring opening and using a yarn needle to stitch together evenly around the circumference.
  • Sew the bottom circle to the cone base first (align edges) and then attach the completed cone to the top of the first ring for a secure fit.
  • Stack the rings in order (purple base, pink, peach, blue, green, yellow) and check alignment; if you want a permanent toy, sew adjacent rings together at inner edges with ladder stitch.
  • Stuff rings and cone gradually and evenly while crocheting and before final assembly to maintain consistent shape across all parts.

Important Notes

  • πŸ’‘Use a stitch marker to mark the ending of each round and move it after finishing every round for accurate stitch counts.
  • πŸ’‘When finishing any body part, leave a long yarn tail (around 10-15 cm) for sewing pieces together to avoid reattaching later.
  • πŸ’‘Stuff the pieces gradually and evenly while crocheting to ensure consistent shapes; overstuffing or under stuffing will change the final form.
  • πŸ’‘Pin parts in place before sewing to ensure correct positioning and symmetry and to check how rings stack together.

This Rainbow Bunny amigurumi pattern brings soft pastels and tactile fun to your crochet projects. Make a stackable toy perfect for nurseries, photos, or heartfelt gifts. Personalize the colors and size to suit your little one or your home decor. 🧢🧸

You ask,

we answer.

FAQs

What size will the finished piece be?

The finished stacking bunny measures approximately 27 cm (10.62 inches) in height when using the recommended yarn and a 2.5 mm crochet hook; sizes may vary with yarn and hook choice.

Can I use different yarn weights for this pattern?

Yes, you can use different yarn weights but that will change the final size and proportions; adjust the hook size accordingly and check ring circumferences as you go.

Do I need prior crochet experience for this pattern?

This pattern is rated intermediate; you should be comfortable crocheting in the round, performing increases and decreases, and sewing pieces together.

How long does this project typically take to complete?

Most crocheters complete this project in 5-7 hours, though the time may vary depending on experience, speed, and how much time you spend on assembly and finishing.