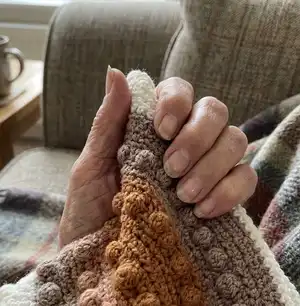
Make a cozy, textured Rainbow Afghan perfect for nursery decor or a cuddly lap blanket. This pretty arch-style afghan uses bobble stitches and simple increases to create a striking rainbow effect with five colors. You will enjoy the rhythmic rows and the satisfying arch shape as the piece grows. The finished blanket measures approximately 32" x 32" and is easy to adapt.
Progress Tracker
0% Complete
— Materials :
Info :
I used Yarn Bee Soft and Sleek yarn from Hobby Lobby in the following colors: Ivory 2 skeins (whichever color you choose for the border will need 2 skeins). Linen 1 skein. Clay 1 skein. Tobacco 1 skein. Brownie 1 skein. Similar medium weight yarn can be used instead of this brand. Hook: H. Yarn needle for weaving in ends.
— Stitches Used :
Info :
Ch - Chain. Sc - single crochet. Slp st - slip stitch. Hdc - half double crochet. Hdc2tog - half double crochet 2 together. Dc2tog - double crochet 2 together. Sc2tog - single crochet 2 together. Bobble stitch: Step 1. *Yarn over, insert hook into the stitch and pull up a loop. Yarn over, pull through two loops.* Repeat 3 times total. You should have a total of 4 loops on your hook. Step 2. Yarn over, pull through all 4 loops at once. It helps to keep this part tighter than the rest.
— Approximate Size :
Info :
Approximate Size: 32"x32"
— Pattern :
Color 1 :
Row 1. Ch 56, dc in the 2nd chain from hook, dc 53, dc 6 in the last st, turn your work so that you are working on the back side of the ch, dc 54. Ch 2, turn.
Row 2 :
Dc 54, (if using stitch markers, place one here) dc 2 in each of the next 6 st, (If using stitch markers, place one here as well) dc 54. Ch 1, turn.
Row 3 :
Bobble row. Sc 2, [bobble, sc 3] around, replacing stitch markers as you come to them. Ch 2, turn.
Row 4 :
Dc 54 or to stitch marker, dc 2 in the next 3 st, dc 6, dc 2 in the next 3 st, replace stitch marker when you come to it, dc 54. Ch 2, turn.
Row 5 :
Dc 54 or to stitch marker, [dc 2 in the next st, dc 1] 3x, dc 6, [dc 1, dc 2 in the next st] 3x, replace stitch marker when you come to it, dc 54. Ch 2, turn.
Row 6 :
Dc 54 or to stitch marker, [dc 2 in the next st, dc 2] 3x, dc 6, [dc 2, dc 2 in the next st] 3x, replace stitch marker when you come to it, dc 54. Ch 1, turn.
Color 2 :
Row 7. Bobble row. Sc 2, [bobble, sc 3] around to last 2 st, bobble, sc 1.
Row 8 :
Dc 54 or to stitch marker, [dc 2 in the next st, dc 3] 3x, dc 6, [dc 3, dc 2 in the next st] 3x, replace stitch marker when you come to it, dc 54. Ch 2, turn.
Row 9 :
Dc 54 or to stitch marker, [dc 2 in the next st, dc 4] 3x, dc 6, [dc 4, dc 2 in the next st] 3x, replace stitch marker when you come to it, dc 54. Ch 2, turn.
Row 10 :
Dc 54 or to stitch marker, [dc 2 in the next st, dc 5] 3x, dc 6, [dc 5, dc 2 in the next st] 3x, replace stitch marker when you come to it, dc 54. Ch 1, turn.
Row 11 :
Bobble row. Sc 2, [bobble, sc 3] around. Ch 2, turn.
Row 12 :
Dc 54 or to stitch marker, [dc 2 in the next st, dc 6] 3x, dc 6, [dc 6, dc 2 in the next st] 3x, replace stitch marker when you come to it, dc 54. Ch 2, turn.
Row 13 :
Dc 54 or to stitch marker, [dc 2 in the next st, dc 7] 3x, dc 6, [dc 7, dc 2 in the next st] 3x, replace stitch marker when you come to it, dc 54. Ch 2, turn.
Color 3 :
Row 14. Dc 54 or to stitch marker, [dc 2 in the next st, dc 8] 3x, dc ,6 [dc 8, dc 2 in the next st] 3x, replace stitch marker when you come to it, dc 54. Ch 1, turn.
Row 15 :
Bobble row. Sc 2 [bobble, sc 3] around. Ch 2, turn.
Row 16 :
Dc 54 or to stitch marker, [dc 2 in the next st, dc 9] 3x, dc 6, [dc 9, dc 2 in the next st] 3x, replace stitch marker when you come to it, dc 54. Ch 2, turn.
Row 17 :
Dc 54 or to stitch marker, [dc 2 in the next st, dc 10] 3x, dc 6, [dc 10, dc 2 in the next st] 3x, replace stitch marker when you come to it, dc 54. Ch 2, turn.
Row 18 :
Dc 54 or to stitch marker, [dc 2 in the next st, dc 11] 3x, dc 6, [dc11, dc 2 in the next st] 3x, replace stitch marker when you come to it, dc 54. Ch 1, turn.
Row 19 :
Bobble row. Sc 2 [bobble, sc 3] around. Ch 2, turn.
Row 20 :
Dc 54 or to stitch marker, [dc 2 in the next st, dc 12] 3x, dc 6, [dc 12, dc 2 in the next st] 3x, replace stitch marker when you come to it, dc 54. Ch 2, turn.
Color 4 :
Row 21. Dc 54 or to stitch marker, [dc 2 in the next st, dc 13] 3x, dc 6, [dc 13, dc 2 in the next st] 3x, replace stitch marker when you come to it, dc 54. Ch 2, turn.
Row 22 :
Dc 54 or to stitch marker, [dc 2 in the next st, dc 14] 3x, dc 6, [dc 14, dc 2 in the next st] 3x, replace stitch marker when you come to it, dc 54. Ch 1, turn.
Row 23 :
Bobble row. Sc 2 [bobble, sc 3] around. Ch 2, turn.
Row 24 :
Dc 54 or to stitch marker, [dc 2 in the next st, dc 15] 3x, dc 6, [dc 15, dc 2 in the next st] 3x, replace stitch marker when you come to it, dc 54. Ch 2, turn.
Row 25 :
Dc 54 or to stitch marker, [dc 2 in the next st, dc 16] 3x, dc 6, [dc 16, dc 2 in the next st] 3x, replace stitch marker when you come to it, dc 54. Ch 2, turn.
Row 26 :
Dc 54 or to stitch marker, [dc 2 in the next st, dc 17] 3x, dc 6, [dc 17, dc 2 in the next st] 3x, replace stitch marker when you come to it, dc 54. Ch 1, turn.
Row 27 :
Bobble row. Sc 2 [bobble, sc 3] around. Ch 2, turn.
Color 5 :
Row 28. Dc 54 or to stitch marker, [dc 2 in the next st, dc 18] 3x, dc 6, [dc 18, dc 2 in the next st] 3x, replace stitch marker when you come to it, dc 54. Ch 2, turn.
Row 29 :
Dc 54 or to stitch marker, [dc 2 in the next st, dc 19] 3x, dc 6, [dc 19, dc 2 in the next st] 3x, replace stitch marker when you come to it, dc 54. Ch 2, turn.
Row 30 :
Dc 54 or to stitch marker, [dc 2 in the next st, dc 20] 3x, dc 6, [dc 20, dc 2 in the next st] 3x, replace stitch marker when you come to it, dc 54. Ch 1, turn.
Row 31 :
Bobble row. Sc 2 [bobble, sc 3] around. Ch 2, turn.
Row 32 :
Dc 54 or to stitch marker, [dc 2 in the next st, dc 21] 3x, dc 6, [dc 21, dc 2 in the next st] 3x, replace stitch marker when you come to it, dc 54. Ch 2, turn.
Row 33 :
Dc 77, [dc 2 in the next st, dc 22] 2x, dc 6, [dc 22, dc 2 in the next st] 2x, dc 77. Finish off.
— Top Triangles :
Info :
I like to do the triangles in either the 5th color selection or in the border color. Choose what you like best!
Row 1 :
Skip 77 st, slp st in the next st, sc 3, hdc 4, dc 11, hdc 4, sc 3, slp st. ch 1, turn.
Row 2 :
Skp the slp st, sc2tog, sc 1, hdc 4, dc 11, hdc 4, sc 1, sc 2tog. Ch 1, turn.
Row 3 :
Sc 2 tog 2x, hdc 2, dc 11, hdc 2, sc2tog 2x. Ch 2, turn.
Row 4 :
Dc2tog 2x, dc 11, dc2tog 2x. Ch 2, turn.
Row 5 :
Dc2tog 2x, dc 7, dc2tog 2x. Ch 2, turn.
Row 6 :
dc2tog 2x, dc 3, dc2tog 2x. Ch 2, turn.
Row 7 :
Dc2tog, dc 3, dc2tog. Ch 2, turn.
Row 8 :
Dc2tog, dc 1, dc2tog. Ch2, turn.
Row 9 :
Dc3tog. Finish off.
Info :
Repeat this on the second top corner, counting 77 stitches up from the opposite side.
Info :
Hdc an even number across the top and bottom of the afghan. I generally go for around 80 st, but the most important thing is for the top and bottom to be the same stitch count.
— Border :
Info :
Join on one of the afghan sides with a slp st, ch2, dc in each stitch around, placing 5 dc in each corner st. Crochet 2 or 3 rows in the border color before finishing off and weaving in the ends.
Info :
Here are some border color ideas for you!
This Rainbow Afghan pattern makes a warm, stylish blanket that is perfect for a nursery or cozy corner. 🧶
The textured bobble rows and soft neutral bands create a timeless look that blends with many decor styles. ✨
Make it in your favorite colors and enjoy a lovely handmade heirloom. 🤗