🧢 Beautiful ✨ Detailed πŸ’ Adorable

Ragdoll Pocket Whale Amigurumi Pattern

Ragdoll Pocket Whale Amigurumi Pattern
4.8β˜… Rating
2-3 Hours Time Needed
1.2K Made This
βœ‚οΈ

Beginner Friendly Level

Perfect for those just starting their crochet journey, with clear instructions and simple techniques

⏱️

Bite-Sized Project

Finishes in 2-4 hoursβ€”perfect for an afternoon of creative relaxation.

🧸

Cute Companion

An adorable friend to cherish, handcrafted with love to bring comfort and joy for years to come.

About This Ragdoll Pocket Whale Amigurumi Pattern

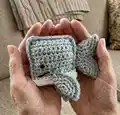
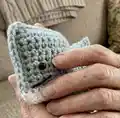
This pattern creates a tiny ragdoll-style pocket whale with a contrasting white belly and small detachable flippers and tail. It uses basic single crochet rows worked flat for the body and simple round pieces for the fins. You will finish the whale with safety eyes, a stitched mouth option, and a bit of stuffing for shape. The pattern is written in US terms and includes step-by-step assembly notes.

Ragdoll Pocket Whale Amigurumi Pattern crochet pattern - detailed view of completed project

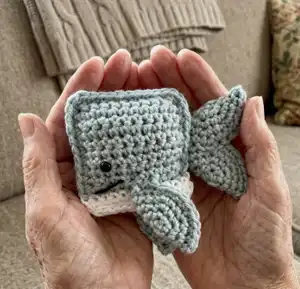
Perfect for making keyrings, small gifts, or a soft toy to keep in your pocket. Clear row-by-row instructions and photo references make it easy to follow.

Why You'll Love This Ragdoll Pocket Whale Amigurumi Pattern

I absolutely love this pattern because it turns simple rows of single crochet into a playful little whale that fits in your hand. I enjoy how quickly each piece comes togetherβ€”perfect for using leftover DK yarn. The design is forgiving, so I can experiment with colour combinations and small details like embroidered mouths. Making these tiny whales always brings a smile, and they make sweet handmade gifts for friends and family.

Ragdoll Pocket Whale Amigurumi Pattern step 1 - construction progress Ragdoll Pocket Whale Amigurumi Pattern step 2 - assembly progress Ragdoll Pocket Whale Amigurumi Pattern step 3 - details and accessories Ragdoll Pocket Whale Amigurumi Pattern step 4 - final assembly and finishing

Switch Things Up

I love experimenting with different colours for the main body and belly; try pastel shades or a bright contrast for a playful look.

I often change the yarn weight and hook to make different sizes; a thicker yarn makes a chunky, cuddly whale while a thinner yarn creates a tiny keychain version.

I sometimes swap safety eyes for embroidered eyes if I want a softer, child-safe toy.

I add a small keyring loop at the top when making this as a keychain or bag charm.

To personalise, I stitch a small mouth or freckles with embroidery thread; small details change the expression completely.

For a more posable whale, I experiment with a short piece of wire inside the tail, but only if it will not be handled by small children.

I like to make matching sets by varying belly colours so each whale in a set is unique and collectible.

Try adding tiny felt embellishments or a miniature sailor hat for seasonal or themed versions.

I occasionally add beads or sequins to create a sparkly, decorative whale for display use only.

If I want a sturdier toy, I use slightly firmer stuffing and a tighter tension to keep the whale's shape over time.

I also like to use the same basic pieces to design other pocket creatures, changing fin shapes and placement to create new characters.

Common Mistakes & How to Fix Them

βœ— Starting with the wrong number of chains will throw off the foundation row; recount your initial CH 12 before proceeding. βœ— Missing the change to white yarn at the last stitch of R10 can leave the belly incomplete; pull up a loop and join the white yarn with a SC as instructed. βœ— Forgetting to insert safety eyes before closing the body can be tricky to fix later; place and secure the eyes before continuing the last side. βœ— Overstuffing the body will distort the shape and make sewing pieces together harder; add small amounts of stuffing gradually for a smooth finish. βœ— Not leaving long yarn tails when fastening off flippers and tail can make attachment difficult; leave a length for sewing and weave in later.

Ragdoll Pocket Whale Amigurumi Pattern

Create a tiny, squishy pocket whale perfect for keyrings, gifts, or a sweet desk companion. This pattern uses simple single crochet rows and minimal assembly so you can finish quickly. You'll learn how to make a rectangular body with a contrasting belly, small flippers and a tail, and then sew everything together. Charming, portable, and beginner-friendly, it makes a lovely handmade present.

Beginner Friendly 2-3 Hours

Materials Needed for Ragdoll Pocket Whale Amigurumi Pattern

β€” Main Fabric

  • 01
    DK acrylic yarn (main colour) - small amount for body (approx 20-30g)
  • 02
    DK acrylic yarn (white) - small amount for belly detail (approx 5-10g)
  • 03
    Alternatively cotton DK yarn may be used (same approximate amounts)

β€” Tools Required

  • 01
    3.5mm hook
  • 02
    Black embroidery thread
  • 03
    2mm safety eyes (2 pieces)
  • 04
    Stitch markers
  • 05
    Scissors
  • 06
    Metal yarn needle
  • 07
    Polyester fibrefill or scraps of yarn for stuffing
  • 08
    Keyring (optional for turning into a keychain)

Progress Tracker

0% Complete

β€” Body :

Info :

-slipknot, CH 12 and turn – this is the foundation row

Round 1 :

R1 – SC in the 2nd CH from hook and then SC until the end of row, CH 1 , turn

Round 2 :

R2 – SC in each ST of the row, CH 1, turn

Round 3 to 9 :

R3 to R9 – SC in each ST of the row, CH 1, turn

Round 10 :

R10 – SC in each ST of the row, at the last ST pull up a loop and join the white yarn with a SC, then CH 1 and turn

Round 11 :

R11 – now working with the white yarn, SC in each ST of the row, CH 1, turn

Round 12 :

R12 –SC in each ST of the row, fasten and cut yarn

Infos :

Bring the 2 sides together. Starting from the right side of your main colour, join new yarn in the same colour and start to SC along all 3 sides. At every corner ST you will need to do 2 SC. Before reaching the white part, you need to insert the safety eyes. Join the white yarn and continue to SC the last side – here you can tuck all the yarn ends inside and use some extra stuffing as well, but not much is needed. Fasten yarn and weave in ends.

β€” FLIPPERS and TAIL :

Info :

-Slipknot, CH 2

Round 1 :

R1 – SC 6 times in the 2nd CH from hook

Round 2 :

R2 – SC 2 times in each ST around (12 sts total)

Round 3 :

R3 – SC 1, INC – all around (18 sts total)

Round 4 :

R4 – SC 2, INC - all around (24 sts total), don’t fasten

Infos :

Fold circle, turn it with the rounded part to face your left hand and start to SC the sides together. Tuck inside the starting yarn tail. Fasten and leave length of yarn for attaching to the body.

Info :

For the tail you need to sew the bottom edges, overlapping, with rounded sides facing each other.

Infos :

Attach tail to the middle of the back side. Attach flippers to either side right above the white stitches. You can either sew on a mouth or not. If you do add a mouth make sure to knot the ends, tuck in and cut remaining yarn.

Assembly Instructions

  • Bring the two rectangular body pieces together and SC along three sides in the main colour, doing 2 SC at each corner and leaving an opening for stuffing and the last white edge.
  • Insert the safety eyes before closing the final side with white yarn, then SC the last side with white, tuck ends inside and add a small amount of stuffing before fastening off.
  • Fold each round flipper piece with rounded parts facing and SC or sew the sides together, then leave a long tail to sew flippers to the body.
  • Sew the tail by overlapping the bottom edges so rounded sides face each other, then attach the tail to the middle of the back side of the whale securely.
  • Position and sew the flippers to either side of the body right above the white belly stitches, using long yarn tails and a yarn needle for neat attachment.

Important Notes

  • πŸ’‘Use stitch markers to keep track of the start and end of rows and to mark placement for safety eyes before closing the body.
  • πŸ’‘Stuff the body lightly and evenly through the opening before finishing the last side so the whale keeps a soft, pocket-friendly shape.
  • πŸ’‘Tuck and weave in yarn ends inside the body while closing the last edge to keep the exterior neat and reduce visible tails.

This tiny Ragdoll Pocket Whale is designed to be quick, joyful, and irresistibly cute to hold. πŸ‹ Make one in a day and gift it to someone who needs a pocket-sized friend. 🧢 Perfect for keyrings, stocking stuffers, or using up DK yarn leftovers.

You ask,

we answer.

FAQs

What size will the finished piece be?

The finished pocket whale measures roughly palm-size (around 6-8 cm wide) when using DK yarn and a 3.5mm hook, though exact size depends on tension and yarn choice.

Can I use different yarn weights for this pattern?

Yes, you can use different yarn weights, but this will change the final size; use an appropriate hook for your yarn and expect the whale to grow proportionally with thicker yarn.

Do I need prior crochet experience for this pattern?

This pattern is rated beginner friendly and uses basic single crochet and simple increases, so basic crochet skills are sufficient to complete it.

How long does this project typically take to complete?

Most crocheters complete this tiny whale in 2-3 hours, depending on experience, finishing details, and assembly time.