🧢 Beautiful ✨ Detailed πŸ’ Adorable

Ragdoll Pocket Whale Amigurumi Pattern

Ragdoll Pocket Whale Amigurumi Pattern
4.1β˜… Rating
2-3 Hours Time Needed
3.5K Made This
βœ‚οΈ

Beginner Friendly Level

Perfect for those just starting their crochet journey, with clear instructions and simple techniques

⏱️

Bite-Sized Project

Finishes in 2-4 hoursβ€”perfect for an afternoon of creative relaxation.

🧸

Cute Companion

An adorable friend to cherish, handcrafted with love to bring comfort and joy for years to come.

About This Ragdoll Pocket Whale Amigurumi Pattern

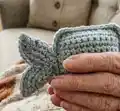
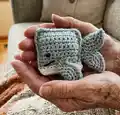
This pattern creates a small pocket-sized whale amigurumi with a white belly detail and separate flippers and tail. It is written in US crochet terms and uses DK yarn with a 3.5mm hook for a compact, plush finish. The design is worked flat for the body pieces then seamed and stuffed lightly before attaching flippers and tail. Photographs at the end of the pattern illustrate key steps for visual guidance.

Ragdoll Pocket Whale Amigurumi Pattern crochet pattern - detailed view of completed project

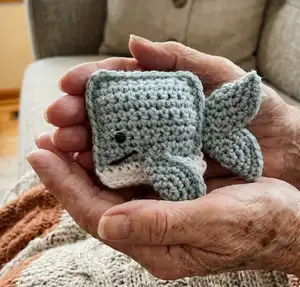
You will make two rectangular body panels, four small rounded flippers/tail parts, then sew them together. The pattern uses basic stitches and clear step-by-step rounds for an easy assembly.

Why You'll Love This Ragdoll Pocket Whale Amigurumi Pattern

I absolutely love this pattern because it turns simple crochet stitches into a charming little companion you can finish quickly. I enjoy how compact and portable the finished whale is β€” it fits in the palm of your hand and makes a sweet gift. The construction is satisfying: working two flat panels and a few small motifs keeps the project moving without long repetitive rounds. I also love that it is beginner friendly but still produces a professional-looking amigurumi with minimal materials.

Ragdoll Pocket Whale Amigurumi Pattern step 1 - construction progress Ragdoll Pocket Whale Amigurumi Pattern step 2 - assembly progress Ragdoll Pocket Whale Amigurumi Pattern step 3 - details and accessories Ragdoll Pocket Whale Amigurumi Pattern step 4 - final assembly and finishing

Switch Things Up

I love changing the colour palette to make different personalities β€” try pastel blues, grey, or playful rainbow stripes for a whimsical look.

If you want a chunkier whale, I use bulky yarn and a larger hook to make a cuddly oversized version while following the same stitch counts.

To create a keychain version, leave a long yarn tail or attach a small keyring through the top seam before closing the body.

I sometimes add tiny felt cheeks or embroidery for eyelashes to give each whale a unique face and expression.

Try using cotton yarn for a firmer, more washable whale that’s great for baby gifts β€” just be sure to use safety eyes rated for baby items or embroider eyes instead.

You can embellish the belly with different colours or a small appliqued heart to personalize each whale as a gift.

For a mobile or garland, make several whales in coordinating colours and string them along a ribbon or cotton cord for a cute nursery display.

I like to experiment with stitch texture too β€” try working the body panels in HDC or alternating rows of BLO to give a striped effect.

To make a flat magnet gift, use a small disc magnet sewn between the panels before closing the body and use less stuffing for a flatter shape.

Don’t be afraid to resize: switching yarn weight and hook will scale the pattern up or down β€” adjust stuffing and eye size accordingly for proportional results.

Common Mistakes & How to Fix Them

βœ— Skipping the foundation chain count will change the width of the body and cause mismatch when joining; always chain exactly 12 for the foundation row and count before continuing. βœ— Not switching to the white yarn at the end of the row correctly will leave a gap on the belly edge; pull up a loop on the last stitch and join the white yarn with a single crochet exactly as instructed. βœ— Forgetting to insert safety eyes before closing the body will make eyes difficult to position; insert safety eyes before you finish joining the sides to lock them in place. βœ— Overstuffing the body makes the whale stiff and changes its shape; stuff lightly and adjust stuffing as you sew the final side closed to keep a soft silhouette.

Ragdoll Pocket Whale Amigurumi Pattern

Make a tiny, squishy Ragdoll Pocket Whale you can tuck into a pocket or give as a sweet handmade gift. This pattern uses simple single crochet stitches and minimal sewing, making it a fast and satisfying make. You will create two small body pieces, four flippers/tail pieces, then assemble them into an adorable whale with a little white belly and embroidered smile. Perfect for gifts, keyrings, or as a beginner-friendly amigurumi project.

Beginner Friendly 2-3 Hours

Materials Needed for Ragdoll Pocket Whale Amigurumi Pattern

β€” Main Fabric

  • 01
    DK acrylic yarn (main colour) - small amount, approximately 20-40g depending on yarn brand
  • 02
    White DK acrylic yarn (for belly trim) - small amount, approximately 5-10g
  • 03
    Alternative: Light worsted or cotton DK yarn can be used instead of acrylic

β€” Tools Required

  • 01
    Crochet hook size 3.5mm
  • 02
    Black embroidery thread for mouth
  • 03
    2mm safety eyes (2 pieces)
  • 04
    Stitch markers
  • 05
    Scissors
  • 06
    Metal yarn needle for sewing and weaving in ends
  • 07
    Polyester fibrefill or scraps of yarn for stuffing
  • 08
    Keyring (optional)

Progress Tracker

0% Complete

β€” Body (Make 2) :

Info :

-slipknot, CH 12 and turn – this is the foundation row

Round 1 :

R1 – SC in the 2nd CH from hook and then SC until the end of row, CH 1, turn

Round 2 :

R2 – SC in each ST of the row, CH 1, turn

Round 3 :

R3 to R9 – SC in each ST of the row, CH 1, turn

Round 4 :

R10 – SC in each ST of the row, at the last ST pull up a loop and join the white yarn with a SC, then CH 1 and turn

Round 5 :

R11 – now working with the white yarn, SC in each ST of the row, CH 1, turn

Round 6 :

R12 – SC in each ST of the row, fasten and cut yarn

Infos :

Bring the 2 sides together. Starting from the right side of your main colour, join new yarn in the same colour and start to SC along all 3 sides. At every corner ST you will need to do 2 SC. Before reaching the white part, you need to insert the safety eyes. Join the white yarn and continue to SC the last side – here you can tuck all the yarn ends inside and use some extra stuffing as well, but not much is needed. Fasten yarn and weave in ends.

β€” Flippers and Tail (Make 4) :

Info :

-Slipknot, CH 2

Round 1 :

R1 – SC 6 times in the 2nd CH from hook

Round 2 :

R2 – SC 2 times in each ST around (12 sts total)

Round 3 :

R3 – SC 1, INC – all around (18 sts total)

Round 4 :

R4 – SC 2, INC - all around (24 sts total), don’t fasten

Infos :

Fold circle, turn it with the rounded part to face your left hand and start to SC the sides together. Tuck inside the starting yarn tail. Fasten and leave length of yarn for attaching to the body.

Info :

For the tail you need to sew the bottom edges, overlapping, with rounded sides facing each other.

Infos :

Attach tail to the middle of the back side. Attach flippers to either side right above the white stitches. You can either sew on a mouth or not. If you do add a mouth make sure to knot the ends, tuck in and cut remaining yarn.

Assembly Instructions

  • Bring the two flat body panels together and SC along three sides, adding 2 SC at each corner to shape the edges and leave an opening for stuffing.
  • Before finishing the final side, insert the 2mm safety eyes into place on the front panel where indicated and secure them before continuing to the white edge.
  • Lightly stuff the body through the opening with polyester filling or yarn scraps, then continue to SC the remaining side and close the body, tucking ends inside as you join the final side.
  • Sew the tail by overlapping the two rounded edges and stitching them together, then attach the tail to the middle of the back side of the body with the yarn tail left from the tail piece.
  • Attach each flipper to either side of the body just above the white belly stitches using the yarn tails and a tapestry needle, positioning them symmetrically for a balanced look.
  • Use black embroidery thread to stitch a small mouth if desired, knotting and tucking the ends securely inside the body after finishing.

Important Notes

  • πŸ’‘Use stitch markers to keep track of your rows and the start of the edge when joining the body panels together.
  • πŸ’‘Insert safety eyes before you finish joining the panels so they sit correctly and are easier to secure.
  • πŸ’‘Stuff lightly β€” too much stuffing will distort the square body shape, so add small amounts and shape as you go.
  • πŸ’‘Weave in and tuck yarn ends inside while assembling to avoid bulky knots showing on the finished whale.

This cute Ragdoll Pocket Whale is a quick, satisfying make that doubles as a tiny gift or keyring charm. It combines simple single crochet shaping with little sewn-on details to create an adorable pocket pal. Make a whole school of tiny whales in different colours for gifts and decorations! πŸ§ΆπŸ‹

You ask,

we answer.

FAQs

What size will the finished piece be?

The finished pocket whale measures approximately 6-8 cm wide depending on yarn and tension when using DK yarn and a 3.5mm hook.

Can I use different yarn weights for this pattern?

Yes, you can use different yarn weights but the final size will change; if you use thicker yarn, switch to a larger hook and expect a bigger whale.

Do I need prior crochet experience for this pattern?

This pattern is beginner friendly and uses basic stitches (SC, CH) though you should be comfortable working flat rows, joining, and simple increases.

How long does this project typically take to complete?

Most makers finish this project in about 2-3 hours, depending on experience, stitching speed, and whether you embroider a mouth or add additional details.