🧢 Beautiful ✨ Detailed πŸ’ Adorable

Groot Amigurumi Pattern

Groot Amigurumi Pattern
4.7β˜… Rating
5-7 Hours Time Needed
1.7K Made This
βœ‚οΈ

Intermediate Level

Ideal for those with basic crochet experience, featuring slightly more advanced stitches and techniques to expand your skills.

⏱️

Weekend Treat

Takes 5-7 hours, making it an enjoyable project to finish over a couple of days.

🧸

Cute Companion

An adorable friend to cherish, handcrafted with love to bring comfort and joy for years to come.

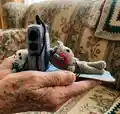
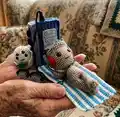
About This Groot Amigurumi Pattern

This pattern creates a charming Baby Groot amigurumi complete with headphones and embroidered decorations. You will work in rounds to shape legs, body, head, crown, arms and accessories with clear stitch counts provided. The design includes placement notes for safety eyes and step-by-step finishing photos to guide assembly.

Groot Amigurumi Pattern crochet pattern - detailed view of completed project

Techniques used include working in the round, front/back loop stitches, simple increases and decreases, and basic embroidery for vine details. The pattern is ideal for intermediate crocheters who enjoy small detailed toys.

Why You'll Love This Groot Amigurumi Pattern

I absolutely love this pattern because it brings a small, joyful character to life with simple shapes and tiny details. I enjoy the way the crown and embroidered vines add personality without complicated techniques. The included headphone accessory is a fun touch that makes the project unique and playful. I find the step-by-step rounds and photos really help me stay confident while shaping the head and body.

Groot Amigurumi Pattern step 1 - construction progress Groot Amigurumi Pattern step 2 - assembly progress Groot Amigurumi Pattern step 3 - details and accessories Groot Amigurumi Pattern step 4 - final assembly and finishing

Switch Things Up

I love how easy it is to customize this Groot β€” I often change the yarn color to make seasonal or themed versions of the character.

I sometimes use a sport or DK weight yarn and a 3.5mm hook to make a chunkier, cuddlier Groot that works great as a little pillow pet.

For a mini keychain version I use thinner yarn and a 1.75-2.0mm hook and replace safety eyes with tiny embroidered eyes for safety.

I like adding felt accessories or tiny crocheted props like a rocket or a tiny plant pot to tell a story with each Groot I make.

Try different eye sizes and placements to change the expression; larger eyes make a cuter, more open look while smaller eyes give a mature, calm expression.

I recommend experimenting with embroidery thread for the vine details β€” use contrasting greens or metallic threads for a fun effect.

If you want posable arms, try inserting thin wire inside the arm before finishing; this makes it possible to pose Groot holding tiny items.

You can replace the headphone colors with metallic-looking yarn or bright neons to create themed accessories for special occasions.

I like to add a small loop at the top of the crown so the piece can become an ornament or hanging decoration for holidays.

When gifting, I sometimes sew a tiny name tag or a small crocheted heart to personalize the Groot for the recipient.

Try mixing textured yarns for the crown to make the leaves and vines pop visually without changing stitch counts.

I often combine the pattern with different stuffing amounts to make flatter or rounder torsos depending on the pose I want Groot to have.

Common Mistakes & How to Fix Them

βœ— Not stuffing as you go can make shaping the head and body difficult later; stuff gradually and check the shape before continuing. βœ— Cutting the thread after the first leg will make joining the body awkward; leave the threads from the second leg and join as instructed at round 16. βœ— Skipping the placement check for safety eyes can lead to awkward facial proportions; insert eyes in row 37 with 5 sc between and check before securing. βœ— Ignoring front/back loop instructions will change the crown and crown decorations; work BLO or FLO exactly where indicated to get the correct texture and fit.

Groot Amigurumi Pattern

Make your own adorable Baby Groot amigurumi with clear step-by-step instructions and helpful photos. This pattern includes every round, assembly notes, and accessory instructions so you can create the full character with headphones and embroidered details. Perfect for gifting or keeping as a cute handmade collectible, you'll enjoy shaping each tiny detail as you crochet.

Intermediate 5-7 Hours

Materials Needed for Groot Amigurumi Pattern

β€” Main Fabric

  • 01
    Yarn brown, green, red, black, blue, gray, light gray, white, azure (55% cotton + 45% acrylic, 180 yds / 1.76 oz) (#2 fine)
  • 02
    Use small amounts of green for embroidered vines and tiny leaves
  • 03
    Red and gray for headphone details (small amounts)
  • 04
    Black for smile embroidery and headphone wire details
  • 05
    Two 9mm black plastic safety eyes and four 6mm black safety eyes

β€” Tools Required

  • 01
    Crochet hook size 2.5mm
  • 02
    Needle for sewing and embroidery
  • 03
    Scissors
  • 04
    Polyester stuffing/filler
  • 05
    Stitch markers
  • 06
    Two 9mm black plastic safety eyes
  • 07
    Four 6mm black plastic safety eyes
  • 08
    Small pins for assembly

Progress Tracker

0% Complete

β€” Legs :

Round 1 :

6sc in MR (6)

Round 2 :

6inc (12)

Round 3 :

12sc BLO (crochet in the back loop of the stitches) (12)

Round 4-5 :

12sc (2row)

Round 6 :

dec, 4sc, dec, 4sc (10)

Round 7 :

dec, 8sc (9)

Round 8-14 :

9sc (7rows)

Round 15 :

8sc, slst

Info :

Do not forget to fill the toy with filler while knitting. We do not cut the threads from the second leg, we continue to knit the body.

β€” Body :

Round 16 :

2ch, attach the first leg 9sc, 2sc by ch, 9sc on the second leg, 2sc by ch (22)

Round 17-25 :

22sc (9rows)

Round 26 :

(3sc, dec)*4, 2sc (18)

Round 27 :

(1sc, dec)*6 (12)

Round 28 :

12sc

Info :

Do not forget to fill the toy with filler while knitting. We continue to knit the head.

β€” Head :

Round 29 :

12inc (24)

Round 30 :

(1sc, inc)*12 (36)

Round 31-32 :

36sc (2row)

Round 33 :

(5sc, inc)*6 (42)

Round 34-41 :

42sc (8rows)

Info :

Insert eyes in row 37, 5sc between the eyes. Check that everything is exactly and you like it and only then put on the puck. Do not forget to fill the toy with filler while knitting.

Round 42 :

(5sc, dec)*6 BLO (36)

Round 43 :

(4sc, dec)*6 (30)

Round 44 :

(3sc, dec)*6 (24)

Round 45 :

(2sc, dec)*6 (18)

Round 46 :

(1sc, dec)*6 (12)

Round 47 :

6dec

Info :

Cut and hide the thread.

β€” Crown :

Info :

Crown: brown. We return to the 42nd row, FLO (crochet in the front loop of the stitches).

Round 43 :

2ch, 42hdc, slst (42)

Round 44 :

ch, 11sc, 4hdc, 6dc, 2ch, slst into the next stitch, 2ch, 3dc, 1hdc, 16sc, slst (41)

Info :

Tie and hide excess threads.

Crown detail (P1) :

Insert the green thread into the 17th loop of the 44th row of the crown. 2ch, 2dc, 1hdc. Tie and hide excess threads.

Crown detail (P2) :

Insert the thread again in the 44th row in the 22nd loop from the beginning of the row. 2ch, 1hdc, 1sc. Cut and hide the threads.

Crown detail (P3) :

Once again, insert the thread now into the 29th loop of the 44th row of the crown. 2ch, 1hdc, 1sc. Tie and hide excess threads.

β€” Arms :

Round 1 :

5sc in MR

Round 2 :

5sc

Round 3 :

inc, 4sc (6)

Round 4 :

6sc

Round 5 :

inc, 5sc (7)

Round 6 :

7sc

Round 7 :

inc, 6sc (8)

Round 8-14 :

8sc (7rows)

Info :

Fill the lower part of the arm to the 8th row, then fold and hold the 8th row to fill the upper part of the arm.

Round 15 :

fold the edges together and knit 3sc.

Info :

Cut off the thread, leaving 4 inch for sewing. With another thread of the same color, sew the 8th row, tie and hide the extra threads.

Info :

Sew on arms in row 26, tie and hide excess threads.

β€” Smile :

Info :

Smile: black. Divide a large piece of yarn into two thinner threads. Then divide the thin thread into two more thin threads. We knit with the thinnest single thread. Hook 1.40mm.

Round 1 :

5ch

Info :

Cut off the thread, leaving 4 inch for sewing. Sew on a smile in the 33rd row, tie and hide the extra threads.

β€” Decorations :

Info :

Decorations: green. Divide a large piece of yarn into two thinner threads. Embroider the decoration as shown in the pictures. Then one of the separated threads is divided again into two thinner threads. Use a single thread to embroider thin jewelry as shown in the pictures.

β€” Headphones (start black) :

Round 1 :

6sc in MR

Round 2 :

at the beginning change color to red 6inc (12)

Round 3 :

(1sc, inc)*6 (18)

Round 4 :

18sc

Round 5 :

(1sc, dec)*6 (12)

Round 6 :

6dec

Info :

Cut and hide the threads.

β€” Headphones part 2 (gray) :

Round 1 :

33ch, turn

Round 2 :

32sc, ch, turn (32)

Round 3 :

32sc

Info :

Cut off the thread, leaving 8 inch for sewing. Fold the first row to the third and sew along the entire length. Then sew the second part of the headphones to the first and to the head. Do as shown in the pictures.

Info :

Insert the thread into the rim of the headphones and embroider about 0.3 inches. Then tie and hide the extra threads.

Assembly Instructions

  • Join the two legs to start the body at round 16: 2ch, attach the first leg 9sc, 2sc by ch, 9sc on the second leg, 2sc by ch β€” continue with 22sc around and follow rounds 17-25.
  • Insert and secure safety eyes in row 37 with 5sc between the eyes and check placement before fastening the eyes permanently.
  • Sew arms to the body at row 26; pin arms in place, stitch securely, tie and hide excess threads.
  • Pin and sew the hands to the head as shown in the pictures, placing them under the crown and sewing through the head inside to secure.
  • Embroider green vine decorations using a divided thread; tack ends and hide excess thread inside the body for a tidy finish.
  • Assemble headphones by sewing the red ear cups to the head first, then attach the folded gray band and stitch around the rim; tie and hide all threads.

Important Notes

  • πŸ’‘Do not forget to fill the toy with filler while knitting; fill gradually to maintain even shape and avoid lumps.
  • πŸ’‘Do not cut the threads from the second leg until you have joined both legs to start the body at round 16.
  • πŸ’‘Place safety eyes before stuffing the head fully and make sure there are 5 single crochet stitches between them in row 37.
  • πŸ’‘Work BLO and FLO rounds exactly where specified to create the crown and detail textures as shown.

This Baby Groot amigurumi pattern includes every round and detailed finishing steps to help you create a lovable tiny character. The headphones and embroidered vines add playful personality and charm to the finished toy. Perfect as a gift or shelf friend β€” make one today and share the joy! 🧢🌱

You ask,

we answer.

FAQs

What size will the finished piece be?

The finished amigurumi measures approximately 12-15 cm tall depending on yarn tension and hook; using the recommended yarn and hook size will give a small pocket-sized Groot.

Can I use different yarn weights for this pattern?

Yes, you can use different yarn weights, but it will change the final size; if you use a thicker yarn, use a larger hook and adjust stuffing amounts and eye sizes accordingly.

Do I need prior crochet experience for this pattern?

This pattern is rated intermediate; basic experience with single crochet, increases, decreases, and working in the round is recommended for best results.

How long does this project typically take to complete?

Most crocheters complete this project in 5-7 hours, though time may vary depending on experience level, assembly speed, and detail work like embroidery.