About This Rabbit Amigurumi Pattern
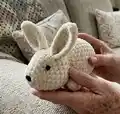
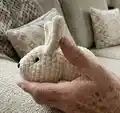
This pattern creates a soft plush rabbit using Himalaya Dolphin Baby or similar plush yarn, resulting in a cuddly mascot approximately 18 cm tall. You will crochet the head with attached torso, ears, paws, tail and a small nose, then assemble and shape the face. The instructions include rounds, abbreviations and helpful photos to guide you.
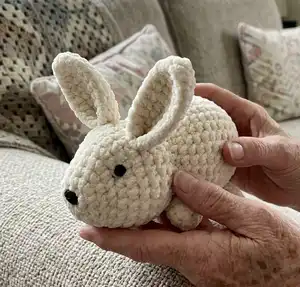
Designed for crocheters with basic to intermediate skills, it uses single crochet, increases and decreases with simple sew-up techniques. The plush texture gives a charming, tactile finish ideal for gifts and nursery decor.
Why You'll Love This Rabbit Amigurumi Pattern
I absolutely love this pattern because it transforms soft chenille yarn into a charming, tactile rabbit that is irresistible to cuddle. I enjoy the simple shaping — the head-with-torso construction keeps assembly easy while still creating a polished toy. The ears and little tail add so much personality with minimal stitching. Making multiples in different colors is one of my favorite ways to experiment with texture and scale.
Switch Things Up
I love how easily you can customize this rabbit by changing yarn colors; try pastel shades for a baby-friendly version or bold hues for a playful look.
To make smaller or larger rabbits, change your yarn weight and hook size—use thinner yarn for tiny keychain friends or bulky yarn for large cuddle toys.
I often add embroidered cheeks or a tiny pompom tail to add personality and texture to each rabbit I make.
Swap the safety eyes for embroidered eyes if you need a child-safe version for very young children.
Experiment with poseable limbs by inserting thin wire inside the paw seams for a more animated toy.
Make a family set by varying ear length, paw size, or adding tiny accessories like a scarf or bow.
Try adding a small bell or crinkle insert in the body for interactive sensory toys for babies (ensure secure stitching).
I sometimes use a contrasting yarn for the inner ear to give the ears a defined look without extra sewing.
For a different finish, lightly brush the plush surface with a soft brush to raise the pile and give a slightly fuzzier effect.
If you want to convert this into a keychain or bag charm, make a mini version and add a sturdy metal loop before closing the piece.
Common Mistakes & How to Fix Them
✗ Placing the safety eyes too low or too close can distort the face; measure and place eyes between rounds 6 and 7 at a distance of 9 stitches before fastening them securely.
✗ Overstuffing the head or torso will make seams and shaping uneven; stuff gradually and evenly, checking the shape as you go to maintain a smooth profile.
✗ Skipping stitch counts during increases or decreases leads to misshapen rounds; count stitches after each increase/decrease round and use a marker to track the start of the round.
✗ Pulling the closing thread too tight when finishing can break the yarn or deform the piece; pull evenly, tighten moderately and hide ends carefully to preserve shape.
✗ Not folding and sewing the paw correctly will produce uneven feet; fold the paw in half and join the 3 sc as instructed to form a neat rounded paw shape.