🧢 Beautiful ✨ Detailed πŸ’ Adorable

Disy the Bear Amigurumi Pattern

Disy the Bear Amigurumi Pattern
4.3β˜… Rating
5-7 Hours Time Needed
3.8K Made This
βœ‚οΈ

Intermediate Level

Ideal for those with basic crochet experience, featuring slightly more advanced stitches and techniques to expand your skills.

⏱️

Weekend Treat

Takes 5-7 hours, making it an enjoyable project to finish over a couple of days.

🧸

Cute Companion

An adorable friend to cherish, handcrafted with love to bring comfort and joy for years to come.

About This Disy the Bear Amigurumi Pattern

This pattern guides you step-by-step to crochet "Disy: the bear", a small plush amigurumi made with bulky velvet yarn. It includes full round-by-round instructions for every part: head, body, arms, legs, ears, tail and muzzle. The design uses simple single crochet shaping, invisible decreases, and clear assembly photos to help you finish a professional-looking toy.

Disy the Bear Amigurumi Pattern crochet pattern - detailed view of completed project

You'll learn how to place safety eyes, embroider expressive eyebrows, and assemble pieces for a balanced final pose. The finished bear is soft, tactile, and perfect for gifting or cuddling.

Why You'll Love This Disy the Bear Amigurumi Pattern

I absolutely love this pattern because it turns simple stitches into a charming, expressive little bear that feels great to hold. I love how the velvet yarn creates a plush, snuggly texture that is perfect for kids and gift-giving. I enjoyed designing the face so it has a sweet, slightly surprised expression that people always comment on. I also appreciate that the pattern is modular β€” you can easily adjust yarn or hook size to make different sized bears.

Disy the Bear Amigurumi Pattern step 1 - construction progress Disy the Bear Amigurumi Pattern step 2 - assembly progress Disy the Bear Amigurumi Pattern step 3 - details and accessories Disy the Bear Amigurumi Pattern step 4 - final assembly and finishing

Switch Things Up

I love customizing this pattern by changing yarn colors to make a whole family of bears; try blush pink, cream, or pale grey for different looks.

I often substitute a chunky chenille or other bulky yarn for a different texture β€” just adjust the hook size and stuffing accordingly.

To make a mini keychain version I use DK yarn and a smaller hook and reduce stuffing for a firmer, smaller toy.

For a sturdier display piece I add a short dowel or a few coffee stirrers inside the body to help the head stand upright.

I enjoy embroidering different expressions by changing eyebrow placement and mouth shape β€” small shifts create big personality changes.

Try using safety eyes of different sizes or embroidered eyes for a child-safe toy option depending on recipient and use.

Want a weighted bottom? Add a small bag of poly pellets into the base before stuffing to help the bear sit neatly.

Add accessories like a tiny scarf, bow, or crocheted sweater to personalize the bear and add gifting appeal.

Mix yarns for a variegated effect β€” pairing a solid muzzle or ears in a contrasting color really makes the face pop.

I recommend testing color and yarn combinations on a small swatch first so you can see how the texture and drape will affect final shaping.

Common Mistakes & How to Fix Them

βœ— Skipping stitch markers when working continuous rounds can cause you to lose track of the beginning of the round; place a marker at the start of every round to keep your counts accurate. βœ— Using the recommended hook size without testing tension can let stuffing show through; work tight and consider a smaller hook if your stitches are too loose. βœ— Forgetting to stuff gradually results in lumps or misshapen sections; stuff small amounts while shaping so the piece remains smooth and even. βœ— Closing limbs too early without securing decreases can leave a hole; ensure decreases are worked neatly and leave a long tail for a secure sew-up when fastening off. βœ— Not counting stitches during increases and decreases leads to uneven shaping; count after each round, especially at change points like rounds with multiple decreases or increases.

Disy the Bear Amigurumi Pattern

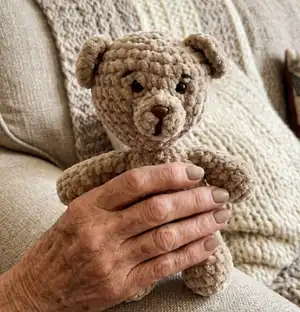
Make a cuddly, pocket-sized bear with this easy-to-follow crochet pattern. You will create a soft, plush Disy using bulky velvet-style yarn and simple amigurumi shaping techniques. The pattern includes full instructions for head, body, arms, legs, ears, muzzle and assembly so you can finish a lovely handmade companion. Perfect for gifting or keeping as a sweet keepsake.

Intermediate 5-7 Hours

Materials Needed for Disy the Bear Amigurumi Pattern

β€” Main Fabric

  • 01
    Bulky velvet yarn - approximately 100 meters (pattern used Soft Baby from Madame Tricote Paris; 100 grams = 120 meters)
  • 02
    Additional small amount of contrasting or brown yarn for eyebrows and mouth details (a few meters)

β€” Tools Required

  • 01
    Crochet hook size 4.0 mm (use 5.0 mm if yarn is bulkier like Bernat Velvet)
  • 02
    8 mm safety eyes (2 pieces)
  • 03
    9 mm x 7 mm safety nose (optional)
  • 04
    Scissors
  • 05
    Yarn needle for sewing and embroidery
  • 06
    Stitch markers
  • 07
    Polyester toy stuffing
  • 08
    Pins for assembly
  • 09
    Optional: 3 plastic coffee stirrers or similar for internal support

Progress Tracker

0% Complete

β€” Body :

Round 1 :

ch 2, 6 sc in the second ch from hook [6]

Round 2 :

inc into each stitch [12]

Round 3 :

(sc in the next stitch, inc in the next stitch) x 6 [18]

Round 4 :

(inc in the next stitch, sc in the next 2 stitches) x 6 [24]

Round 5 :

(sc in the next 3 stitches, inc in the next stitch) x 6 [30]

Round 6 - 8 :

sc in the next 30 stitches [30]

Round 9 :

(dec in the next 2 stitches, sc in the next 3 stitches) x 6 [24]

Round 10 - 11 :

sc in the next 24 stitches [24]

Info :

From here add stuffing as you go.

Round 12 :

(sc in the next 2 stitches, dec in the next 2 stitches) x 6 [18]

Round 13 :

sc in the next 18 stitches [18]

Round 14 :

(dec in the next 2 stitches, sc in the next stitch) x 6 [12]

Info :

If you will add an additional support to the body and head, put it after finish round 14.

Round 15 :

sc in the next 12 stitches [12]

Round 16 :

(dec in the next 2 stitches, sc in the next 2 stitches) x 3 [9]

Round 17 :

sc in the next 9 stitches [9]

Info :

Fasten off and cut the yarn, you can add an extra knot and weave the end.

β€” Head :

Round 1 :

ch 2, 6 sc in the second ch from hook [6]

Round 2 :

inc into each stitch [12]

Round 3 :

(sc in the next stitch, inc in the next stitch) x 6 [18]

Round 4 :

(inc in the next stitch, sc in the next 2 stitches) x 6 [24]

Round 5 :

(sc in the next 3 stitches, inc in the next stitch) x 6 [30]

Round 6 :

(inc in the next stitch, sc in the next 4 stitches) x 6 [36]

Round 7 - 10 :

sc in the next 36 stitches [36]

Info :

Place the safety eyes between rounds 7 and 8 with 3 stitches of separation.

Round 11 :

(sc in the next 4 stitches, dec in the next 2 stitches) x 6 [30]

Info :

From here add stuffing as you go.

Round 12 :

(dec in the next 2 stitches, sc in the next 3 stitches) x 6 [24]

Round 13 :

(sc in the next 2 stitches, dec in the next 2 stitches) x 6 [18]

Round 14 :

(dec in the next 2 stitches, sc in the next stitch) x 6 [12]

Info :

Fasten off and leave a long tail to sew the head to the body.

Info :

Embroidery the eyebrows as is shown below.

β€” Arms (make 2) :

Round 1 :

ch 2, 6 sc in the second ch from hook [6]

Round 2 :

inc into each stitch [12]

Round 3 - 4 :

sc in the next 12 stitches [12]

Round 5 :

(sc in the next 2 stitches, dec in the next 2 stitches) x 3 [9]

Round 6 - 8 :

sc in the next 9 stitches (add the stuffing - do not add more in the next round) [9]

Round 9 :

(sc in the next stitch, dec in the next 2 stitches) x 3 [6]

Round 10 :

To close the arm, fold it in half, 3 sc through the stitches of both parts as pictured below. [3]

Info :

Fasten off and leave a long tail to sew the arms to the body.

β€” Tail :

Round 1 :

ch 2, 6 sc in the second ch from hook [6]

Round 2 :

sc into each stitch. [6]

Round 3 :

sc in the next 4 stitches. [4]

Info :

Fasten off and leave a long tail to sew the tail to the body.

β€” Legs (make 2) :

Round 1 :

ch 2, 6 sc in the second ch from hook [6]

Round 2 :

inc into each stitch [12]

Round 3 :

(sc in the next 2 stitches, inc in the next stitch) x 4 [16]

Round 4 - 5 :

sc in the next 16 stitches [16]

Round 6 :

sc in the next 4 stitches, (dec in the next 2 stitches) x 6 [10]

Round 7 - 8 :

sc in the next 10 stitches (add the stuffing - do not add more in the next round) [10]

Round 9 :

to close the leg, fold it in half, 5 sc through the stitches of both parts as pictured below. [5]

Info :

Fasten off and leave a long tail to sew the legs to the body.

β€” Ears (make 2) :

Round 1 :

ch 2, 6 sc in the second ch from hook [6]

Round 2 :

inc into each stitch. [12]

Round 3 :

sc in the next 4 stitches. [4]

Info :

Fasten off and leave a long tail to sew the ear to the head.

β€” Muzzle :

Round 1 :

ch 2, 6 sc in the second ch from hook [6]

Round 2 :

(inc in the next stitch, sc in the next 2 stitches) x 2 [8]

Round 3 :

sc in the next 8 stitches [8]

Info :

Fasten off and leave a long tail to sew the muzzle to the head. Place the safety nose between rows 2 and 3 in one of the stitches without increase or embroidery one.

β€” Assembly :

Info :

Time to sew all together...

Sew the head :

Sew the head to the round 15 of the body (rounds 16 and 17 should be inside the head) taking both loops of the last round of the head.

Sew the arms :

Sew the arms one round below from the head approximately on both sides of the body.

Sew the legs :

Sew the legs between rounds 5 and 6 in the body and the tail in the middle as pictured below.

Sew the ears and muzzle :

Sew the ears between rounds 4 and 7 using the 4 sc stitches from last round. Sew the muzzle between rounds 8 and 11 in the head.

Info :

Optional: You can look for something to help the head stay up. I used 3 plastic coffee stirrers tied together with some pieces of yarn that I already had at home.

Assembly Instructions

  • Sew the head to round 15 of the body, ensuring rounds 16 and 17 remain inside the head and taking both loops of the last round of the head for a secure join.
  • Position and sew the arms approximately one round below the head on both sides of the body so they sit symmetrically and slightly forward.
  • Sew the legs between rounds 5 and 6 on the body, spacing them evenly for balance, and sew the tail in the middle at the back of the body.
  • Attach the ears between rounds 4 and 7 using the 4 single crochet stitches from the last round, then sew the muzzle between rounds 8 and 11 on the head.
  • Place safety eyes between head rounds 7 and 8 with three stitches separation, then embroider eyebrows and mouth details before final closing where needed.

Important Notes

  • πŸ’‘Work with tight tension and consider using a hook one size smaller than recommended for plush yarns to prevent stuffing from showing through.
  • πŸ’‘Add stuffing gradually from the instructions point noted (head and body) to ensure smooth, even shaping and avoid lumps.
  • πŸ’‘Place safety eyes before stuffing the head fully and secure safety noses between muzzle rows 2 and 3 in a non-increase stitch.
  • πŸ’‘Use stitch markers to mark the beginning of rounds and important placement points for eyes and facial features for consistent results.

Thank you for crocheting Disy: the bear β€” I hope this little companion brings as much joy to you as it did to me while designing it. Share your creations with #disythebear and tag @gavacrochetlove so I can see your lovely results. Happy crocheting and enjoy every soft stitch! 🧢🧸

You ask,

we answer.

FAQs

What size will the finished piece be?

The finished amigurumi measures approximately 18-22 cm tall depending on yarn and hook size; using the recommended bulky velvet yarn and a 4 mm hook will yield a small cuddly bear.

Can I use different yarn weights for this pattern?

Yes, you can use different yarn weights but this will affect final size; choose an appropriate hook for your yarn and adjust stuffing and support as needed.

Do I need prior crochet experience for this pattern?

This pattern is rated intermediate and assumes you know single crochet, increases, decreases, and basic amigurumi assembly; familiarity with invisible decreases is helpful.

How long does this project typically take to complete?

Most crocheters complete this project in 5-7 hours, although time will vary by experience level and how much detailing and assembly you do.

How do I keep the head upright?

You can add internal support such as several plastic coffee stirrers tied together or a small dowel inside the body to give the head extra stability after sewing.