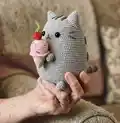
About This Pusheen Cat with Ice Cream Amigurumi Pattern
This pattern creates a sweet Pusheen cat holding an ice cream cone — a playful amigurumi with striped tail and embroidered details. The head and body are crocheted in one continuous piece for smooth shaping and easy assembly. You will also crochet separate ears, feet, tail, stripes, ice cream scoop and cherry and sew them on.

The pattern uses DK/light worsted yarn for the body and lighter sport yarn for the ice cream details. Step-by-step rounds, abbreviations and materials are included to help you complete your plush Pusheen.
Why You'll Love This Pusheen Cat with Ice Cream Amigurumi Pattern
I absolutely love this pattern because it combines a classic Pusheen silhouette with a cute accessory — the ice cream — that adds extra personality. I enjoy the way the head and body are worked in one piece; it keeps shaping simple and gives a clean look. The striping and embroidered sprinkles let me add small creative details that make each Pusheen unique. Sewing on the tiny parts is so satisfying and results in a cuddly, display-ready toy.
Switch Things Up
I love experimenting with colors for this Pusheen; try pastel tones for a softer, nursery-friendly version or bold hues for a playful statement piece.
I often make the ice cream scoop bigger by using thicker yarn and a larger hook to create a chunky, cuddly accessory.
If you want a keychain or bag charm, I reduce the hook size and use sport or fingering yarn to make a mini version that is light and portable.
I like to mix yarn textures for the stripes and tail to add tactile contrast — for example, a boucle or slightly fuzzy yarn for the darker stripes gives a cozy feel.
To make Pusheen poseable, I add a short length of thin craft wire inside the tail before closing, which helps it hold shape and position.
I sometimes embroider different facial expressions; raising or lowering the mouth stitch changes the personality from sleepy to surprised.
Try tiny felt or crocheted props — a little hat or scarf — to dress Pusheen seasonally; I sew them on with small stitches so they are removable if desired.
For a realistic waffle cone, I use surface embroidery to stitch a criss-cross pattern on the cone section after finishing and stuffing.
I recommend experimenting with eye size and placement — 10 mm or 12 mm safety eyes alter the look significantly; always test placement before final sewing.
I enjoy creating sets by making multiple small Pusheens in matching colorways and display them together; it’s a lovely gift idea and a fun way to play with color combinations.
Common Mistakes & How to Fix Them
✗ Skipping the stitch marker in continuous rounds causes you to lose track of the start; use a stitch marker in the last stitch of each round and move it up as you go.
✗ Adding safety eyes too late or in the wrong position will misplace facial features; add safety eyes between rounds 42 and 43 with 11 stitches in between for accurate placement.
✗ Overstuffing the head or body creates bulges and distorts shape; stuff gradually while crocheting, adding small amounts to keep even firmness and correct shape.
✗ Not keeping the increases and decreases counted precisely leads to misshapen rounds; count stitches after every increase or decrease round to maintain correct stitch counts.
✗ Changing colors without leaving a sufficient yarn tail can make sewing stripes difficult; leave longer yarn tails when cutting to sew stripes and attach parts cleanly.