🧢 Beautiful ✨ Detailed πŸ’ Adorable

Purple Starfish Amigurumi Pattern

Purple Starfish Amigurumi Pattern
4.0β˜… Rating
2-3 Hours Time Needed
2.9K Made This
βœ‚οΈ

Intermediate Level

Ideal for those with basic crochet experience, featuring slightly more advanced stitches and techniques to expand your skills.

⏱️

Bite-Sized Project

Finishes in 2-4 hoursβ€”perfect for an afternoon of creative relaxation.

🧸

Cute Companion

An adorable friend to cherish, handcrafted with love to bring comfort and joy for years to come.

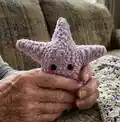
About This Purple Starfish Amigurumi Pattern

This pattern teaches you how to crochet a purple starfish amigurumi with five arms, using super bulky yarn for a plush finish. You will make a flat belly circle and a shaped back, join them, crochet and stuff each arm, then finish with eyes and embroidered details. The instructions include exact rounds, placement tips for eyes, and suggestions for embroidery.

Purple Starfish Amigurumi Pattern crochet pattern - detailed view of completed project

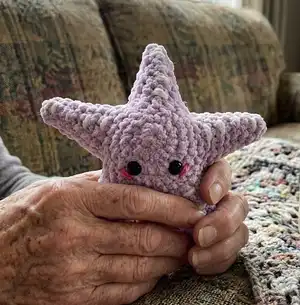
Perfect for gift-making or decorating a seaside-themed nursery, this pattern is fun and quick to crochet. Photos are provided to guide assembly and finishing steps.

Why You'll Love This Purple Starfish Amigurumi Pattern

I absolutely love this pattern because it turns simple rounds into a charming five-armed star with personality. I enjoy how the construction joins two disks to create a sculpted body and then shapes each arm one at a time. The pattern is forgiving and lets you adjust stuffing and eye placement for unique expressions. Working with super bulky yarn gives a wonderfully tactile, squishy result that makes the finished toy feel extra special.

Purple Starfish Amigurumi Pattern step 1 - construction progress Purple Starfish Amigurumi Pattern step 2 - assembly progress Purple Starfish Amigurumi Pattern step 3 - details and accessories Purple Starfish Amigurumi Pattern step 4 - final assembly and finishing

Switch Things Up

I love changing colors to make a whole family of starfish in different shades; try pastels or brights.

I sometimes use a thicker hook with the same yarn to create a firmer, chunkier starfish for display.

I like to embroider small freckles or spots on the arms to give each starfish unique character and personality.

I often swap the safety eyes for embroidered eyes for a baby-safe version that is soft and machine-washable.

I make tiny starfish keychains by using fingering yarn and a small hook to scale the pattern down significantly.

I add sequins or small beads for a sparkly, decorative seaside ornament suitable for seasonal decor.

I occasionally use variegated yarn to get a subtle color variation along each arm without changing colors manually.

I will change the eye spacing or cheek placement to create different expressions, from surprised to sleepy to cheerful.

I sometimes stuff only lightly for a floppy look, or more firmly for a sculpted, plump starfish that holds shape better.

I recommend trying different embroidery colors for the mouth and spikes; coral or mint can look lovely against purple.

Common Mistakes & How to Fix Them

βœ— Skipping the magic ring start can leave a visible hole in the center; always use a proper MR and pull tight to close the center completely. βœ— Not counting stitches after increases often causes uneven arm shapes; count your stitches at the end of each round to ensure accuracy. βœ— Stuffing too late or too loosely results in flop or lumpy arms; stuff gradually while shaping each arm to maintain smooth contours. βœ— Placing safety eyes without checking spacing will make the face look off-center; position the eyes between rows 3 and 4 with four stitches between them before securing. βœ— Pulling yarn overly tight during joins can distort the pieces; use even tension and stitch gently when crocheting the belly and back together.

Purple Starfish Amigurumi Pattern

Make a cuddly purple starfish amigurumi with this clear, photo-assisted pattern. You will create a soft, five-armed starfish using super bulky yarn and simple crochet shaping. The pattern walks you through the belly and back pieces, joining, arm shaping, stuffing, and finishing touches.

Intermediate 2-3 Hours

Materials Needed for Purple Starfish Amigurumi Pattern

β€” Main Fabric

  • 01
    Super Bulky yarn / Category 6 - Purple (main color), quantity: small skein (~50-100g) depending on size
  • 02
    Accent yarn: Pink - small amount for cheeks/mouth embroidery (approx 5-10g)
  • 03
    Accent yarn: Orange - small amount for spikes embroidery (approx 5-10g)
  • 04
    Fiberfill stuffing - small bag for stuffing the body and arms
  • 05
    Plastic safety eyes 8mm - 2 pieces

β€” Tools Required

  • 01
    Crochet hook size 3.5mm (E)
  • 02
    Stitch marker
  • 03
    Sewing needle
  • 04
    Scissors
  • 05
    Plastic safety eyes 8mm (2 pieces)
  • 06
    Hot glue gun
  • 07
    Polyester stuffing (fiberfill)

Progress Tracker

0% Complete

β€” Starfish's Belly :

Info :

Begin with Purple yarn

Round 1 :

5SC in an MR (5)

Round 2 :

5 INC (10)

Round 3 :

10 INC (20)

Round 4 :

(SC, INC) 10 times (30)

Info :

Cut the yarn.

β€” Starfish's Back :

Info :

Begin with Purple yarn

Round 1 :

6SC in an MR (6)

Round 2 :

6INC (12)

Round 3 :

(SC, INC) 6 times (18)

Round 4 :

(2SC, INC) 6 times (24)

Round 5 :

(3SC, INC) 6 times (30)

Info :

From this row, crochet together the abdominal part to create the arms of the starfish.

Round 6 :

6SC (starfish's back), 6SC (starfish's belly) (12)

Round 7 :

12SC (12)

Round 8 :

(2SC, DEC) 3 times (9)

Round 9 :

9SC (9)

Round 10 :

2SC, DEC, 3SC, DEC (7)

Round 11 :

7SC (7)

Round 12 :

DEC, SC, DEC, 2SC (5)

Round 13 :

5SC (5)

Info :

Cut the yarn.

Infos :

*Stuffing* Crochet the remaining 4 arms similarly as above. Fasten off and cut the yarn.

β€” Assembly :

Info :

Attach the eyes between rows 3 and 4, with 4 stitches between them.

Info :

Embroider pink and orange for the mouth and spikes as desired to complete the product.

Info :

Stuff each arm as you finish it to keep the shape smooth and even, using fiberfill.

Info :

Weave in ends securely and use hot glue for safety eye reinforcement if desired.

Assembly Instructions

  • Attach the eyes between rows 3 and 4 on the front, placing 4 stitches between them and secure the safety eyes with washers.
  • Embroider small pink cheeks and an orange mouth/spikes using yarn or embroidery thread; refer to photos for placement.
  • Stuff each arm firmly but evenly as you complete it, adding small amounts of fiberfill to keep the shape smooth.
  • Weave in all yarn ends neatly and reinforce safety eyes with hot glue if extra security is desired for display pieces.

Important Notes

  • πŸ’‘Use a stitch marker to mark the start of rounds to avoid losing your place during shaping and joins.
  • πŸ’‘Stuff the starfish gradually and evenly for best shape; overstuffing will distort the arms and body.
  • πŸ’‘Pin or hold embroidery and eyes in place before final sewing to ensure symmetrical placement and expression.
  • πŸ’‘Weave in ends as you go to make finishing quicker and neater when the project is complete.

This adorable Purple Starfish is quick to make and full of seaside charm. Perfect for gifts, nursery decor, or a cute handmade collection. Add colorful embroidery for personality and display with pride. 🧢🧡

You ask,

we answer.

FAQs

What size will the finished piece be?

The finished starfish measures approximately 10-15 cm across depending on tension and exact yarn amounts when using super bulky yarn and a 3.5mm hook.

Can I use a different yarn weight for this pattern?

Yes, but changing yarn weight will change the final size; use an appropriate hook for your chosen yarn and expect differences in arm thickness and overall dimensions.

Do I need prior crochet experience for this pattern?

This pattern is rated intermediate; experience with magic rings, increases, decreases, and counting rounds will help you complete it successfully.

How long does this project typically take to complete?

Most crocheters complete the starfish in 2-3 hours, though time may vary depending on experience level and whether you embroider details.