🧢 Beautiful ✨ Detailed πŸ’ Adorable

Crochet Donut Pillow Pattern

Crochet Donut Pillow Pattern
4.7β˜… Rating
5-7 Hours Time Needed
2.2K Made This
βœ‚οΈ

Intermediate Level

Ideal for those with basic crochet experience, featuring slightly more advanced stitches and techniques to expand your skills.

⏱️

Weekend Treat

Takes 5-7 hours, making it an enjoyable project to finish over a couple of days.

🏑

Cozy Accent

A warm touch for your space that transforms ordinary corners into inviting nooks filled with handmade charm.

About This Crochet Donut Pillow Pattern

This pattern shows you how to crochet a round donut pillow with a contrasting frosting row and embroidered sprinkle details. Youll work continuous rounds in single crochet to shape the donut and then close and stuff it for a plush finish. The pattern includes step-by-step round counts and clear decoration instructions so you can personalize colors and sprinkles.

Crochet Donut Pillow Pattern crochet pattern - detailed view of completed project

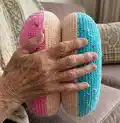
Designed for intermediate crocheters who enjoy shaping and finishing techniques. The finished pillow measures about 12.2 inches (29 cm) across using the recommended materials.

Why You'll Love This Crochet Donut Pillow Pattern

I absolutely love this pattern because it turns simple single crochet rounds into a charming, tactile home accessory. I enjoy how the frosting row (worked in back loops only) creates a neat contrast and texture that looks like real icing. I also love the quick gratification this project gives β€” you see the doughnut form emerge fast as you increase and decrease. Decorating with colorful yarn sprinkles is my favorite part because it lets me add playful personality to each pillow.

Crochet Donut Pillow Pattern step 1 - construction progress Crochet Donut Pillow Pattern step 2 - assembly progress Crochet Donut Pillow Pattern step 3 - details and accessories Crochet Donut Pillow Pattern step 4 - final assembly and finishing

Switch Things Up

I love customizing this donut pillow by changing the frosting color to match my decorβ€”try pastels for a soft look or bright neons for a playful statement.

I often change the yarn weight and hook size to make minis or jumbo donuts; a finer yarn and smaller hook makes a tiny keychain version.

I sometimes add a zipper along one side instead of sewing the hole closed so I can remove the stuffing for washing.

I like to mix yarn textures: use plush yarn for the dough and a smooth acrylic for the frosting to create contrast.

Try embroidering different sprinkle shapesβ€”short straight stitches, tiny french knots, or small chain-loop sprinkles all give different effects.

I occasionally stitch a small patch label or loop to hang the donut as a decoration rather than a pillow.

If you want a sturdier pillow, add a thin cardboard round inside the center hole to keep shape while retaining softness around the edges.

I sometimes thread multiple colors into one needle to make variegated sprinkles for a confetti look across the frosting.

For a holiday twist, use metallic or sparkly yarn for sprinkles, or adjust colors to seasonal palettes to create themed pillows.

If you want a flatter cushion, stop increasing earlier and reduce stuffing; for a puffier donut add rounds of SC before beginning decreases.

I also recommend experimenting with placement of the frosting rowβ€”moving it up or down slightly changes the visual profile and can make the donut look thicker or thinner.

Common Mistakes & How to Fix Them

βœ— Skipping stitch counts during increases can create a lopsided donut shape; count stitches each round and mark the beginning of rounds to maintain accuracy. βœ— Crocheting too loosely makes the donut floppy and hard to stuff; keep consistent tight tension so the pillow holds shape and stuffing stays inside. βœ— Forgetting to stuff gradually causes lumps or uneven filling; stuff a little at a time while you are sewing the hole closed to maintain a smooth shape. βœ— Not using back loop only (BLO) for the frosting row will hide the frosting texture; work the designated row into the back loops only to achieve the correct icing effect.

Crochet Donut Pillow Pattern

Make a sweet, squishy donut pillow with this detailed crochet pattern. Youll create a plush round pillow with a frosting row and colorful sprinkle decorations. The pattern uses simple single crochet rounds and shaping to form a comfortable decorative cushion you can customize. Great for gifting or adding a playful accent to your home.

Intermediate 5-7 Hours

Materials Needed for Crochet Donut Pillow Pattern

β€” Main Fabric

  • 01
    Himalaya Dolphin Baby peach color -80333- 100% Polyester (main yarn for doughnut base) - approx two skeins depending on tension
  • 02
    Himalaya Dolphin Baby pink color -80303- 100% Polyester (alternate/frosting color) - approx one skein or small amount
  • 03
    You can substitute with other polyester, cotton or acrylic plush yarns β€” final size depends on yarn and tension
  • 04
    Finished size approximately 12.20 inches (29 centimeters) across
  • 05
    Fiberfill stuffing - approximately 150 grams per donut pillow

β€” Tools Required

  • 01
    Crochet hook size 3.5 mm
  • 02
    Fiberfill (150 grams is enough for one donut pillow)
  • 03
    Long darning/sewing needle for sewing and decoration
  • 04
    Scissors
  • 05
    Polyester or cotton yarns for donut decoration and stitching
  • 06
    Stitch marker (recommended to mark round start)

Progress Tracker

0% Complete

β€” Donut Pillow :

Round 1 :

Start crochet the bottom of donut pillow with peach color 36 CH then connect in a ring (36)

Round 2 :

36 SC (36)

Round 3 :

(2 SC,1 INC) *12 (48)

Round 4 :

48 SC (48)

Round 5 :

(3 SC,1 INC) *12 (60)

Round 6 :

(4 SC,1 INC) *12 (72)

Round 7 :

72 SC (72)

Round 8 :

(5 SC,1 INC) *12 (84)

Round 9 :

(6 SC,1 INC) *12 (96)

Round 10 :

96 SC (96)

Round 11 :

(7 SC,1 INC) *12 (108)

Round 12 :

108 SC (108)

Round 13 :

(8 SC,1 INC) *12 (120)

Round 14 :

120 SC (120)

Round 15 :

(9 SC,1 INC) *12 (132)

Round 16 :

132 SC (132)

Round 17 :

(10 SC,1 INC) *12 (144)

Round 18 :

144 SC (144)

Round 19 :

(11 SC,1 INC) *12 (156)

Round 20-23 :

4 Rows 15 SC (156)

Round 24 :

CC and crochet this row with a hook only for the back loops.

Round 25-30 :

6 Rows 156 SC (156)

Round 31 :

(11 SC,1 DEC) *12 (144)

Round 32 :

144 SC (144)

Round 33 :

(10 SC,1 DEC) *12 (132)

Round 34 :

132 SC (132)

Round 35 :

(9 SC,1 DEC) (120)

Round 36 :

120 SC (120)

Round 37 :

(8CS,1 DEC) *12 (108)

Round 38 :

108 SC (108)

Round 39 :

(7 SC,1 DES) *12 (96)

Round 40 :

96 SC (96)

Round 41 :

(6 SC,1 DEC) *12 (84)

Round 42 :

(5 SC,1 DEC) *12 (72)

Round 43 :

72 SC (72)

Round 44 :

(4 SC,1 DEC) *12 (60)

Round 45 :

(3 SC,1 DEC) *12 (48)

Round 46 :

48 SC (48)

Round 47 :

(2 SC,1 DEC) *12 (36)

Round 48 :

36 SC (36)

Info :

Pass the long end of the yarn through the last loop of the stitch. Fold the donut as in the picture and start sewing up the hole.

Info :

Here I used dark cotton yarn to show how I sew up the hole. Sew a little and be sure to stuff the donut with fiberfill and again sew a little and stuff the donut...

β€” Decoration :

Decoration Step 1 :

Insert a needle with yarn from the bottom of donut.

Decoration Step 2 :

After pulling out the needle, insert it nearby, stepping back two centimeters.

Decoration Step 3 :

Repeat this with different colors of yarn until you decorate the donut.

Decoration Step 4 :

At the end, stick the yarn back from where you started to insert the needle.

Decoration Step 5 :

Tie 2 ends of the yarn and hide inside.

Info :

Congratulation! Your Donut is finished!

Assembly Instructions

  • Pass the long end of the yarn through the last loop, fold the donut and sew the center hole closed, stuffing gradually as you go to keep an even shape.
  • Work the frosting row (Round 24) in the back loops only to create the raised icing; change color at the start of that round (CC).
  • Use a long needle to insert yarn from the bottom and pull out nearby two centimeters away to make each sprinkle; repeat with different colors across the frosted area.
  • When sewing the final closure, stuff a small amount, sew a little, then add more stuffing and continue sewing to prevent lumps and ensure a smooth finish.

Important Notes

  • πŸ’‘Crochet tightly for best shape; if you crochet loosely you may need additional yarn to fill the pillow.
  • πŸ’‘Work Round 24 into back loops only (BLO) after a color change to create the frosting texture.
  • πŸ’‘Stuff gradually while sewing the hole closed to maintain a smooth, evenly filled donut.

This delightful donut pillow pattern turns soft plush yarn into a playful, cozy accent for your home. Make one in bright colors for a cheerful pop or in pastels for a softer look. Each pillow is quick to make and easy to customize with different frosting and sprinkle colors. 🍩🧢

You ask,

we answer.

FAQs

What size will the finished piece be?

The finished pillow measures approximately 12.20 inches (29 centimeters) across when using the recommended yarn and a 3.5 mm hook.

Can I use different yarn weights for this pattern?

Yes, you can use different yarn weights, but this will affect the final size and yarn requirements. Use an appropriate hook for your chosen yarn and adjust stuffing accordingly.

Do I need prior crochet experience for this pattern?

This pattern is rated intermediate, so basic knowledge of single crochet, increases, decreases, and working in rounds is recommended for best results.

How do I create the frosting texture?

Change color at Round 24 (CC) and work that round into the back loops only (BLO) to create a raised frosting look.

How much stuffing do I need?

Approximately 150 grams of fiberfill is enough to stuff one donut pillow as directed in the pattern.