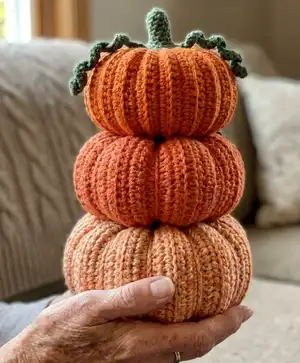
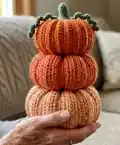
Create a cozy, pumpkin-shaped plush hat perfect for autumn and Halloween. This pattern guides you step-by-step through a super-bulky hat base, textured outer ribbing, stuffing, and a cute crocheted stem. You'll enjoy working with chunky yarn for fast results and a satisfying, squishy finish. Ideal for gifting or seasonal wear, the finished hat has a playful pumpkin silhouette and soft, wearable structure.
Progress Tracker
0% Complete
— Hat Base Cap :
Info :
Notes for the hat base cap: I’m alternating the placements of the increases to make the base round rather than hexagonal. Feel free to add or subtract an increase round to better fit your head size, just be sure your stitch count is a multiple of 6. The following stitch counts will be based on the number of stitches I state and use in the pattern, so be sure to adjust accordingly if you made any changes. Feel free to add or subtract a regular round (non-increasing round) to better fit the depth of your head. I recommend making the hat a bit deeper for a snugger fit so it doesn’t fall off as easily once it’s stuffed.
Round 1 :
Magic circle with 6 single crochet (SC) inside. You should have 6 stitches in your round.
Round 2 :
In this round you increase in every stitch. SC into the first stitch in the round and use a stitch marker to keep track of the beginning of the round. SC into the same stitch. Put 2 SC (SC INC) in each of the next 5 stitches until the end of the round (our increases). You should now have 12 stitches in your round.
Round 3 :
In this round you increase in every other stitch. SC into the first stitch in the round and use a stitch marker to keep track of the beginning of the round. SC INC in the next stitch. *SC in the next stitch. SC INC in the next stitch.* Repeat *above* 4 more times. You should have 18 stitches in your round.
Round 4 :
In this round you increase every 2 stitches. SC into the first stitch in the round and use a stitch marker to keep track of the beginning of the round. SC into the same stitch. (an increase stitch) SC in the next 2 stitches. *SC INC in the next stitch. SC in the next 2 stitches.* Repeat *above* 4 more times. You should have 24 stitches in your round.
Round 5 :
In this round you increase every 3 stitches. SC into the first stitch in the round and use a stitch marker to keep track of the beginning of the round. SC in the next 2 stitches. SC INC in the next stitch. *SC in the next 3 stitches. SC INC in the next stitch.* Repeat *above* 4 more times. You should have 30 stitches in your round.
Round 6 :
In this round you increase every 4 stitches. SC into the first stitch in the round and use a stitch marker to keep track of the beginning of the round. SC into the same stitch. (an increase stitch) SC in the next 4 stitches. *SC INC in the next stitch. SC in the next 4 stitches.* Repeat *above* 4 more times. You should have 36 stitches in your round.
Round 7 :
In this round you increase every 5 stitches. SC into the first stitch in the round and use a stitch marker to keep track of the beginning of the round. SC in the next 4 stitches. SC INC in the next stitch. *SC in the next 5 stitches. SC INC in the next stitch.* Repeat *above* 4 more times. You should have 42 stitches in your round.
Round 8 :
In this round you increase every 6 stitches. SC into the first stitch in the round and use a stitch marker to keep track of the beginning of the round. SC into the same stitch. (an increase stitch) SC in the next 6 stitches. *SC INC in the next stitch. SC in the next 6 stitches.* Repeat *above* 4 more times. You should have 48 stitches in your round.
Rows 9-18 :
In these rounds you DON’T increase (regular rounds). SC into the first stitch in the round and use a stitch marker to keep track of the beginning of the round. SC into the next 47 stitches in the round. You should have 48 stitches in your round.
Row 19 :
In this round you work in the front loops and DON’T increase. SC into the front loop (FLO) of the first stitch in the round and use a stitch marker to keep track of the beginning of the round. SC FLO into the next 47 stitches in the round. You should have 48 stitches in your round.
— Hat Outer Ribbing :
Info :
Notes for the hat outer ribbing: These rows will give the hat its pumpkin texture. You’ll be working the rows perpendicular to the rounds you just completed above.
Row Foundation :
Slip stitch (SS) into the first stitch of the round. Chain 16 and make sure it roughly matches the height of the base cap (from the last round to the magic circle’s center) when layed flush against its surface. Feel free to adjust the chain’s length but make sure the number of chains is even. Chain 1 and turn.
Row 1 :
In this row you increase. SS in the next 3 stitches. SC in the next 3 stitches. HDC INC in the next stitch. (an increase stitch) *HDC in the next stitch. HDC INC in the next stitch.* Repeat *above* 4 more times until there is 1 stitch left in the row.
Follow this next step if this is the very first time you’re doing row 1 :
HDC the last stitch and the same stitch you chained from (first stitch in the round) together: How-to: Yarn over. Insert hook into stitch. Insert hook into the same stitch you chained from (first stitch in the round). Yarn over. Pull yarn through both stitches on the hook. Yarn over. Pull yarn through all 3 loops on hook.
Follow this next step if you’re doing the repeated rows :
HDC BLO the last stitch and the next stitch in the round together: How-to: Yarn over. Insert hook into last stitch BLO. Insert hook into the next stitch in the round. Yarn over. Pull yarn through stitch and loop on the hook. Yarn over. Pull yarn through all 3 loops on hook.
Row 2 :
In this row you DON’T increase/decrease (regular row). SS into the next stitch in the round. Turn. HDC in the back loops only (BLO) of the next 15 stitches in the row (skipping SS). SC BLO in the next 3 stitches. SS BLO in the next 3 stitches. Chain 1 and turn. You should have 21 stitches in your row (not counting the chain).
Row 3 :
In this row you DON’T increase/decrease (regular row). SS BLO in the next 3 stitches. SC BLO in the next 3 stitches. HDC BLO in the next 14 stitches. HDC BLO the last stitch and the NEXT stitch in the round together: How-to: Yarn over. Insert hook into last stitch BLO. Insert hook into the next stitch in the round. Yarn over. Pull yarn through stitch and loop on the hook. Yarn over. Pull yarn through all 3 loops on hook. You should have 21 stitches in your row.
Row 4 :
In this row you DON’T increase/decrease (regular row). SS into the next stitch in the round. Turn. HDC BLO in the next 15 stitches in the row (skipping SS). SC BLO in the next 3 stitches. SS BLO in the next 3 stitches. Chain 1 and turn. You should have 21 stitches in your row (not counting the chain).
Row 5 :
In this row you DON’T increase/decrease (regular row). SS BLO in the next 3 stitches. SC BLO in the next 3 stitches. HDC BLO in the next 14 stitches. HDC BLO the last stitch and the next stitch in the round together: How-to: Yarn over. Insert hook into last stitch BLO. Insert hook into the next stitch in the round. Yarn over. Pull yarn through stitch and loop on the hook. Yarn over. Pull yarn through all 3 loops on hook. You should have 21 stitches in your row.
Row 6 :
In this row you decrease. SS into the next stitch in the round. Turn. HDC BLO in first stitch in row (skipping SS). HDC DEC using the next 2 stitches: (a decrease stitch) How-to: Yarn over. Insert hook into back loop of first stitch. Insert hook into back loop of second stitch. Yarn over. Pull yarn through 2 loops on hook. Yarn over. Pull yarn through all 3 loops on hook. Repeat *above* 4 more times until there is 1 stitch left in the row. You should have 16 stitches in your row (not counting the chain).
Rows 7-42 :
Repeat rows 1-6 SIX (6) more times.
Rows 43-47 :
Repeat rows 1-5 ONE (1) more time.
Row 48 (last row) :
In this row you decrease and connect the row to the very first row. Slip stitch (SS) into the next stitch in the round. Turn. *HDC BLO in first stitch in row (skipping SS) and first leftover loop of the very first row’s foundation chain together. How-to: Yarn over. Insert hook into back loop of stitch in current row. Insert hook into loop of the chain stitch in the very first row. This should be the loop of the foundation chain that you didn’t use to create your first row. Yarn over. Pull yarn through 2 loops on hook. Yarn over. Pull yarn through all 3 loops on hook.* HDC DEC using the next 2 stitches and the next leftover loop of the very first row’s foundation chain together. How-to: Yarn over. Insert hook into back loop of stitch in current row. Insert hook into back loop of next stitch in current row. Insert hook into loop of the chain stitch in the very first row. Yarn over. Pull yarn through 2 loops on hook. Yarn over. Pull yarn through all 3 loops on hook. Repeat *above* 3 more times. *HDC BLO in next stitch and next leftover loop of the very first row’s foundation chain together.* *HDC DEC using the next 2 stitches and the next leftover loop of the very first row’s foundation chain together.* Repeat *above* 3 more times. SC BLO the next 3 stitches and the next 3 leftover loops together. SS BLO the next 3 stitches and the next 3 leftover loops together. Fasten off and cut enough yarn to gather the ribbing’s edge, sew the gathered edges onto the top of the hat’s base cap and to weave in the ends.
— Stuffing & Closing :
Info :
Attach the long tail to your yarn needle. Sew a running stitch through the very end loops along the edges of the rows until you round back to where you started. Start stuffing the inside of the hat in small handfuls. I recommend double checking that the hat’s base cap is concave as you stuff by trying it on and continuously shaping the hat as you go. Be sure not to overstuff or it might be difficult to wear. Pull your yarn to gather your edges together and check if the hat is shaped to your liking. Once pleased with the shape, align the gathered edges with the very top of the hat’s base cap and sew them together so it retains its shape. Tie the yarn off and weave in the ends.
— Stem :
Round 1 :
Magic circle with 6 single crochet (SC) inside. You should have 6 stitches in your round.
Rounds 2-4 :
In these rounds you DON’T increase (regular rounds). SC into the first stitch in the round and use a stitch marker to keep track of the beginning of the round. SC into the next 5 stitches in the round. You should have 6 stitches in your round.
Round 5 :
In this round you increase in every other stitch. SC into the first stitch in the round and use a stitch marker to keep track of the beginning of the round. SC INC into the next stitch. SC into the next stitch. *SC INC into the next stitch. SC into the next stitch.* Repeat *above* 4 more times. You should now have 13 stitches in your round.
Round 5 (continued) :
Vine Tendril 1: SS into the first stitch in the round. Chain 21. Turn. SS down 20 stitches. SS into the next stitch in the round. SS to the other side of the round.
Vine Tendril 2 :
Chain 21. Turn. SS down 20 stitches. SS into the next stitch in the round. SS back to the beginning of the round.
Info :
Fasten off and cut enough yarn to sew the stem onto the top of the hat and to weave in the ends.
— Finish :
Info :
Use your yarn needle to sew the stem securely to the top of your hat. Tie off the yarn and weave it into the inside of the hat. Take the additional loose yarn from where you tightened the magic circle and securely weave it into the inside of the hat.
This pumpkin plush hat pattern brings a cozy burst of autumn to your handmade wardrobe! 🎃 The chunky yarn and textured ribbing make a fast, satisfying project that looks fantastic on display or worn out and about. Personalize colors and vine details to make each hat uniquely yours. Happy crocheting and enjoy your seasonal creation! 🧶